1. Flink部署
下载安装文件 https://flink.apache.org/downloads.html#apache-flink-1100
这里部署standalone模式,只需要进入bin目录执行 start-cluster.sh 即可启动
# 解压后 查看文件
MacBook-Pro:Downloads hnbian$ cd flink-1.10.0
MacBook-Pro:flink-1.10.0 hnbian$ ll
total 1112
-rw-r--r--@  1 hnbian  staff    11K  1 24 17:01 LICENSE
drwxr-xr-x@  3 hnbian  staff    96B  1 24 17:01 plugins
-rw-r--r--@  1 hnbian  staff   1.3K  1 24 17:01 README.txt
drwxr-xr-x@ 22 hnbian  staff   704B  2  8 02:54 opt
drwxr-xr-x@  7 hnbian  staff   224B  2  8 02:54 lib
drwxr-xr-x@  7 hnbian  staff   224B  2  8 02:54 examples
drwxr-xr-x@ 29 hnbian  staff   928B  2  8 02:54 bin
drwxr-xr-x@ 30 hnbian  staff   960B  2  8 02:55 licenses
-rw-r--r--@  1 hnbian  staff   538K  2  8 02:55 NOTICE
drwxr-xr-x@ 15 hnbian  staff   480B  4 29 21:25 conf
drwxr-xr-x@  6 hnbian  staff   192B  4 29 21:30 log
- 启动集群
MacBook-Pro:flink-1.10.0 hnbian$ cd bin
MacBook-Pro:bin hnbian$ ./start-cluster.sh
Starting cluster.
Starting standalonesession daemon on host MacBook-Pro.local.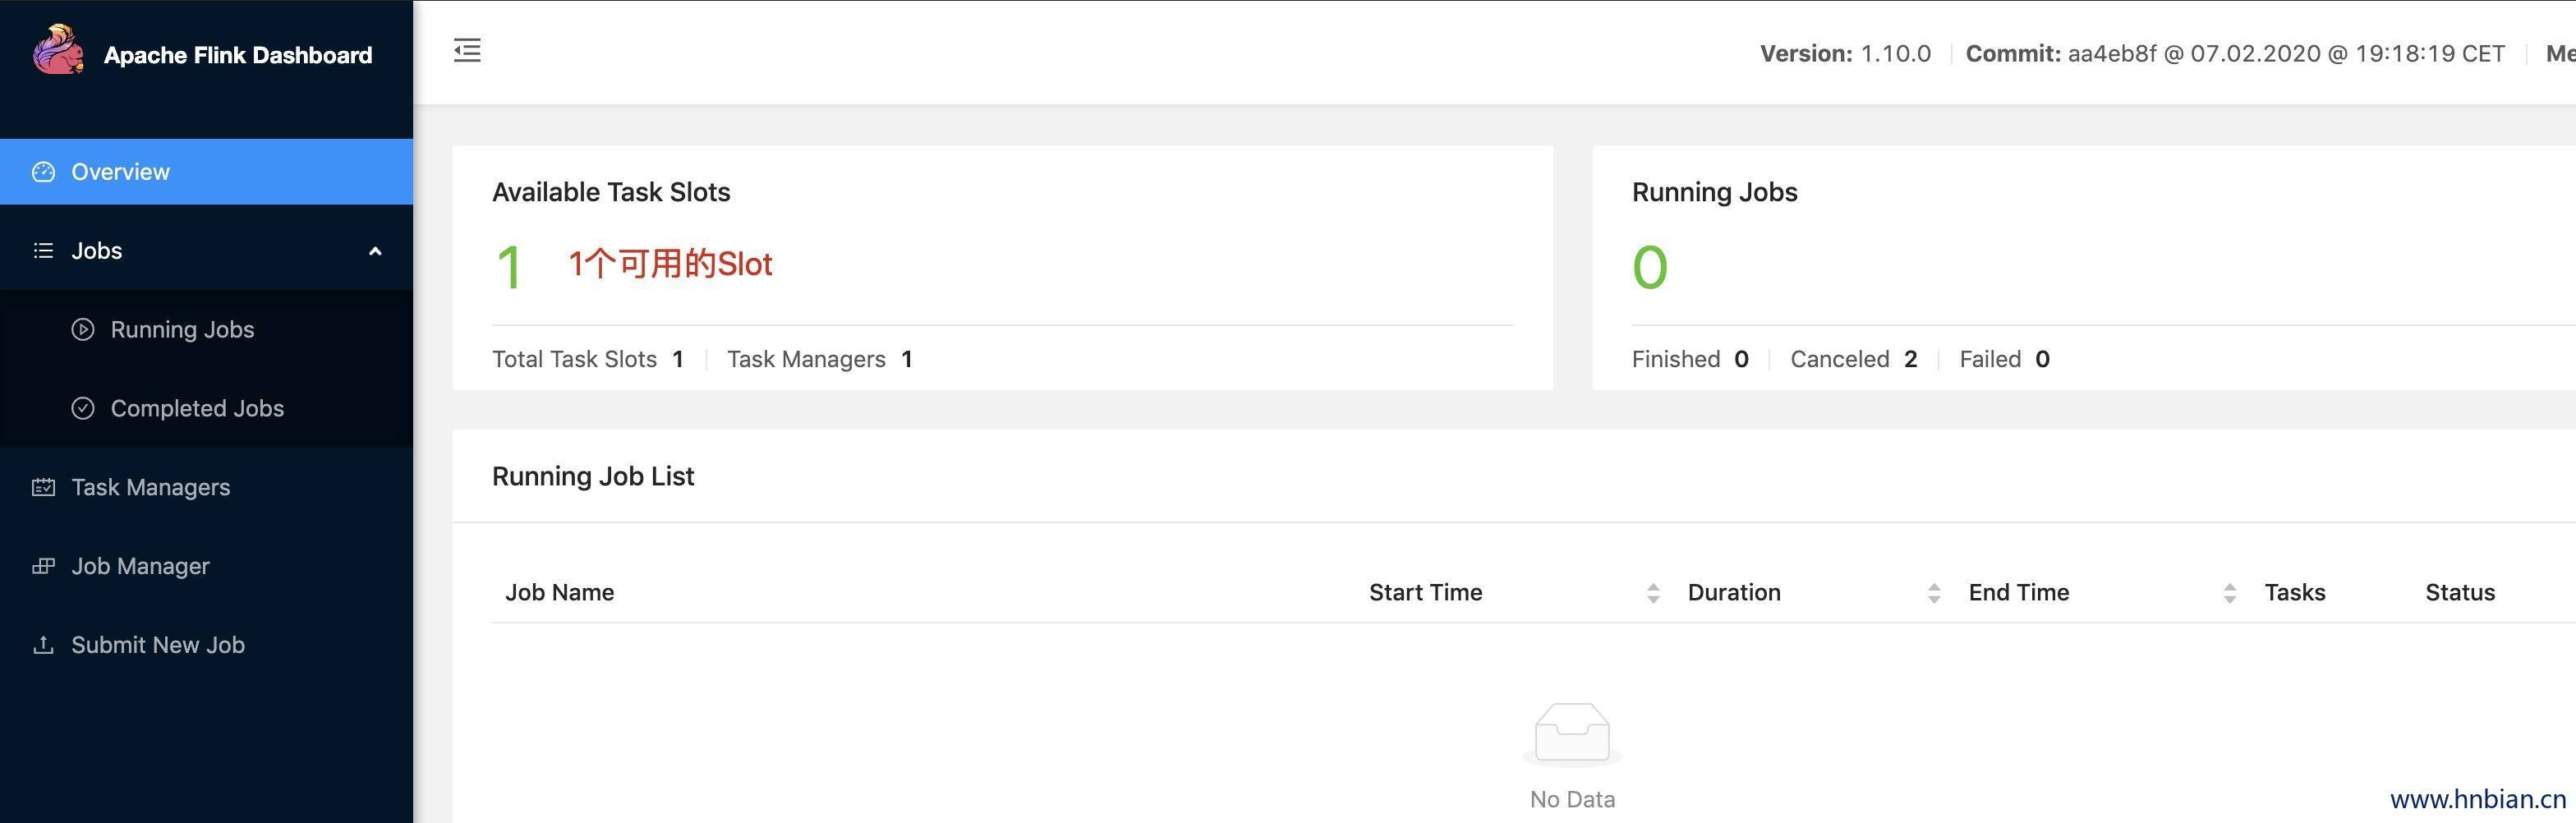
Starting taskexecutor daemon on host MacBook-Pro.local.- 查看web界面
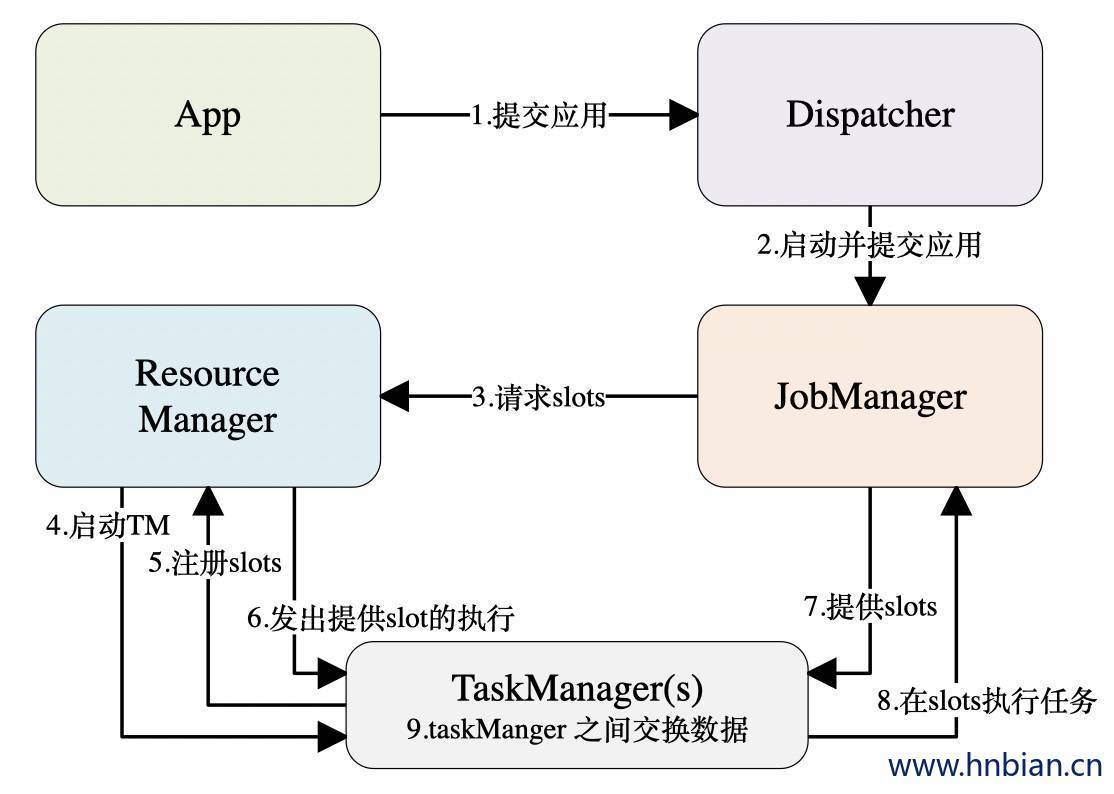
2. standalone 模式下任务提交流程
3. 编写wordcount 代码
3.1 引入依赖
<properties>
    <flink.version>1.10.0</flink.version>
</properties>

<dependencies>
    <dependency>
        <groupId>org.apache.flink</groupId>
        <artifactId>flink-scala_2.11</artifactId>
        <version>${flink.version}</version>
    </dependency>

    <dependency>
        <groupId>org.apache.flink</groupId>
        <artifactId>flink-streaming-scala_2.11</artifactId>
        <version>${flink.version}</version>
    </dependency>

    <dependency>
        <groupId>org.apache.flink</groupId>
        <artifactId>flink-clients_2.11</artifactId>
        <version>${flink.version}</version>
    </dependency>
</dependencies>
3.2 编写 wordcount 代码
import org.apache.flink.api.java.utils.ParameterTool
import org.apache.flink.api.scala._
import org.apache.flink.streaming.api.scala.StreamExecutionEnvironment

/**
  * @Author haonan.bian
  * @Description 数据流的WordCount
  * @Date 2020-04-28 22:31
  * 发送数据
  * nc -lk 8888
  **/
object StreamWordCount extends App{


  //--host localhost --port 8888
  val parameters = ParameterTool.fromArgs(args)

  val host = parameters.get("host")
  val port = parameters.getInt("port")

  val env = StreamExecutionEnvironment.getExecutionEnvironment


  val inputDataStream = env.socketTextStream(host,port)

  inputDataStream.flatMap(_.split(" "))
    .map((_,1))
    .keyBy(0)
    .sum(1)
    .print()
    //.setParallelism(2) // 设置并行度 默认CPU线程数

  // 执行作业
  env.execute("StreamWordCount")

  /**
    * 在IDE中测试打印结果如下
    * 前面的数字是线程编号
    *
    * 11> (xiah,1)
    * 9> (xiaog,1)
    * 7> (xiaom,1)
    * 4> (hello,1)
    * 4> (hello,2)
    * 4> (hello,3)
    * 9> (xiaod,1)
    * 4> (hello,4)
    */
}
4. webUI中提交任务
先将代码打包,打包时需要带上依赖
- 提交任务

- 发送数据
MacBook-Pro:bin hnbian$ nc -lk 8888
hello
hello world
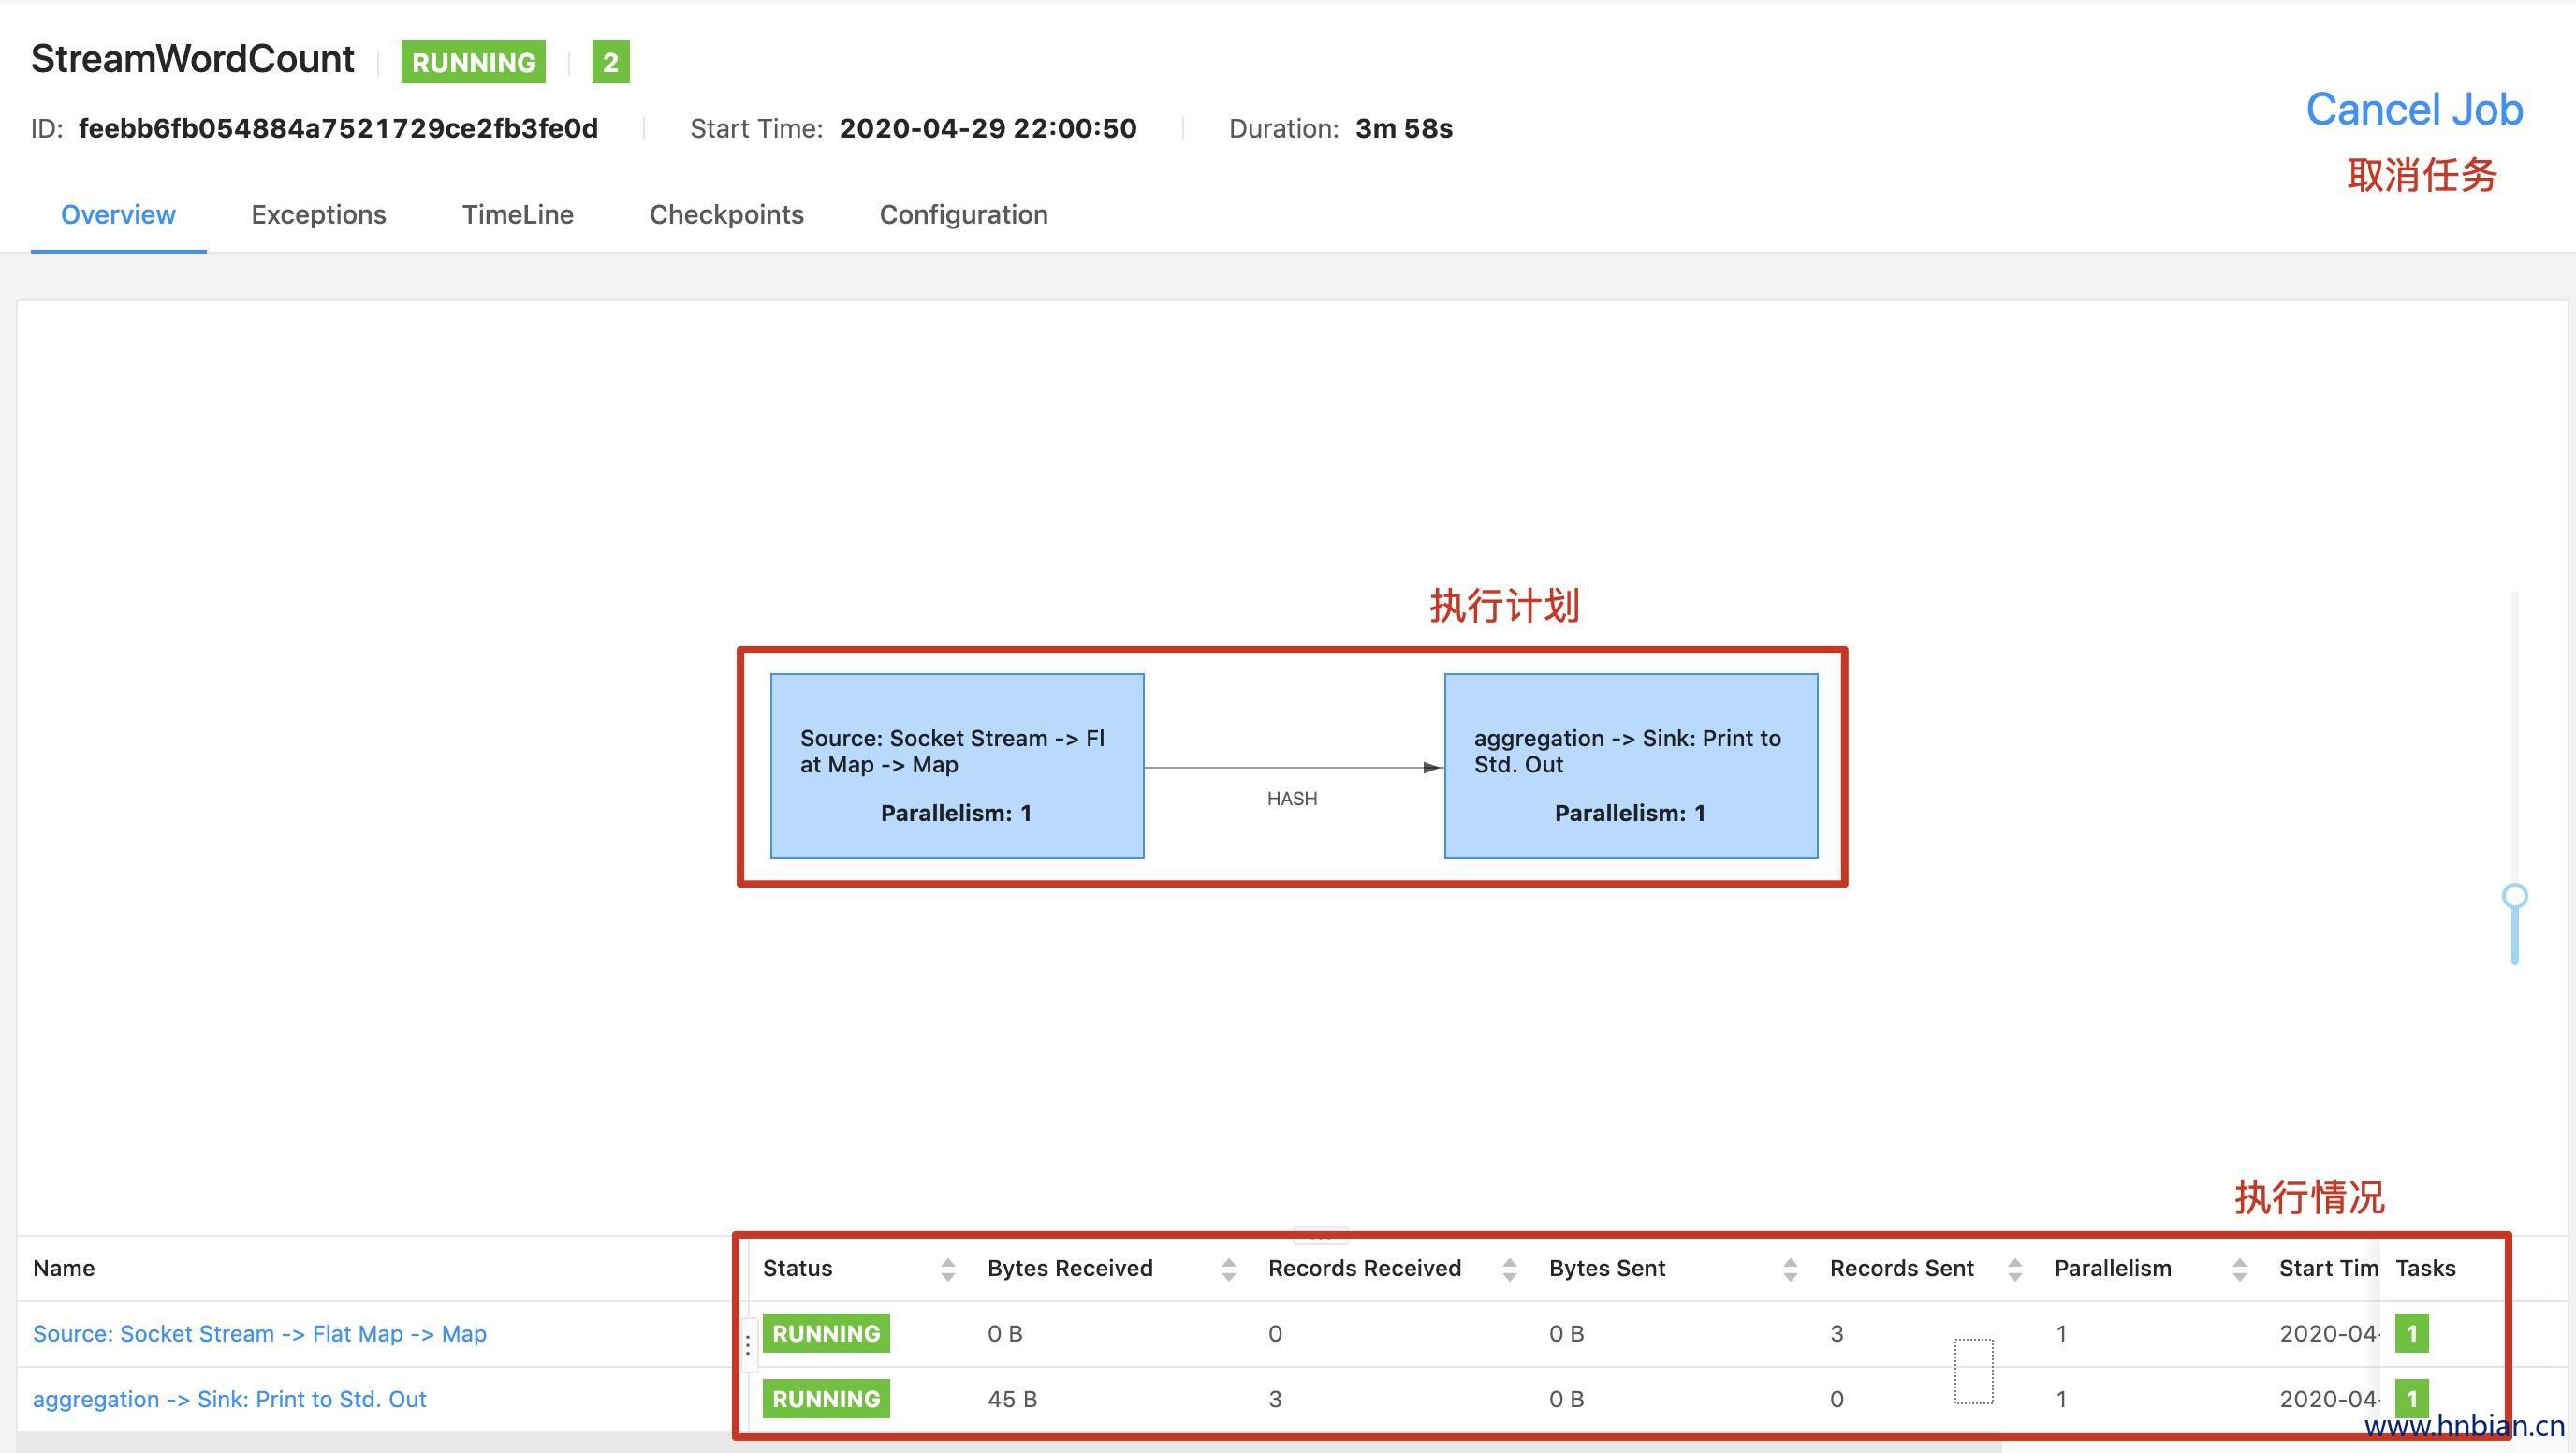
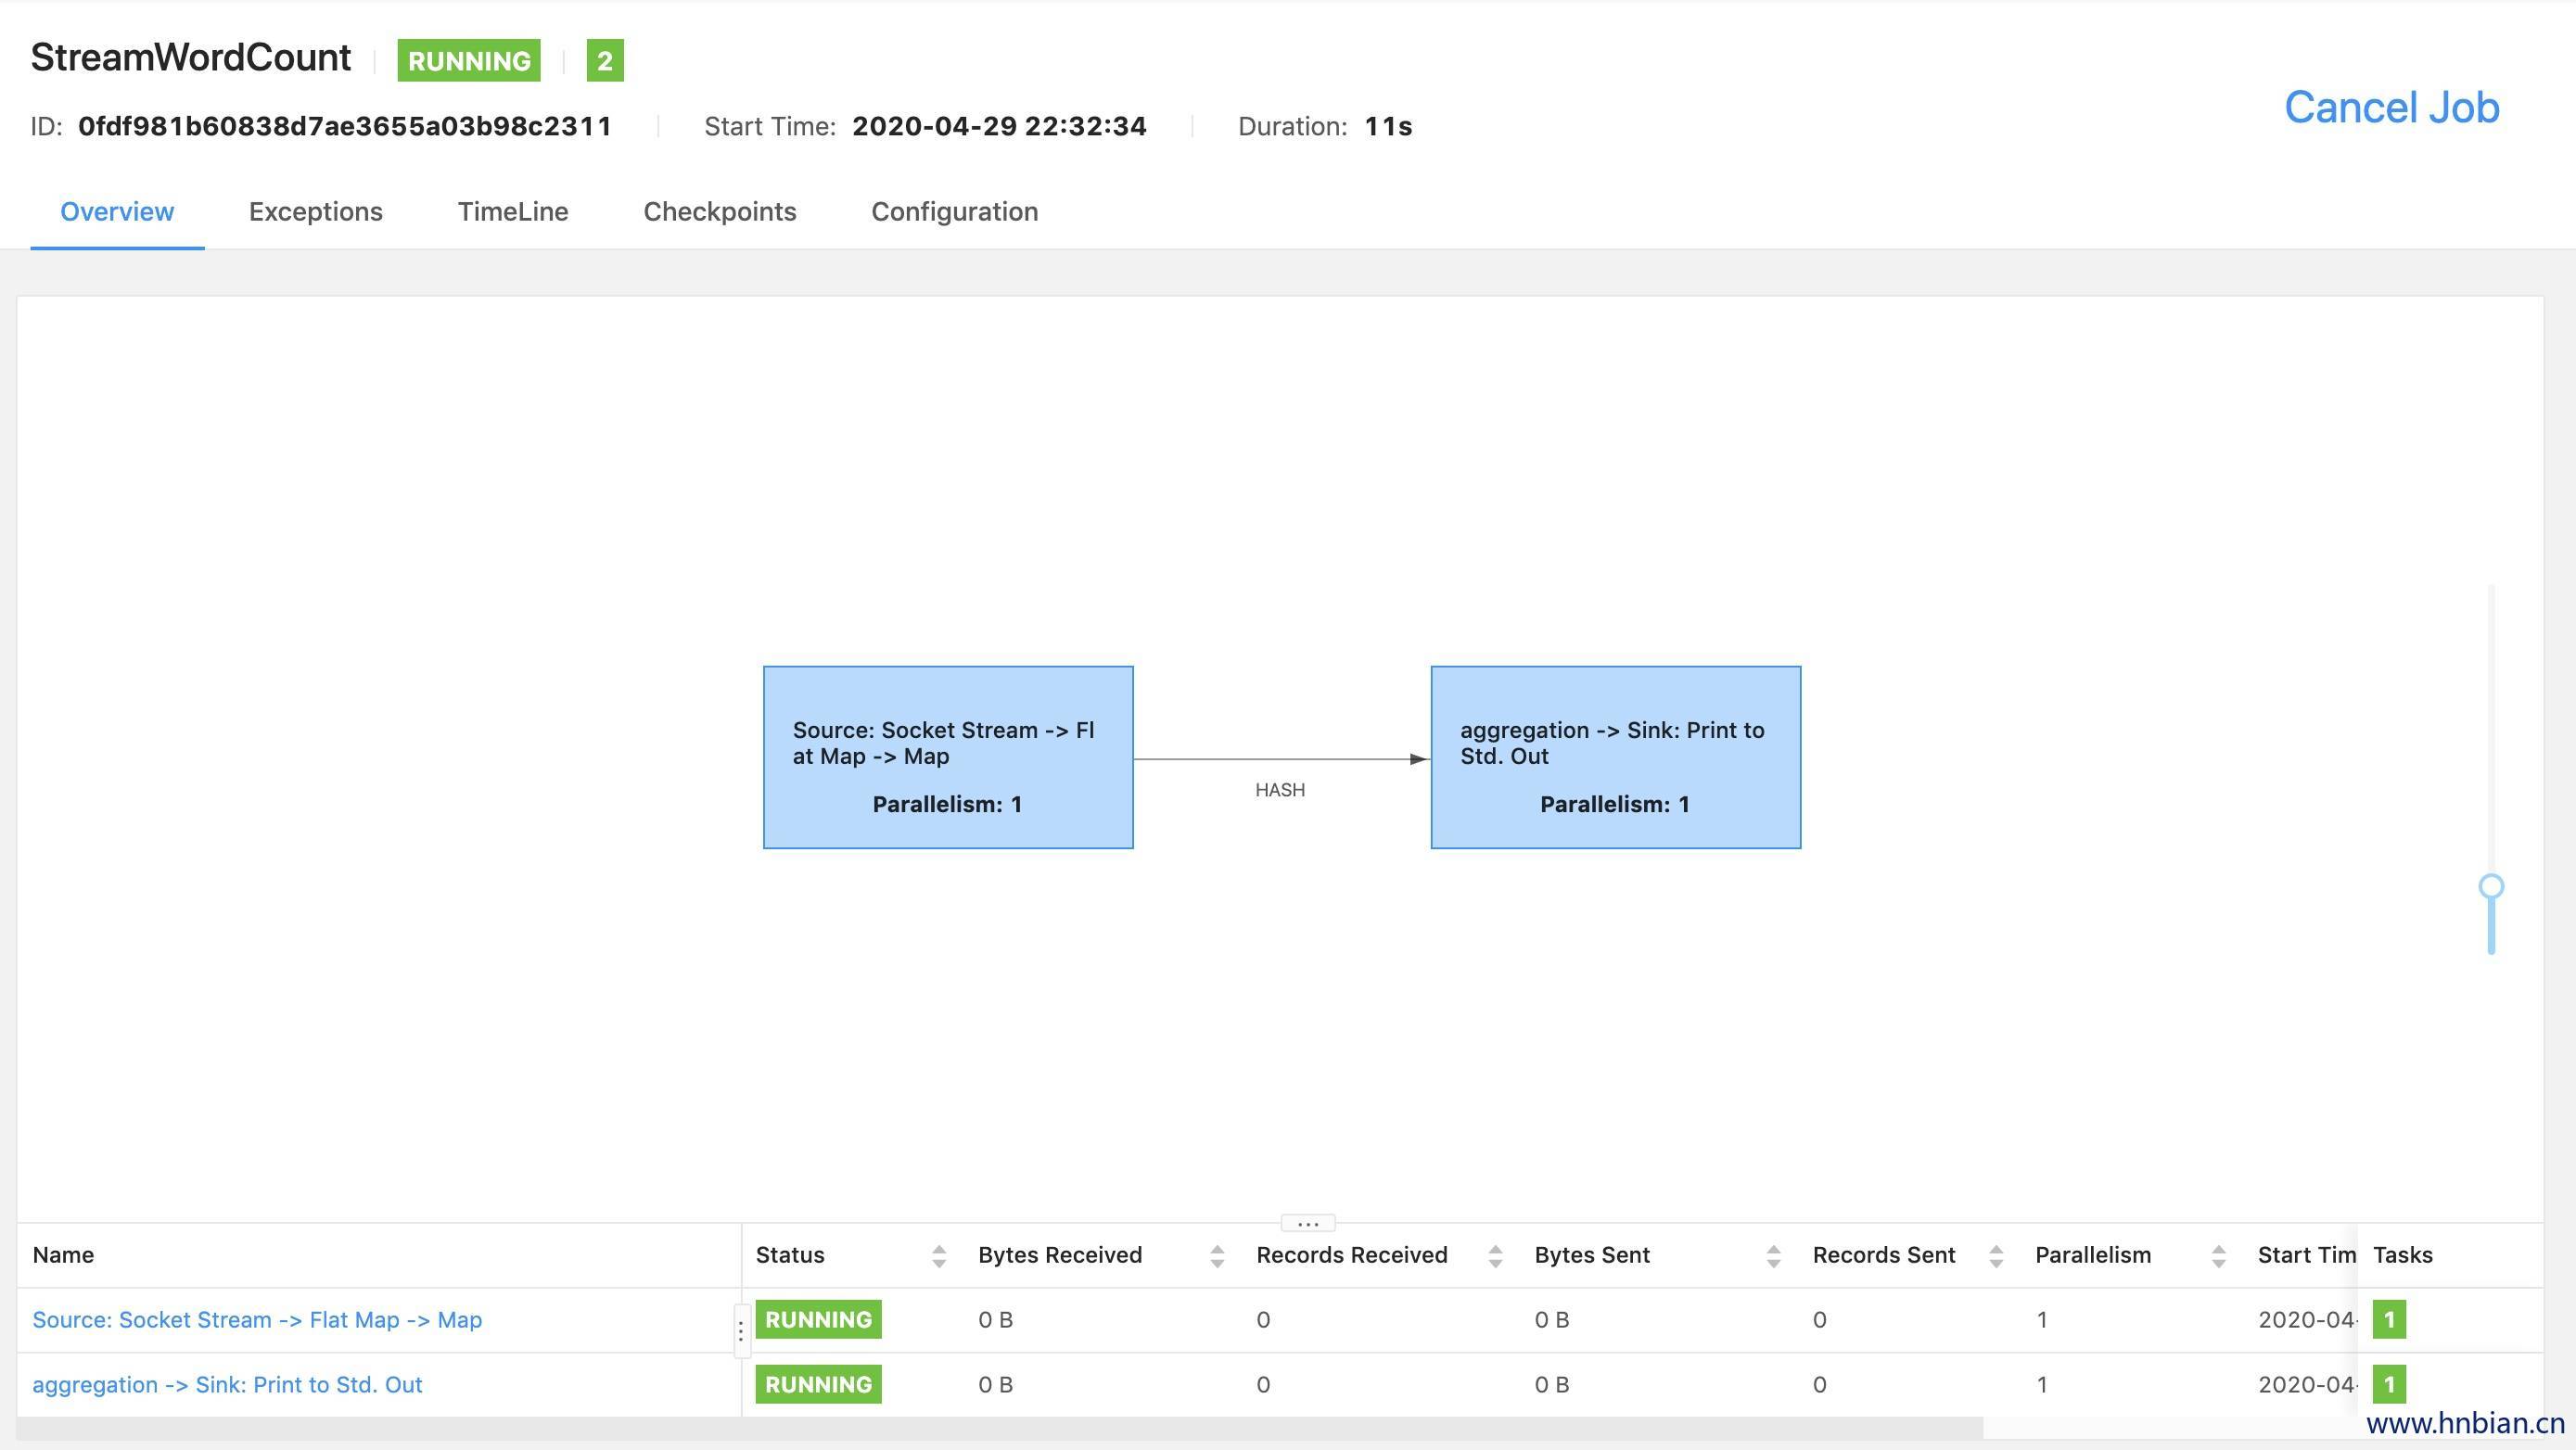
- 查看任务执行情况
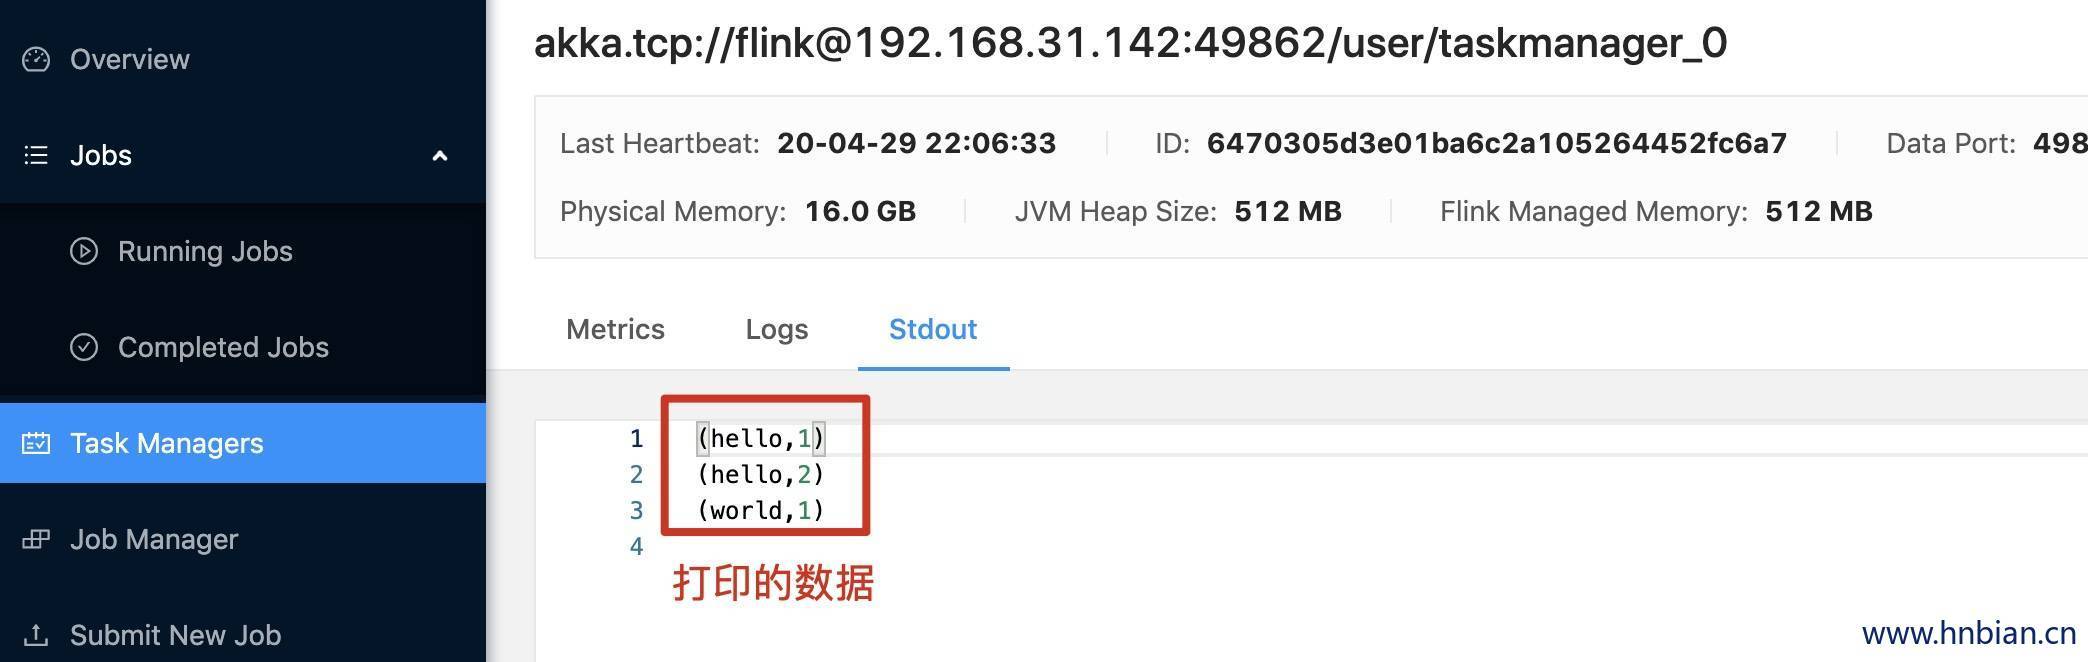
- 查看打印结果
5. 使用命令提交任务
./flink run -c com.hnbian.flink.wordcount.StreamWordCount -p 2 \
> /FlinkCode/target/FlinkCode-1.0-SNAPSHOT-jar-with-dependencies.jar \
> --host localhost --port 8888
Job has been submitted with JobID 0fdf981b60838d7ae3655a03b98c2311
- 查看任务是否提交成功
- 使用命令行关闭任务
# 查看任务列表
MacBook-Pro:bin hnbian$ ./flink list
Waiting for response...
------------------ Running/Restarting Jobs -------------------
29.04.2020 22:32:34 : 0fdf981b60838d7ae3655a03b98c2311 : StreamWordCount (RUNNING)
--------------------------------------------------------------
No scheduled jobs.

# 关闭任务
MacBook-Pro:bin hnbian$ ./flink cancel 0fdf981b60838d7ae3655a03b98c2311
Cancelling job 0fdf981b60838d7ae3655a03b98c2311.
Cancelled job 0fdf981b60838d7ae3655a03b98c2311.
MacBook-Pro:bin hnbian$