Ambari 介绍 一、环境安装


1. Ambari 介绍

Ambari 是 Apache Software Foundation 中的一个顶级项目。就 Ambari 的作用来说,就是创建、管理、监视 Hadoop 的集群,但是这里的 Hadoop 是广义,指的是 Hadoop 整个生态圈(例如 Hive,Hbase,Sqoop,Zookeeper 等),而并不仅是特指 Hadoop。用一句话来说,Ambari 就是为了让 Hadoop 以及相关的大数据软件更容易使用的一个工具。

2. 环境说明

组件 版本
Centos 7.5
Ambari 2.7.3
HDP 3.1.0.0
HDP-GPL 3.1.0.0
HDP-UTILS 1.1.0.22
MySQL 5.7
OracleJDK8 1.8.0_191-b12
X86 X86-64

节点 部署服务
hnode1 ambari server
hnode2 ambari agent
hnode3 ambari agent

3. 安装集群时间同步服务(ntpd)

三个节点上都要安装

#安装时间同步服务(ntp)
[root@hnode1 opt] yum install ntp
Loaded plugins: fastestmirror, refresh-packagekit, security
Loading mirror speeds from cached hostfile
 * base: ftp.sjtu.edu.cn
 * extras: ap.stykers.moe
 * updates: mirror.bit.edu.cn

# 强制从远程更新
[root@hnode3 ~]# sudo ntpdate 0.centos.pool.ntp.org
28 Apr 15:54:51 ntpdate[75627]: step time server 193.4.58.77 offset 2443633.848252 sec

# 启动服务
[root@hnode1 opt] systemctl start ntpd.service
[root@hnode1 opt]

# 检查服务状态
[root@hnode3 ~] systemctl status ntpd.service
● ntpd.service - Network Time Service
   Loaded: loaded (/usr/lib/systemd/system/ntpd.service; enabled; vendor preset: disabled)
   Active: active (running) since 一 2020-03-30 16:26:16 CST; 37min ago

# 设置开机启动
[root@hnode3 ~] systemctl enable ntpd.service

# 检查开机启动是否设置成功
[root@hnode3 ~]# systemctl is-enabled ntpd
enabled

4. 关闭防火墙

# 查看防火墙状态
[root@hnode1 ~] firewall-cmd --state
running
[root@hnode1 ~]
# 关闭防火墙
[root@hnode1 ~] systemctl stop firewalld.service
[root@hnode1 ~]
# 查看防火墙状态
[root@hnode1 ~] firewall-cmd --state
not running
[root@hnode1 ~]
# 关闭防火墙开机启动
[root@hnode1 ~] systemctl disable firewalld.service
  • 关闭 selinux
vim /etc/selinux/config

# 将 SELINUX=enforcing 修改为:
SELINUX=disabled

# 重启服务器后查看 SELINUX 状态
[root@hnode1 ~]# sestatus
SELinux status:                 disabled

5. 设置免密登录

设置免密登录,从hnode1 免密登录到hnode2、hnode3

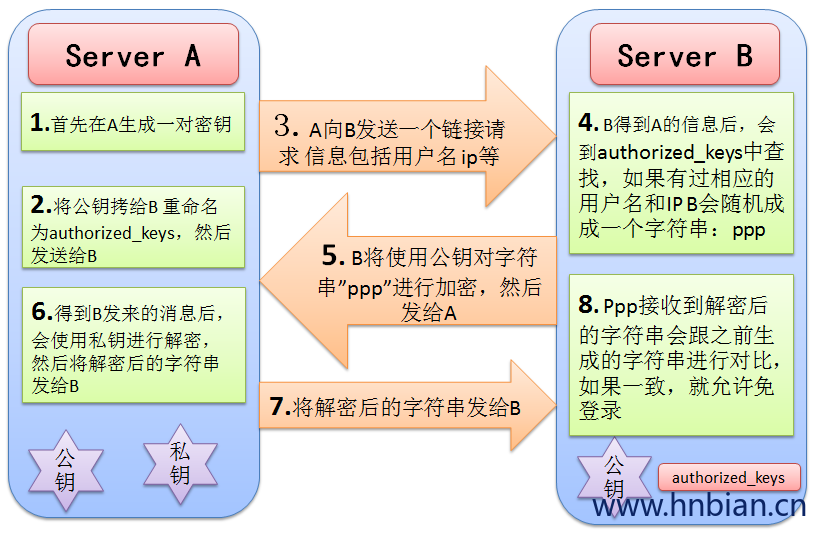
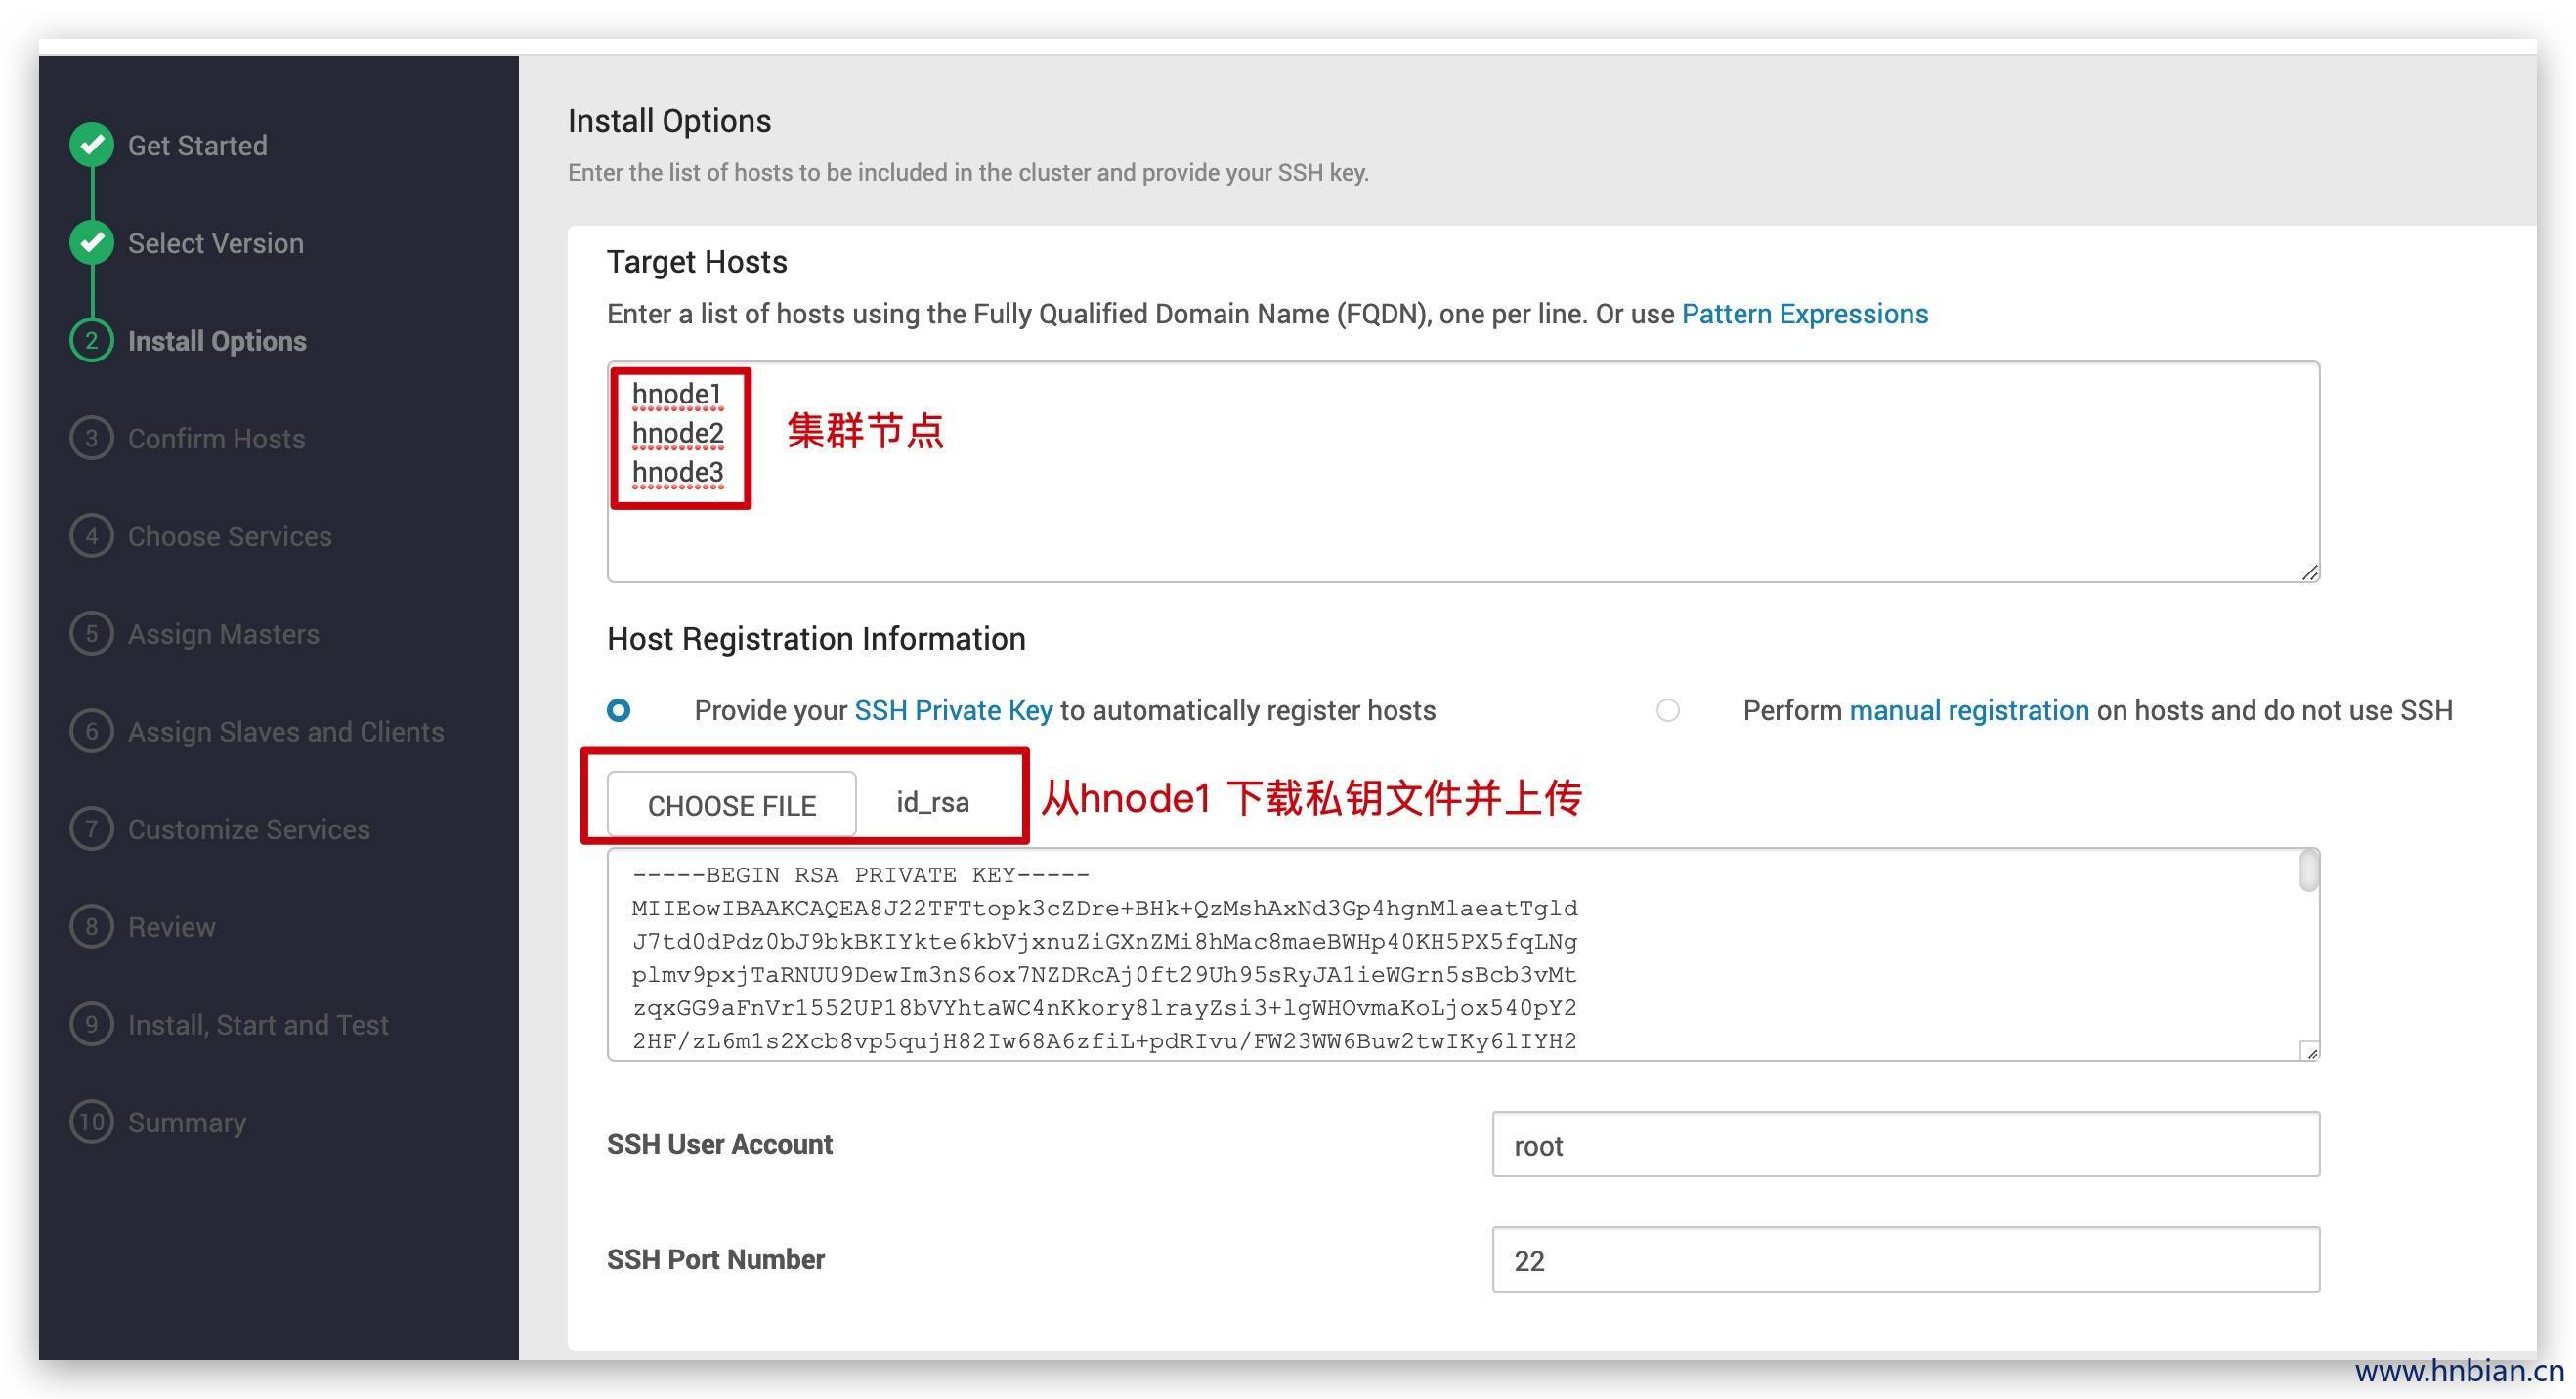
# home下创建.ssh目录
[root@hnode1 ~] mkdir .ssh
[root@hnode1 ~] cd .ssh/
[root@hnode1 .ssh] pwd
/root/.ssh
# 生成秘钥
[root@hnode1 .ssh] ssh-keygen -t rsa
Generating public/private rsa key pair.
Enter file in which to save the key (/root/.ssh/id_rsa): (回车)
Enter passphrase (empty for no passphrase):(回车)
Enter same passphrase again:(回车)
Your identification has been saved in /root/.ssh/id_rsa.
Your public key has been saved in /root/.ssh/id_rsa.pub.
The key fingerprint is:
SHA256:F1XLKMmnivY288gcK5IsY90xm0kawlM62D+uyGIeB0k root@hnode1
The keys randomart image is:
+---[RSA 2048]----+
|            ...  |
|         . o o . |
| E        = o o  |
|. . .      =     |
| * o    S o      |
|. O . +. o       |
| . O *o*o        |
|oo* O.*+++       |
|=+.=.o o*+.      |
+----[SHA256]-----+
# 查看生成的文件
[root@hnode1 .ssh] ll
总用量 8
-rw-------. 1 root root 1675 3月  30 18:58 id_rsa
-rw-r--r--. 1 root root  393 3月  30 18:58 id_rsa.pub

[root@hnode1 .ssh]

#将公钥拷贝到hnode2、hnode3
[root@hnode1 .ssh] ssh-copy-id hnode2
...
root@hnode2s password: # (输入hnode2的密码)
...

[root@hnode1 .ssh]
# 尝试登陆hnode2
[root@hnode1 .ssh] ssh hnode2
Last login: Mon Mar 30 18:32:21 2020 from hnode1 # 登陆成功
Last login: Mon Mar 30 18:32:21 2020 from hnode1
# 登出
[root@hnode2 ~] exit
Connection to hnode2 closed.

#将秘钥拷贝到hnode3
[root@hnode1 .ssh] ssh-copy-id hnode3
...
root@hnode3s password: # (输入hnode3的密码)
...

[root@hnode1 .ssh] ssh hnode3
Last login: Mon Mar 30 17:50:57 2020 from hnode1
# 登出
[root@hnode3 ~] exit
Connection to hnode3 closed.

免密登录大致原理

6. 安装Java

三个节点上都要安装

# 解压安装包
[root@hnode1 jdk1.8.0_191] tar -zxvf jdk-8u191-linux-x64.tar.gz
root@hnode1 opt] cd jdk1.8.0_191/
[root@hnode1 jdk1.8.0_191] ll
总用量 25976
drwxr-xr-x. 2 10 143     4096 10月  6 2018 bin
-r--r--r--. 1 10 143     3244 10月  6 2018 COPYRIGHT
drwxr-xr-x. 3 10 143      132 10月  6 2018 include
-rw-r--r--. 1 10 143  5207154 9月  12 2018 javafx-src.zip
drwxr-xr-x. 5 10 143      185 10月  6 2018 jre
drwxr-xr-x. 5 10 143      245 10月  6 2018 lib
-r--r--r--. 1 10 143       40 10月  6 2018 LICENSE
drwxr-xr-x. 4 10 143       47 10月  6 2018 man
-r--r--r--. 1 10 143      159 10月  6 2018 README.html
-rw-r--r--. 1 10 143      424 10月  6 2018 release
-rw-r--r--. 1 10 143 21101479 10月  6 2018 src.zip
-rw-r--r--. 1 10 143   108062 9月  12 2018 THIRDPARTYLICENSEREADME-JAVAFX.txt
-r--r--r--. 1 10 143   155003 10月  6 2018 THIRDPARTYLICENSEREADME.txt
[root@hnode1 jdk1.8.0_191] pwd
/opt/jdk1.8.0_191
[root@hnode1 jdk1.8.0_191]
# 配置环境变量
[root@hnode1 jdk1.8.0_191] vim /etc/profile

# 文件底部增加如下配置

# jdk 安装地址
export JAVA_HOME=/opt/jdk1.8.0_191

PATH=$PATH:$JAVA_HOME/bin

# 刷新配置文件
[root@hnode1 jdk1.8.0_191] source /etc/profile
# 打印Java home
[root@hnode1 jdk1.8.0_191] echo $JAVA_HOME
/opt/jdk1.8.0_191
# 查看 java 版本进行验证
[root@hnode1 jdk1.8.0_191] java -version
# 打印除下列 java 版本信息 说明jdk安装成功
java version "1.8.0_191"
Java(TM) SE Runtime Environment (build 1.8.0_191-b12)
Java HotSpot(TM) 64-Bit Server VM (build 25.191-b12, mixed mode)

7. 安装MySQL

7.1 下载MySQL

# 下载 MySQL
[root@hnode1 opt] wget -i -c http://dev.mysql.com/get/mysql57-community-release-el7-10.noarch.rpm
--2020-03-30 19:35:18--  http://dev.mysql.com/get/mysql57-community-release-el7-10.noarch.rpm
正在解析主机 dev.mysql.com (dev.mysql.com)... 137.254.60.11
正在连接 dev.mysql.com (dev.mysql.com)|137.254.60.11|:80... 已连接。
已发出 HTTP 请求,正在等待回应... 301 Moved Permanently
位置:https://dev.mysql.com/get/mysql57-community-release-el7-10.noarch.rpm [跟随至新的 URL]
--2020-03-30 19:35:22--  https://dev.mysql.com/get/mysql57-community-release-el7-10.noarch.rpm
正在连接 dev.mysql.com (dev.mysql.com)|137.254.60.11|:443... 已连接。
已发出 HTTP 请求,正在等待回应... 302 Found
位置:https://repo.mysql.com//mysql57-community-release-el7-10.noarch.rpm [跟随至新的 URL]
--2020-03-30 19:35:30--  https://repo.mysql.com//mysql57-community-release-el7-10.noarch.rpm
正在解析主机 repo.mysql.com (repo.mysql.com)... 223.119.236.209
正在连接 repo.mysql.com (repo.mysql.com)|223.119.236.209|:443... 已连接。
已发出 HTTP 请求,正在等待回应... 200 OK
长度:25548 (25K) [application/x-redhat-package-manager]
正在保存至: “mysql57-community-release-el7-10.noarch.rpm”

100%[======================================================>] 25,548      71.4KB/s 用时 0.3s

2020-03-30 19:35:33 (71.4 KB/s) - 已保存 “mysql57-community-release-el7-10.noarch.rpm” [25548/25548])

# 安装mysql 

yum -y install mysql57-community-release-el7-10.noarch.rpm
yum -y install mysql-community-server

7.2 启动mysql并设置开机自启

systemctl start mysqld.service    # 启动mysql
systemctl status mysqld.service  # 查看mysql状态
systemctl stop mysqld.service   # 关闭mysql
systemctl enable mysqld.service   # 开机自启

7.3 配置mysql编码,字符格式:

[root@hnode1 opt] vim /etc/my.cnf 

# 文件底部添加下面代码

log-error=/var/log/mysqld.log
pid-file=/var/run/mysqld/mysqld.pid
collation_server=utf8_general_ci
character_set_server=utf8
default-storage-engine=INNODB

7.4 运行mysql 安全配置向导

# 安装之后的密码会存在/var/log/mysqld.log 文件中

[root@hnode1 opt] cat /var/log/mysqld.log
2020-03-30T11:57:32.968090Z 0 [Warning] TIMESTAMP ...
...
2020-03-30T11:57:33.657151Z 1 [Note] A temporary password is generated for root@localhost: o6)j!d;l>iQz

(o6)j!d;l>iQz) # 就是 MySQL 的初始密码


[root@hnode1 opt] mysql_secure_installation

Securing the MySQL server deployment.

Enter password for user root: # 刚刚查询到的MySQL初始密码(o6)j!d;l>iQz)

The existing password for the user account root has expired. Please set a new password.

New password: # 新的密码 (Admin123!)

Re-enter new password: # 新的密码


By default, a MySQL installation has an anonymous user,
allowing anyone to log into MySQL without having to have
a user account created for them. This is intended only for
testing, and to make the installation go a bit smoother.
You should remove them before moving into a production
environment.

Remove anonymous users? (Press y|Y for Yes, any other key for No) : y #是否删除匿名用户,生产环境建议删除
Success.


Normally, root should only be allowed to connect from
'localhost'. This ensures that someone cannot guess at
the root password from the network.

Disallow root login remotely? (Press y|Y for Yes, any other key for No) : n #是否禁止root远程登录,根据自己的需求选择y/n并回车

 ... skipping.
By default, MySQL comes with a database named 'test' that
anyone can access. This is also intended only for testing,
and should be removed before moving into a production
environment.


Remove test database and access to it? (Press y|Y for Yes, any other key for No) : n #是否删除test数据库

 ... skipping.
Reloading the privilege tables will ensure that all changes
made so far will take effect immediately.

Reload privilege tables now? (Press y|Y for Yes, any other key for No) : y #是否重新加载权限表
Success.

All done!

7.5 测试连接MySQL

# 命令行中连接MySQL
[root@hnode1 opt] mysql -u root -p
Enter password: (Admin123!)
Welcome to the MySQL monitor.  Commands end with ; or \g.
Your MySQL connection id is 9
Server version: 5.7.29 MySQL Community Server (GPL)

Copyright (c) 2000, 2020, Oracle and/or its affiliates. All rights reserved.

Oracle is a registered trademark of Oracle Corporation and/or its
affiliates. Other names may be trademarks of their respective
owners.

Type 'help;' or '\h' for help. Type '\c' to clear the current input statement.

mysql> show databases
    -> ;
+--------------------+
| Database           |
+--------------------+
| information_schema |
| mysql              |
| performance_schema |
| sys                |
+--------------------+
4 rows in set (0.01 sec)

mysql> quit
Bye

7.6 在mysql数据库创建相应的用户和DB

7.6.1 创建ambari数据库及数据库的用户名和密码

mysql> set global validate_password_policy=0;
Query OK, 0 rows affected (0.00 sec)

mysql> set global validate_password_length=1;
Query OK, 0 rows affected (0.00 sec)

mysql> create database ambari character set utf8;
Query OK, 1 row affected (0.01 sec)

mysql> CREATE USER 'ambari'@'%'IDENTIFIED BY 'Ambari123';
Query OK, 0 rows affected (0.01 sec)

mysql> GRANT ALL PRIVILEGES ON ambari.* TO 'ambari'@'%';
Query OK, 0 rows affected (0.00 sec)

mysql> FLUSH PRIVILEGES;
Query OK, 0 rows affected (0.00 sec)

7.6.2 创建hive数据库及hive库的用户名和密码

mysql> create database hive character set utf8;
Query OK, 1 row affected (0.00 sec)

mysql> CREATE USER 'hive'@'%'IDENTIFIED BY 'Hive123';
Query OK, 0 rows affected (0.00 sec)

mysql> GRANT ALL PRIVILEGES ON hive.* TO 'hive'@'%';
Query OK, 0 rows affected (0.00 sec)

mysql> FLUSH PRIVILEGES;
Query OK, 0 rows affected (0.00 sec)

7.6.3 创建oozie数据库及oozie库的用户名和密码

mysql> create database oozie character set utf8;
Query OK, 1 row affected (0.00 sec)

mysql> CREATE USER 'oozie'@'%'IDENTIFIED BY 'Oozie123';
Query OK, 0 rows affected (0.00 sec)

mysql> GRANT ALL PRIVILEGES ON oozie.* TO 'oozie'@'%';
Query OK, 0 rows affected (0.00 sec)

mysql> FLUSH PRIVILEGES;
Query OK, 0 rows affected (0.00 sec)

7.6.4 创建ranger数据库及ranger库的用户名和密码(不用创建)

mysql> create database ranger character set utf8;
Query OK, 1 row affected (0.00 sec)

mysql> CREATE USER 'rangeradmin'@'%'IDENTIFIED BY 'Ranger123';
Query OK, 0 rows affected (0.01 sec)

mysql> GRANT ALL PRIVILEGES ON rangeradmin.* TO 'rangeradmin'@'%';
Query OK, 0 rows affected (0.00 sec)

mysql> FLUSH PRIVILEGES;
Query OK, 0 rows affected (0.00 sec)

mysql>
mysql> show databases;
+--------------------+
| Database           |
+--------------------+
| information_schema |
| ambari             |
| hive               |
| mysql              |
| oozie              |
| performance_schema |
| ranger             |
| sys                |
+--------------------+
8 rows in set (0.01 sec)


7.6.5 下载mysql-connection-java


[root@hnode1 ~] yum install mysql-connector-java
已加载插件:fastestmirror
Loading mirror speeds from cached hostfile
 * base: mirrors.aliyun.com
 * extras: mirrors.aliyun.com
...
完毕!

# 检查文件是否存在

[root@hnode1 ~] ls /usr/share/java
mysql-connector-java.jar

7.7 下载所需安装文件


wget http://public-repo-1.hortonworks.com/ambari/centos7/2.x/updates/2.7.3.0/ambari-2.7.3.0-centos7.tar.gz

wget http://public-repo-1.hortonworks.com/HDP/centos7/3.x/updates/3.1.0.0/HDP-3.1.0.0-centos7-rpm.tar.gz

wget http://public-repo-1.hortonworks.com/HDP-UTILS-1.1.0.22/repos/centos7/HDP-UTILS-1.1.0.22-centos7.tar.gz

#查看下载好的文件

[root@hnode1 opt] ll -rth
-rw-r--r--. 1 root root  87M 3月  30 21:50 HDP-UTILS-1.1.0.22-centos7.tar.gz
-rw-r--r--. 1 root root 1.9G 3月  30 21:51 ambari-2.7.3.0-centos7.tar.gz
-rw-r--r--. 1 root root 8.5G 3月  30 21:52 HDP-3.1.0.0-centos7-rpm.tar.gz

8. 安装yum相关工具

[root@hnode1 ~] yum install yum-utils -y
[root@hnode1 ~] yum repolist
[root@hnode1 ~] yum install createrepo -y

9. 安装Apache httpd

9.1 安装


[root@hnode1 ~] yum install httpd -y
已加载插件:fastestmirror
Loading mirror speeds from cached hostfile
...
完毕!

# 安装完成后,会生成 /var/www/html 目录(相当于Tomcat的webapps目录)
# 进入到/var/www/html目录下,创建ambari和hdp目录,用来存放安装文件。

cd /var/www/html
[root@hnode1 html]
总用量 0
[root@hnode1 html] pwd
/var/www/html
[root@hnode1 html] mkdir ambari
[root@hnode1 html] mkdir hdp
[root@hnode1 html] mkdir hdp/HDP-UTILS-1.1.0.22
[root@hnode1 html]

# 将下载好的文件解压到对应目录

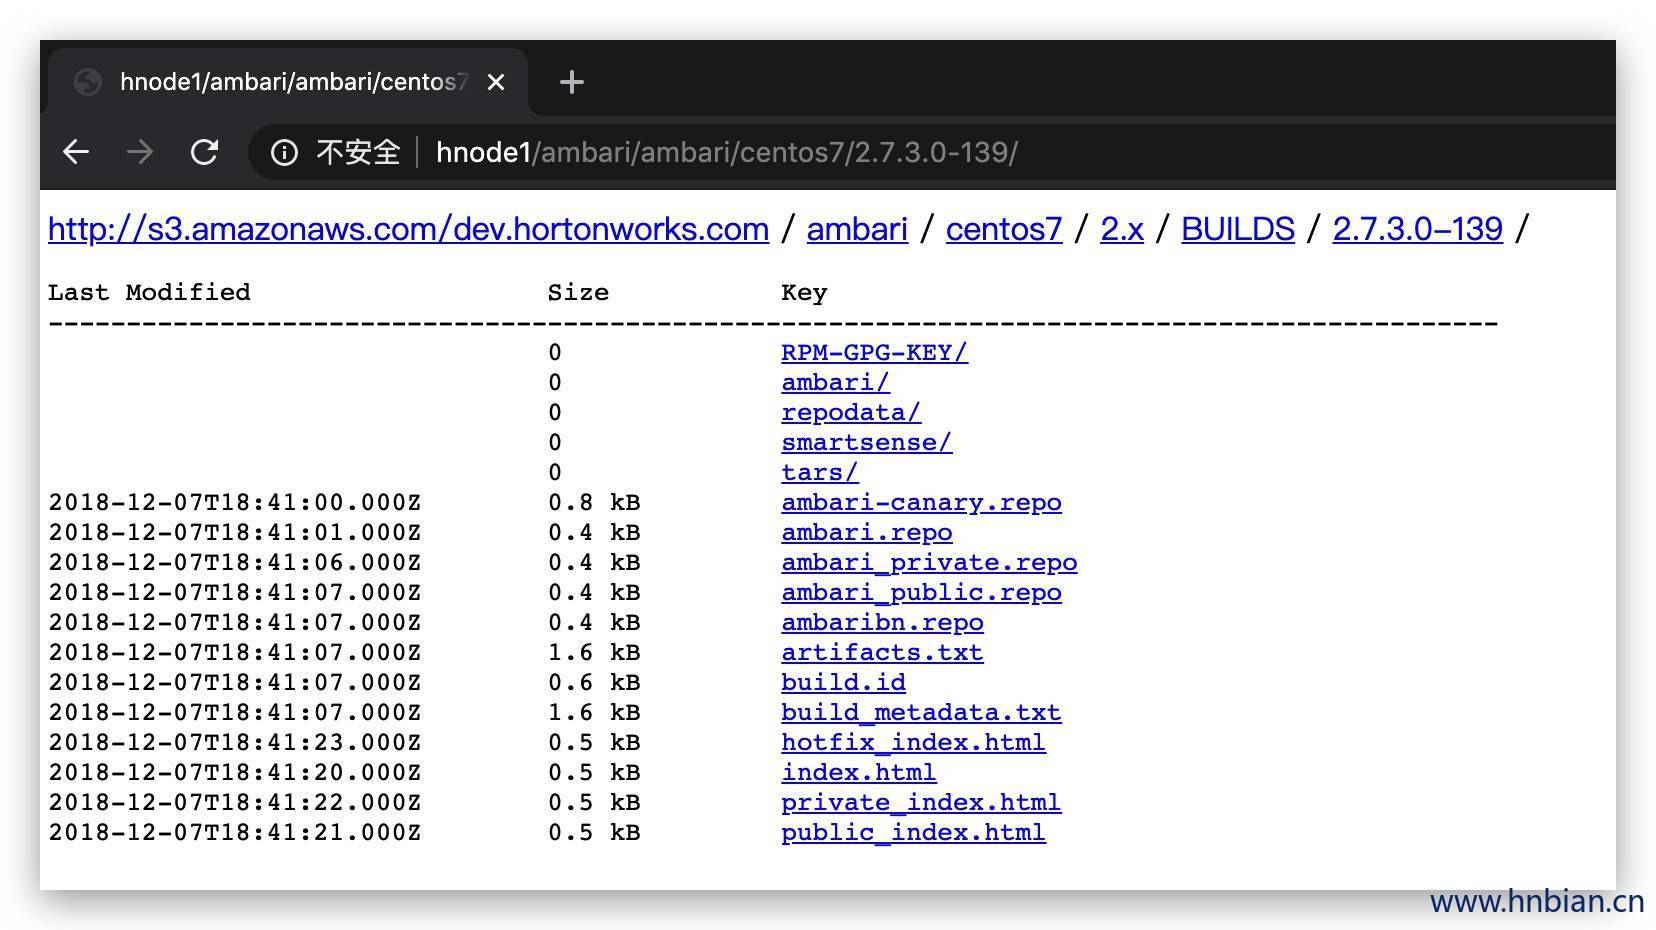
tar -zxvf ambari-2.7.3.0-centos7.tar.gz -C /var/www/html/ambari/
tar -zxvf HDP-3.1.0.0-centos7-rpm.tar.gz -C /var/www/html/hdp/
tar -zxvf HDP-UTILS-1.1.0.22-centos7.tar.gz -C /var/www/html/hdp/HDP-UTILS-1.1.0.22/

9.2 启动

# 启动httpd
[root@hnode1 html] systemctl start httpd
[root@hnode1 html]
[root@hnode1 html]

# 查看httpd状态
[root@hnode1 html] systemctl status httpd
● httpd.service - The Apache HTTP Server
   Loaded: loaded (/usr/lib/systemd/system/httpd.service; disabled; vendor preset: disabled)
   Active: active (running) since 一 2020-03-30 20:46:31 CST; 6s ago
     Docs: man:httpd(8)
           man:apachectl(8)
 Main PID: 1845 (httpd)
   Status: "Processing requests..."
   CGroup: /system.slice/httpd.service
           ├─1845 /usr/sbin/httpd -DFOREGROUND
           ├─1846 /usr/sbin/httpd -DFOREGROUND
           ├─1847 /usr/sbin/httpd -DFOREGROUND
           ├─1848 /usr/sbin/httpd -DFOREGROUND
           ├─1849 /usr/sbin/httpd -DFOREGROUND
           └─1850 /usr/sbin/httpd -DFOREGROUND

3月 30 20:46:31 hnode1 systemd[1]: Starting The Apache HTTP Server...
3月 30 20:46:31 hnode1 httpd[1845]: AH00558: httpd: Could not reliably determine the 
server's fully qualified domain name, using ::1. Set the 'ServerName' directive globally to suppress this message
3月 30 20:46:31 hnode1 systemd[1]: Started The Apache HTTP Server.
[root@hnode1 html]

# 设置httpd开机自启
[root@hnode1 html] systemctl enable httpd

9.3 访问

浏览器输入:http://ip地址(默认端口80)

httpd 首页

Ambari

10. 配置本地 Repo

10.1 配置Ambari


wget -O /etc/yum.repos.d/ambari.repo http://public-repo-1.hortonworks.com/ambari/centos7/2.x/updates/2.7.3.0/ambari.repo
...
正在解析主机 public ...
...
100%[=================================================>] 376         --.-K/s 用时 0s

2020-03-30 22:20:10 (76.0 MB/s) - 已保存 “/etc/yum.repos.d/ambari.repo” [376/376])

# 修改配置文件
vim /etc/yum.repos.d/ambari.repo

#VERSION_NUMBER=2.7.3.0-139
[ambari-2.7.3.0]
#json.url = http://public-repo-1.hortonworks.com/HDP/hdp_urlinfo.json
name=ambari Version - ambari-2.7.3.0

#修改host 地址
baseurl=http://hnode1/ambari/ambari/centos7/2.7.3.0-139
gpgcheck=1

#修改host 地址
gpgkey=http://hnode1/ambari/ambari/centos7/2.7.3.0-139/RPM-GPG-KEY/RPM-GPG-KEY-Jenkins
enabled=1
priority=1

# 地址配置完成之后可以在浏览器里面检查一下是否能够正常访问

10.2 配置HDP和HDP-UTILS

# 创建配置文件
[root@hnode1 opt] vim /etc/yum.repos.d/ambari.repo
[root@hnode1 opt]
[root@hnode1 opt] ls /etc/yum.repos.d/ | grep HDP.repo
HDP.repo

# 文件内添加如下添加内容:

[root@hnode1 opt] vim /etc/yum.repos.d/HDP.repo

#VERSION_NUMBER=3.1.0.0-78
[HDP-3.1.0.0]
name=HDP Version - HDP-3.1.0.0
baseurl=http://hnode1/hdp/HDP/centos7
gpgcheck=1
gpgkey=http://hnode1/hdp/HDP/centos7/3.1.0.0-78/RPM-GPG-KEY/RPM-GPG-KEY-Jenkins
enabled=1
priority=1

[HDP-UTILS-1.1.0.22]
name=HDP-UTILS Version - HDP-UTILS-1.1.0.22
baseurl=http://hnode1/hdp/HDP-UTILS-1.1.0.22
gpgcheck=1
gpgkey=http://hnode1/hdp/HDP-UTILS-1.1.0.22/HDP-UTILS/centos7/1.1.0.22/RPM-GPG-KEY/RPM-GPG-KEY-Jenkins
enabled=1
priority=1

10.3 分发Ambari.repo和HDP.repo

# 把ambari.repo HDP.repo分发到各个节点的相同目录下

[root@hnode1 opt] cd /etc/yum.repos.d
[root@hnode1 yum.repos.d] scp ambari.repo HDP.repo hnode2:$PWD
ambari.repo                                          100%  524   415.4KB/s   00:00
HDP.repo                                             100%  469   227.5KB/s   00:00
[root@hnode1 yum.repos.d] scp ambari.repo HDP.repo hnode3:$PWD
ambari.repo                                          100%  524   279.6KB/s   00:00
HDP.repo                                             100%  469   295.9KB/s   00:00
[root@hnode1 yum.repos.d]


# node2 查看文件是否成功分发
[root@hnode2 yum.repos.d]# ll
-rw-r--r--. 1 root root  524 3月  30 22:31 ambari.repo
-rw-r--r--. 1 root root 1664 9月   5 2019 CentOS-Base.repo
...
-rw-r--r--. 1 root root  469 3月  30 22:31 HDP.repo


# node3 查看文件是否成功分发
[root@hnode3 yum.repos.d]# ll
-rw-r--r--. 1 root root  524 3月  30 22:31 ambari.repo
-rw-r--r--. 1 root root 1664 9月   5 2019 CentOS-Base.repo
...
-rw-r--r--. 1 root root  469 3月  30 22:31 HDP.repo

10.4 生成本地源

使用createrepo命令,创建yum本地源(软件仓库),即为存放本地特定位置的众多rpm包建立索引,描述各包所需依赖信息,并形成元数据。

[root@hnode1 yum.repos.d]# createrepo /var/www/html/hdp/HDP/centos7/
Spawning worker 0 with 201 pkgs
Workers Finished
Saving Primary metadata
Saving file lists metadata
Saving other metadata
Generating sqlite DBs
Sqlite DBs complete

[root@hnode1 yum.repos.d]# createrepo /var/www/html/hdp/HDP-UTILS-1.1.0.22/
Spawning worker 0 with 16 pkgs
Workers Finished
Saving Primary metadata
Saving file lists metadata
Saving other metadata
Generating sqlite DBs
Sqlite DBs complete

11. 安装Ambari-Server

11.1 安装ambari-server


[root@hnode1 yum.repos.d]# yum install ambari-server
已加载插件:fastestmirror
Loading mirror speeds from cached hostfile
 * base: mirrors.aliyun.com
 * extras: mirrors.aliyun.com
 * updates: mirrors.aliyun.com
ambari-2.7.3.0                                                            | 2.9 kB  00:00:00
ambari-2.7.3.0/primary_db                                                 |  25 kB  00:00:00
正在解决依赖关系
--> 正在检查事务
...

依赖关系解决

============================================================================================
 Package                   架构       版本                   源                        大小
============================================================================================
正在安装:
 ambari-server             x86_64     2.7.3.0-139            ambari-2.7.3.0           352 M
为依赖而安装:
 postgresql                x86_64     9.2.24-2.el7_7         updates                  3.0 M
 postgresql-libs           x86_64     9.2.24-2.el7_7         updates                  234 k
 postgresql-server         x86_64     9.2.24-2.el7_7         updates                  3.8 M

事务概要
============================================================================================
安装  1 软件包 (+3 依赖软件包)
......
(4/4): postgresql-server-9.2.24-2.el7_7.x86_64.rpm                        | 3.8 MB  00:00:05
--------------------------------------------------------------------------------------------
总计                                                               57 MB/s | 359 MB  00:00:06
从 http://hnode1/ambari/ambari/centos7/2.7.3.0-139/RPM-GPG-KEY/RPM-GPG-KEY-Jenkin 检索密钥


获取 GPG 密钥失败:[Errno 14] HTTP Error 404 - Not Found
[root@hnode1 yum.repos.d]# vim ambari.repo
[root@hnode1 yum.repos.d]#
[root@hnode1 yum.repos.d]#
[root@hnode1 yum.repos.d]#
[root@hnode1 yum.repos.d]# yum install ambari-server
已加载插件:fastestmirror
Loading mirror speeds from cached hostfile
 * base: mirrors.aliyun.com
 * extras: mirrors.aliyun.com
 * updates: mirrors.aliyun.com
ambari-2.7.3.0                                                            | 2.9 kB  00:00:00
正在解决依赖关系
--> 正在检查事务
---> 软件包 ambari-server.x86_64.0.2.7.3.0-139 将被 安装
--> 正在处理依赖关系 postgresql-server >= 8.1,它被软件包 ambari-server-2.7.3.0-139.x86_64 需要
--> 正在检查事务
...
--> 解决依赖关系完成

依赖关系解决

=================================================================================================
 Package                    架构        版本                   源                           大小
=================================================================================================
正在安装:
 ambari-server              x86_64      2.7.3.0-139            ambari-2.7.3.0              352 M
为依赖而安装:
 postgresql                 x86_64      9.2.24-2.el7_7         updates                     3.0 M
 postgresql-libs            x86_64      9.2.24-2.el7_7         updates                     234 k
 postgresql-server          x86_64      9.2.24-2.el7_7         updates                     3.8 M

事务概要
=================================================================================================
安装  1 软件包 (+3 依赖软件包)

总计:359 M
安装大小:451 M
Is this ok [y/d/N]: y
...
是否继续?[y/N]:y
Running transaction check
Running transaction test
Transaction test succeeded
Running transaction
  正在安装    : postgresql-libs-9.2.24-2.el7_7.x86_64                                 1/4
  正在安装    : postgresql-9.2.24-2.el7_7.x86_64                                      2/4
  正在安装    : postgresql-server-9.2.24-2.el7_7.x86_64                               3/4
  正在安装    : ambari-server-2.7.3.0-139.x86_64                                      4/4
  验证中      : postgresql-server-9.2.24-2.el7_7.x86_64                               1/4
  验证中      : ambari-server-2.7.3.0-139.x86_64                                      2/4
  验证中      : postgresql-libs-9.2.24-2.el7_7.x86_64                                 3/4
  验证中      : postgresql-9.2.24-2.el7_7.x86_64                                      4/4

已安装:
  ambari-server.x86_64 0:2.7.3.0-139
...
完毕!

11.2 配置ambari-server

[root@hnode1 ~]# ambari-server setup
Using python  /usr/bin/python
Setup ambari-server
Checking SELinux...
SELinux status is 'disabled'
Customize user account for ambari-server daemon [y/n] (n)? y
Enter user account for ambari-server daemon (root):root
Adjusting ambari-server permissions and ownership...
Checking firewall status...
Checking JDK...
[1] Oracle JDK 1.8 + Java Cryptography Extension (JCE) Policy Files 8
[2] Custom JDK
==============================================================================
Enter choice (1): 2 #选择自定义jdk
WARNING: JDK must be installed on all hosts and JAVA_HOME must be valid on all hosts.
WARNING: JCE Policy files are required for configuring Kerberos security. If you plan 
to use Kerberos,please make sure JCE Unlimited Strength Jurisdiction Policy Files are valid on all hosts.
Path to JAVA_HOME: /opt/jdk1.8.0_191 #JAVA_HOME
Validating JDK on Ambari Server...done.
Check JDK version for Ambari Server...
JDK version found: 8
Minimum JDK version is 8 for Ambari. Skipping to setup different JDK for Ambari Server.
Checking GPL software agreement...
GPL License for LZO: https://www.gnu.org/licenses/old-licenses/gpl-2.0.en.html
Enable Ambari Server to download and install GPL Licensed LZO packages [y/n] (n)? y
Completing setup...
Configuring database...
Enter advanced database configuration [y/n] (n)? y #配置数据库
Configuring database...
==============================================================================
Choose one of the following options:
[1] - PostgreSQL (Embedded)
[2] - Oracle
[3] - MySQL / MariaDB
[4] - PostgreSQL
[5] - Microsoft SQL Server (Tech Preview)
[6] - SQL Anywhere
[7] - BDB
==============================================================================
Enter choice (1): 3
Hostname (localhost): hnode1 #mysql hostname
Port (3306): # mysql 端口 默认 3306
Database name (ambari): #使用的数据库名称
Username (ambari): #mysql用户名
Enter Database Password (bigdata): #密码 前面增加的ambari用户的密码 (Ambari123)
Re-enter password: #(Ambari123)
Passwords do not match
Enter Database Password (bigdata):
Invalid characters in password. Use only alphanumeric or _ or - characters
Enter Database Password (bigdata):
Re-enter password:
Configuring ambari database...
Should ambari use existing default jdbc /usr/share/java/mysql-connector-java.jar [y/n] (y)? y
Configuring remote database connection properties...
WARNING: Before starting Ambari Server, you must run the following DDL directly 
from the database shell to create the schema: /var/lib/ambari-server/resources/Ambari-DDL-MySQL-CREATE.sql
Proceed with configuring remote database connection properties [y/n] (y)? y
Extracting system views...
ambari-admin-2.7.3.0.139.jar
....
Ambari repo file contains latest json url http://public-repo-1.hortonworks.com/HDP/hdp_urlinfo.json, 
   updating stacks repoinfos with it...
Adjusting ambari-server permissions and ownership...
Ambari Server 'setup' completed successfully.

11.3 登录MySQL创建执行建表脚本


[root@hnode1 ~]# mysql -u ambari -p -h hnode1
Enter password:
Welcome to the MySQL monitor.  Commands end with ; or \g.
...
mysql> use ambari;
Database changed
mysql> show tables;
Empty set (0.00 sec)
# 执行 Ambari-DDL-MySQL-CREATE.sql 脚本
mysql> source /var/lib/ambari-server/resources/Ambari-DDL-MySQL-CREATE.sql;
Query OK, 0 rows affected (0.00 sec)

Query OK, 0 rows affected (0.00 sec)

mysql>

# 有无报错信息 查看创建的表
mysql> show tables;
+-------------------------------+
| Tables_in_ambari              |
+-------------------------------+
| ClusterHostMapping            |
| QRTZ_BLOB_TRIGGERS            |
| QRTZ_CALENDARS                |
| QRTZ_CRON_TRIGGERS            |
| QRTZ_FIRED_TRIGGERS           |
| QRTZ_JOB_DETAILS              |
| QRTZ_LOCKS                    |
| QRTZ_PAUSED_TRIGGER_GRPS      |
| QRTZ_SCHEDULER_STATE          |
| QRTZ_SIMPLE_TRIGGERS          |
| QRTZ_SIMPROP_TRIGGERS         |
| QRTZ_TRIGGERS                 |
| adminpermission               |
| adminprincipal                |
| adminprincipaltype            |
| adminprivilege                |
| adminresource                 |
| adminresourcetype             |
| alert_current                 |
| alert_definition              |
| alert_group                   |
| alert_group_target            |
| alert_grouping                |
| alert_history                 |
| alert_notice                  |
| alert_target                  |
| alert_target_states           |
| ambari_configuration          |
| ambari_operation_history      |
| ambari_sequences              |
| artifact                      |
| blueprint                     |
| blueprint_configuration       |
| blueprint_setting             |
| clusterconfig                 |
| clusters                      |
| clusterservices               |
| clusterstate                  |
| confgroupclusterconfigmapping |
| configgroup                   |
| configgrouphostmapping        |
| execution_command             |
| extension                     |
| extensionlink                 |
| groups                        |
| host_role_command             |
| host_version                  |
| hostcomponentdesiredstate     |
| hostcomponentstate            |
| hostconfigmapping             |
| hostgroup                     |
| hostgroup_component           |
| hostgroup_configuration       |
| hosts                         |
| hoststate                     |
| kerberos_descriptor           |
| kerberos_keytab               |
| kerberos_keytab_principal     |
| kerberos_principal            |
| key_value_store               |
| kkp_mapping_service           |
| members                       |
| metainfo                      |
| permission_roleauthorization  |
| remoteambaricluster           |
| remoteambariclusterservice    |
| repo_applicable_services      |
| repo_definition               |
| repo_os                       |
| repo_tags                     |
| repo_version                  |
| request                       |
| requestoperationlevel         |
| requestresourcefilter         |
| requestschedule               |
| requestschedulebatchrequest   |
| role_success_criteria         |
| roleauthorization             |
| servicecomponent_version      |
| servicecomponentdesiredstate  |
| serviceconfig                 |
| serviceconfighosts            |
| serviceconfigmapping          |
| servicedesiredstate           |
| setting                       |
| stack                         |
| stage                         |
| topology_host_info            |
| topology_host_request         |
| topology_host_task            |
| topology_hostgroup            |
| topology_logical_request      |
| topology_logical_task         |
| topology_request              |
| upgrade                       |
| upgrade_group                 |
| upgrade_history               |
| upgrade_item                  |
| user_authentication           |
| users                         |
| viewentity                    |
| viewinstance                  |
| viewinstancedata              |
| viewinstanceproperty          |
| viewmain                      |
| viewparameter                 |
| viewresource                  |
| viewurl                       |
| widget                        |
| widget_layout                 |
| widget_layout_user_widget     |
+-------------------------------+
111 rows in set (0.00 sec)

11.4 启动Ambari-Server

功能 命令
启动命令 ambari-server start
停止命令 ambari-server stop
查看状态 ambari-server status
重启命令 ambari-server restart
  • ambari-server
    • start
    • stop
    • reset
    • restart
    • upgrade
    • status
    • upgradestack
    • setup
    • setup-jce
    • setup-ldap
    • sync-ldap
    • set-current
    • setup-security
    • refresh-stack-hash
    • backup
    • restore
    • update-host-names
    • check-database
    • enable-stack
    • setup-sso
    • db-purge-history
    • install-mpack
    • uninstall-mpack
    • upgrade-mpack
    • setup-kerberos
    • setup-pam
    • migrate-ldap-pam
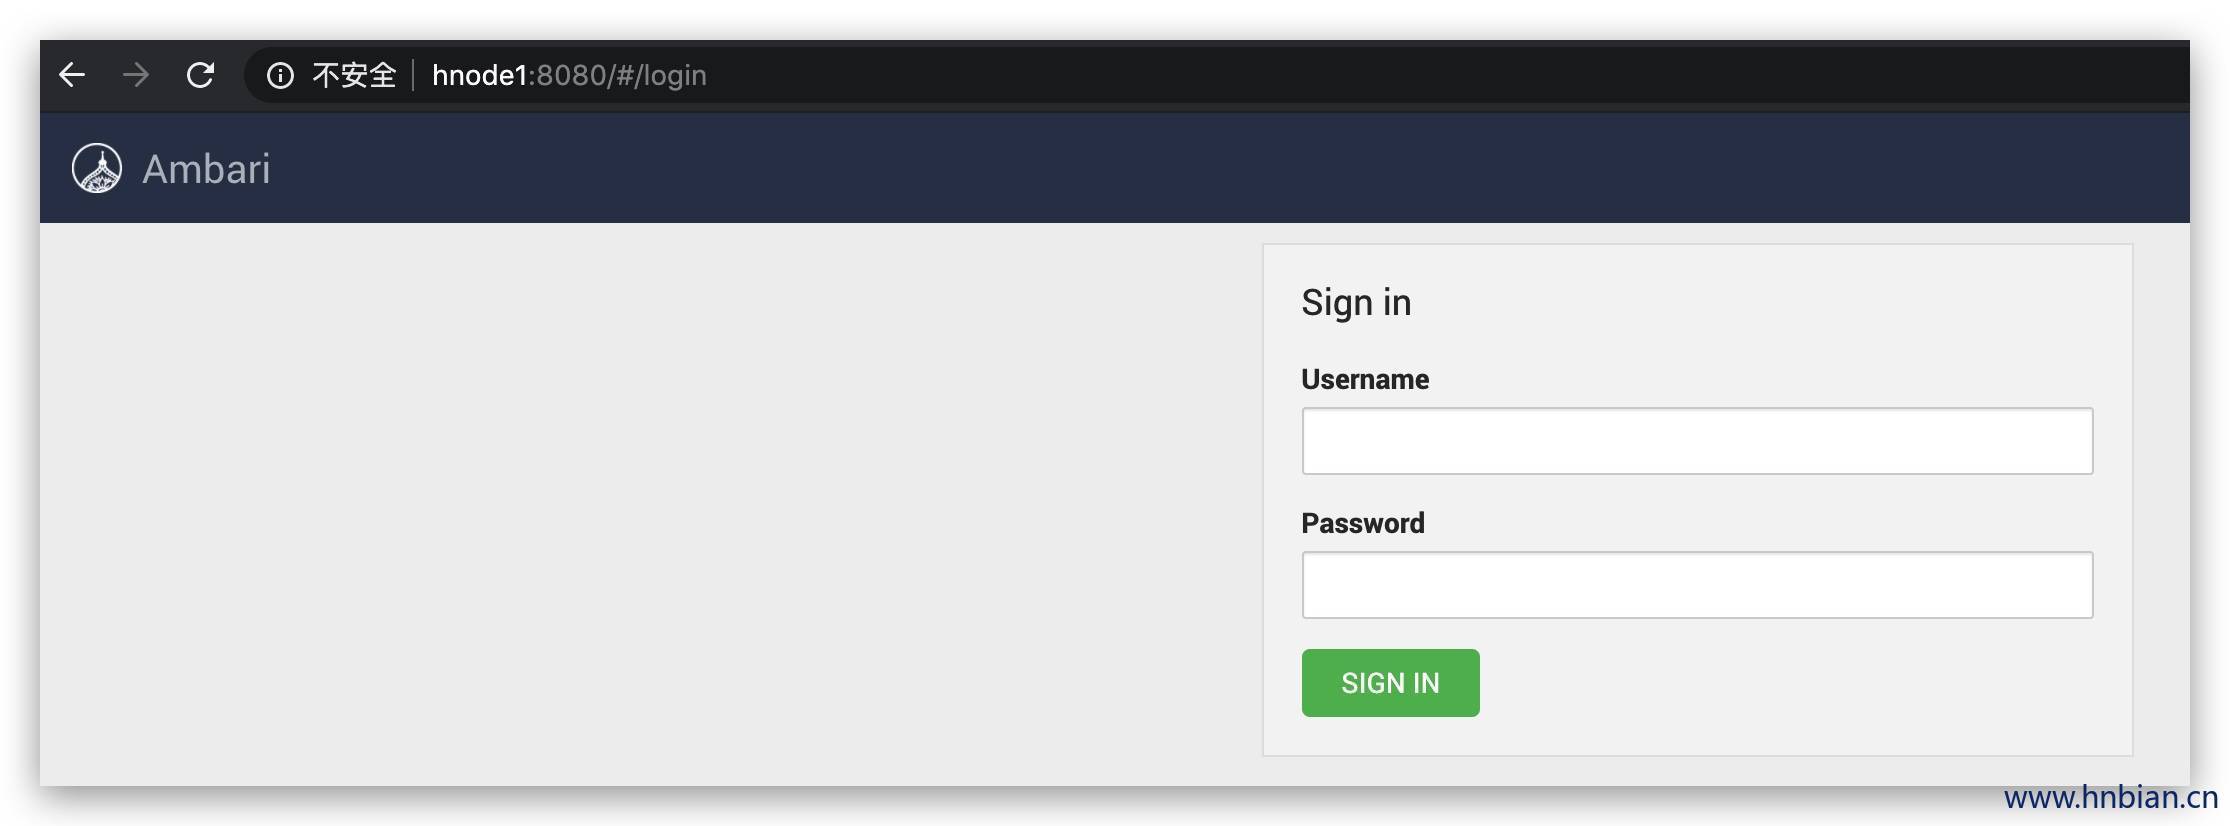
[root@hnode1 ~]# ambari-server start
# 如果启动失败,关闭服务【ambari-server stop】,重新启动
Using python  /usr/bin/python
Starting ambari-server
Ambari Server running with administrator privileges.
Organizing resource files at /var/lib/ambari-server/resources...
Ambari database consistency check started...
Server PID at: /var/run/ambari-server/ambari-server.pid
Server out at: /var/log/ambari-server/ambari-server.out
Server log at: /var/log/ambari-server/ambari-server.log
Waiting for server start.........................................
Server started listening on 8080

DB configs consistency check: no errors and warnings were found.
Ambari Server 'start' completed successfully.

http://hnode1:8080
Ambari 登录页

11.5 安装Agent

功能 命令
启动命令 service ambari-agent start
停止命令 service ambari-agent stop
查看状态 service ambari-agent status
重启命令 service ambari-agent restart
# 在每个计算节点都要安装 agent

[root@hnode1 ~]# yum -y install ambari-agent
已加载插件:fastestmirror
Loading mirror speeds from cached hostfile
 * base: mirrors.aliyun.com
 * extras: mirrors.aliyun.com
 * updates: mirrors.aliyun.com
HDP-3.1.0.0                                                 | 2.9 kB  00:00:00
HDP-UTILS-1.1.0.22                                          | 2.9 kB  00:00:00
ambari-2.7.3.0                                              | 2.9 kB  00:00:00
base                                                        | 3.6 kB  00:00:00
extras                                                      | 2.9 kB  00:00:00
mysql-connectors-community                                  | 2.5 kB  00:00:00
mysql-tools-community                                       | 2.5 kB  00:00:00
mysql57-community                                           | 2.5 kB  00:00:00
updates                                                     | 2.9 kB  00:00:00
正在解决依赖关系
--> 正在检查事务
---> 软件包 ambari-agent.x86_64.0.2.7.3.0-139 将被 安装
--> 解决依赖关系完成

依赖关系解决

=================================================================================
 Package            架构          版本               源                     大小
=================================================================================
正在安装:
 ambari-agent       x86_64        2.7.3.0-139        ambari-2.7.3.0         36 M

事务概要
=================================================================================
安装  1 软件包

总下载量:36 M
安装大小:68 M
Downloading packages:
ambari-agent-2.7.3.0-139.x86_64.rpm                           |  36 MB  00:00:00
Running transaction check
Running transaction test
Transaction test succeeded
Running transaction
  正在安装    : ambari-agent-2.7.3.0-139.x86_64                                1/1
  验证中      : ambari-agent-2.7.3.0-139.x86_64                                1/1

已安装:
  ambari-agent.x86_64 0:2.7.3.0-139

完毕!

12. 集群安装

启用安装向导创建集群

配置集群名称

选择版本,配置仓库地址

配置集群节点与秘钥

确认主机

这个步骤可能会出现如下错误:

ERROR 2020-04-05 15:04:48,778 main.py:269 - Ambari agent machine hostname (localhost.localdomain) does not match expected ambari server hostname (hnode1). Aborting registration. Please check hostname, hostname -f and /etc/hosts file to confirm your hostname is setup correctly

# 请检查hostname的配置

选择要安装的组件

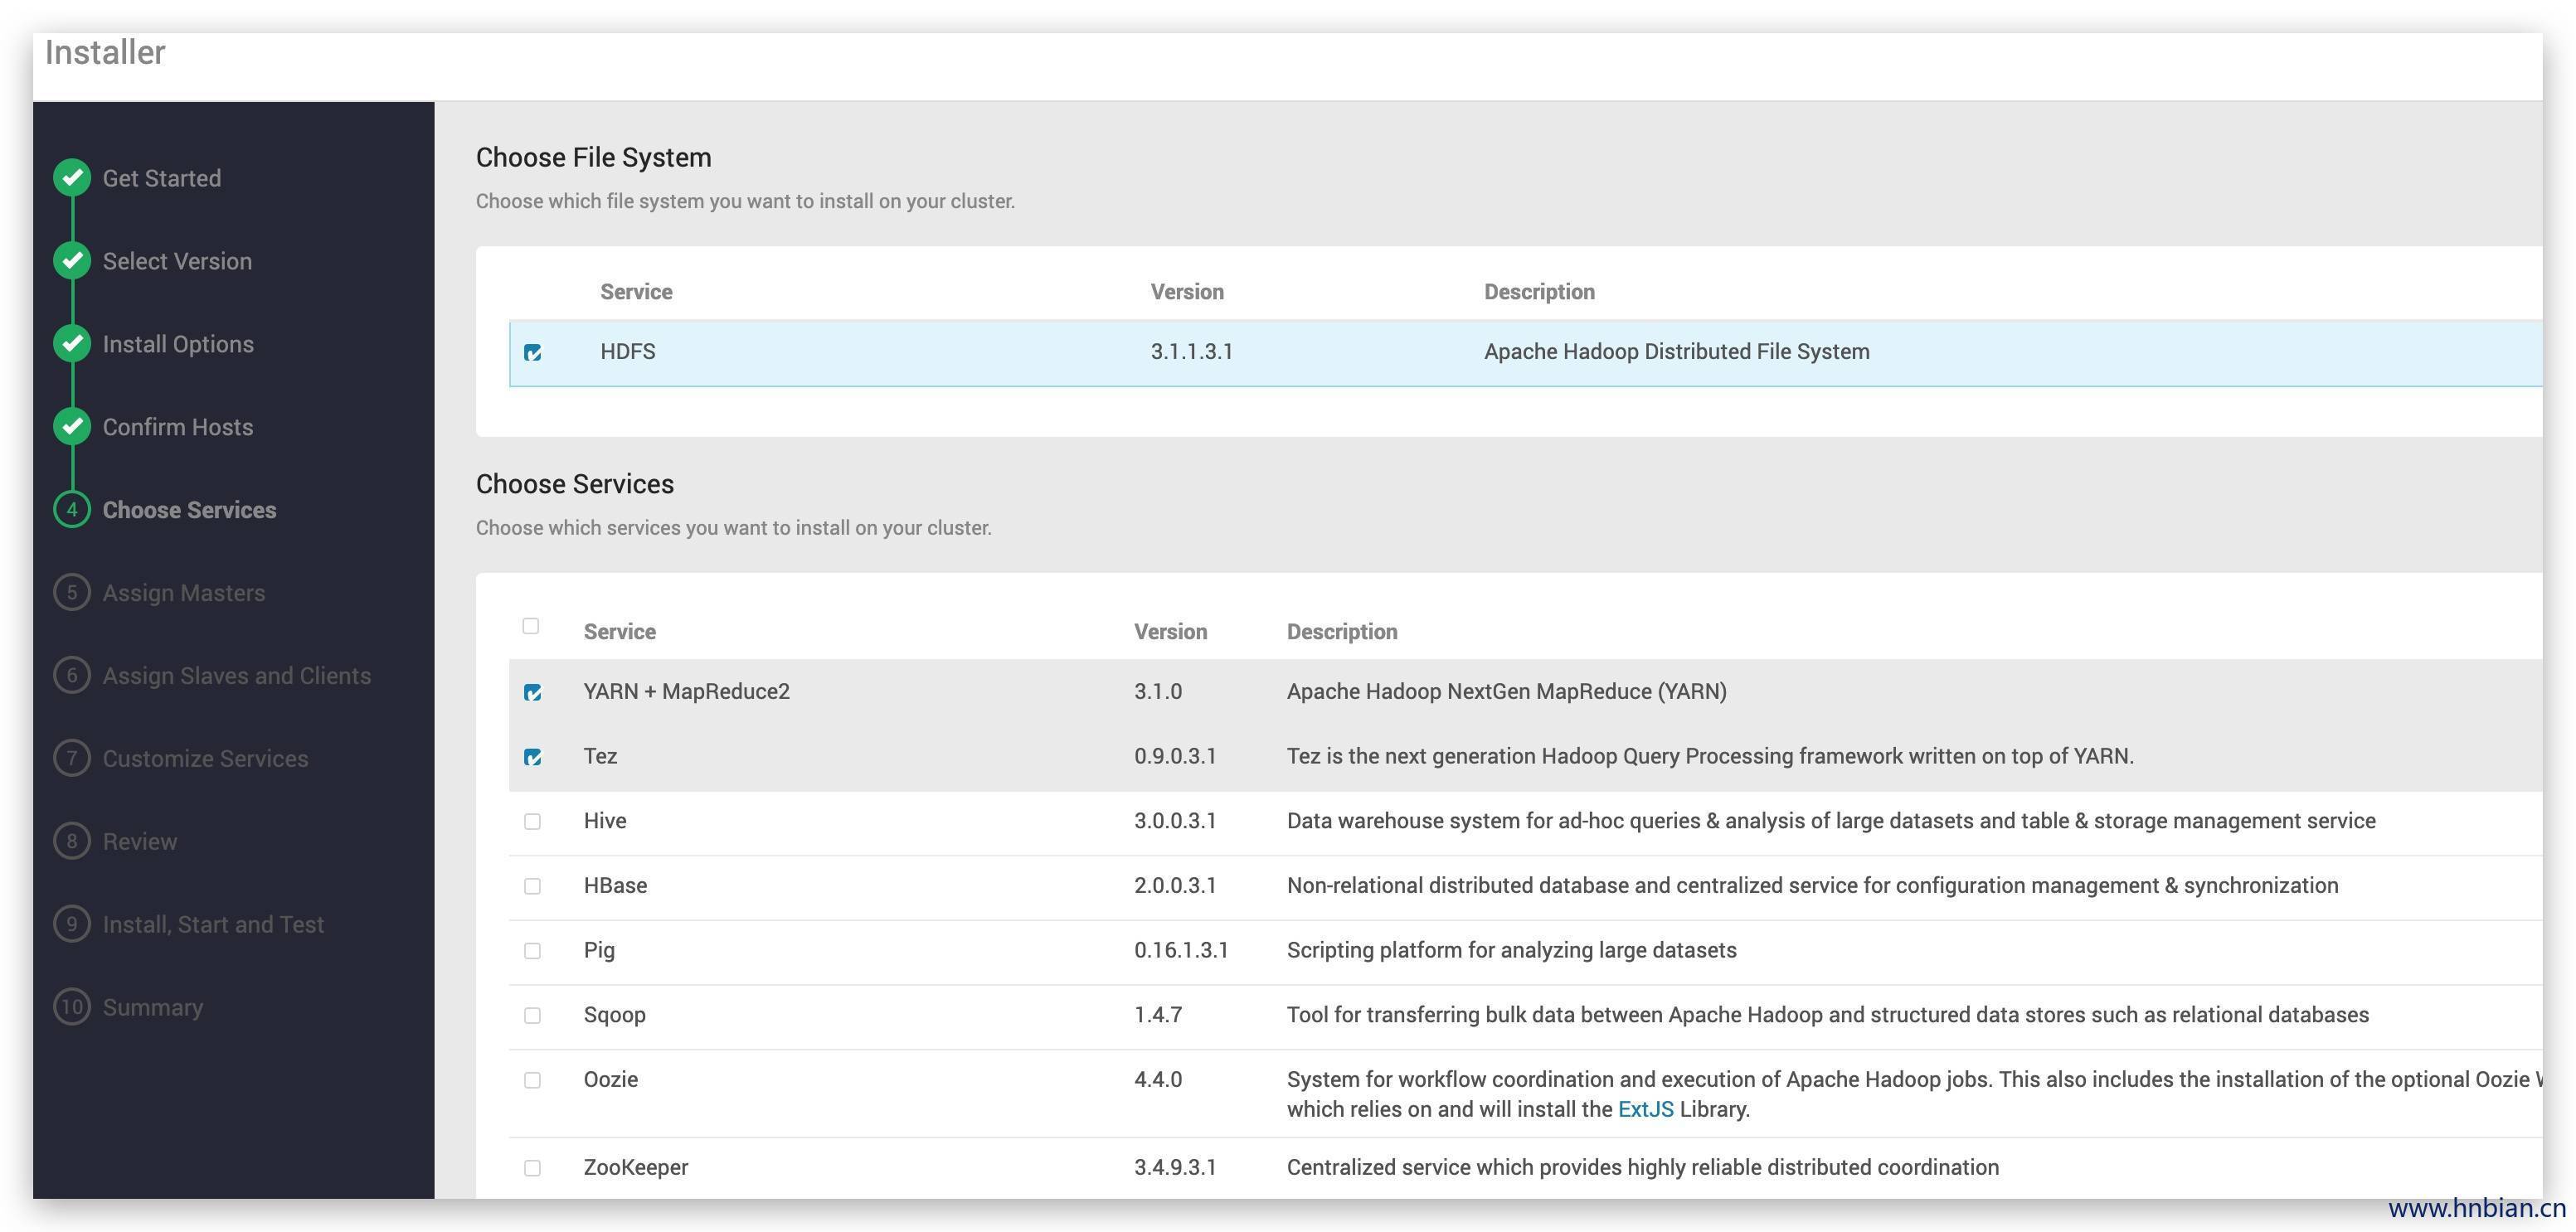
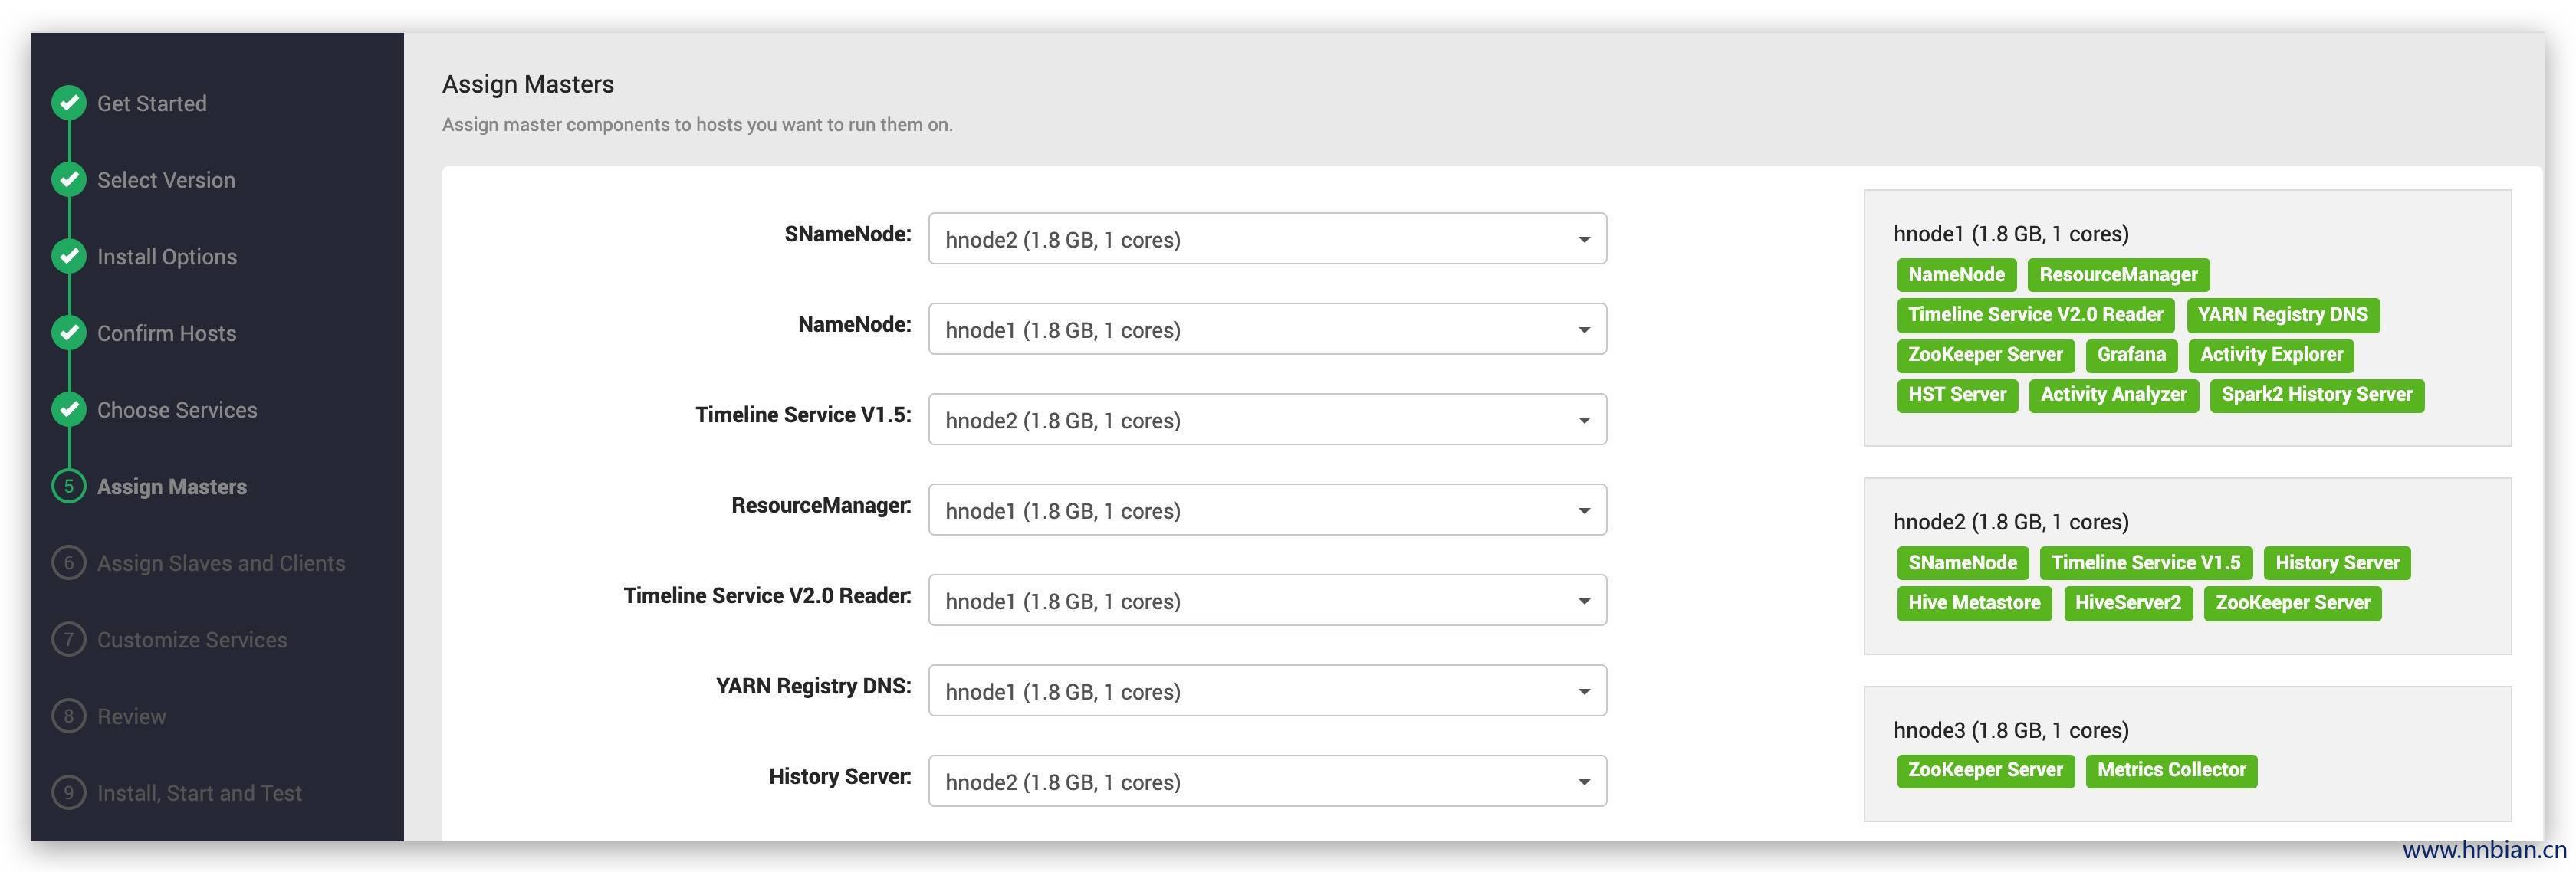
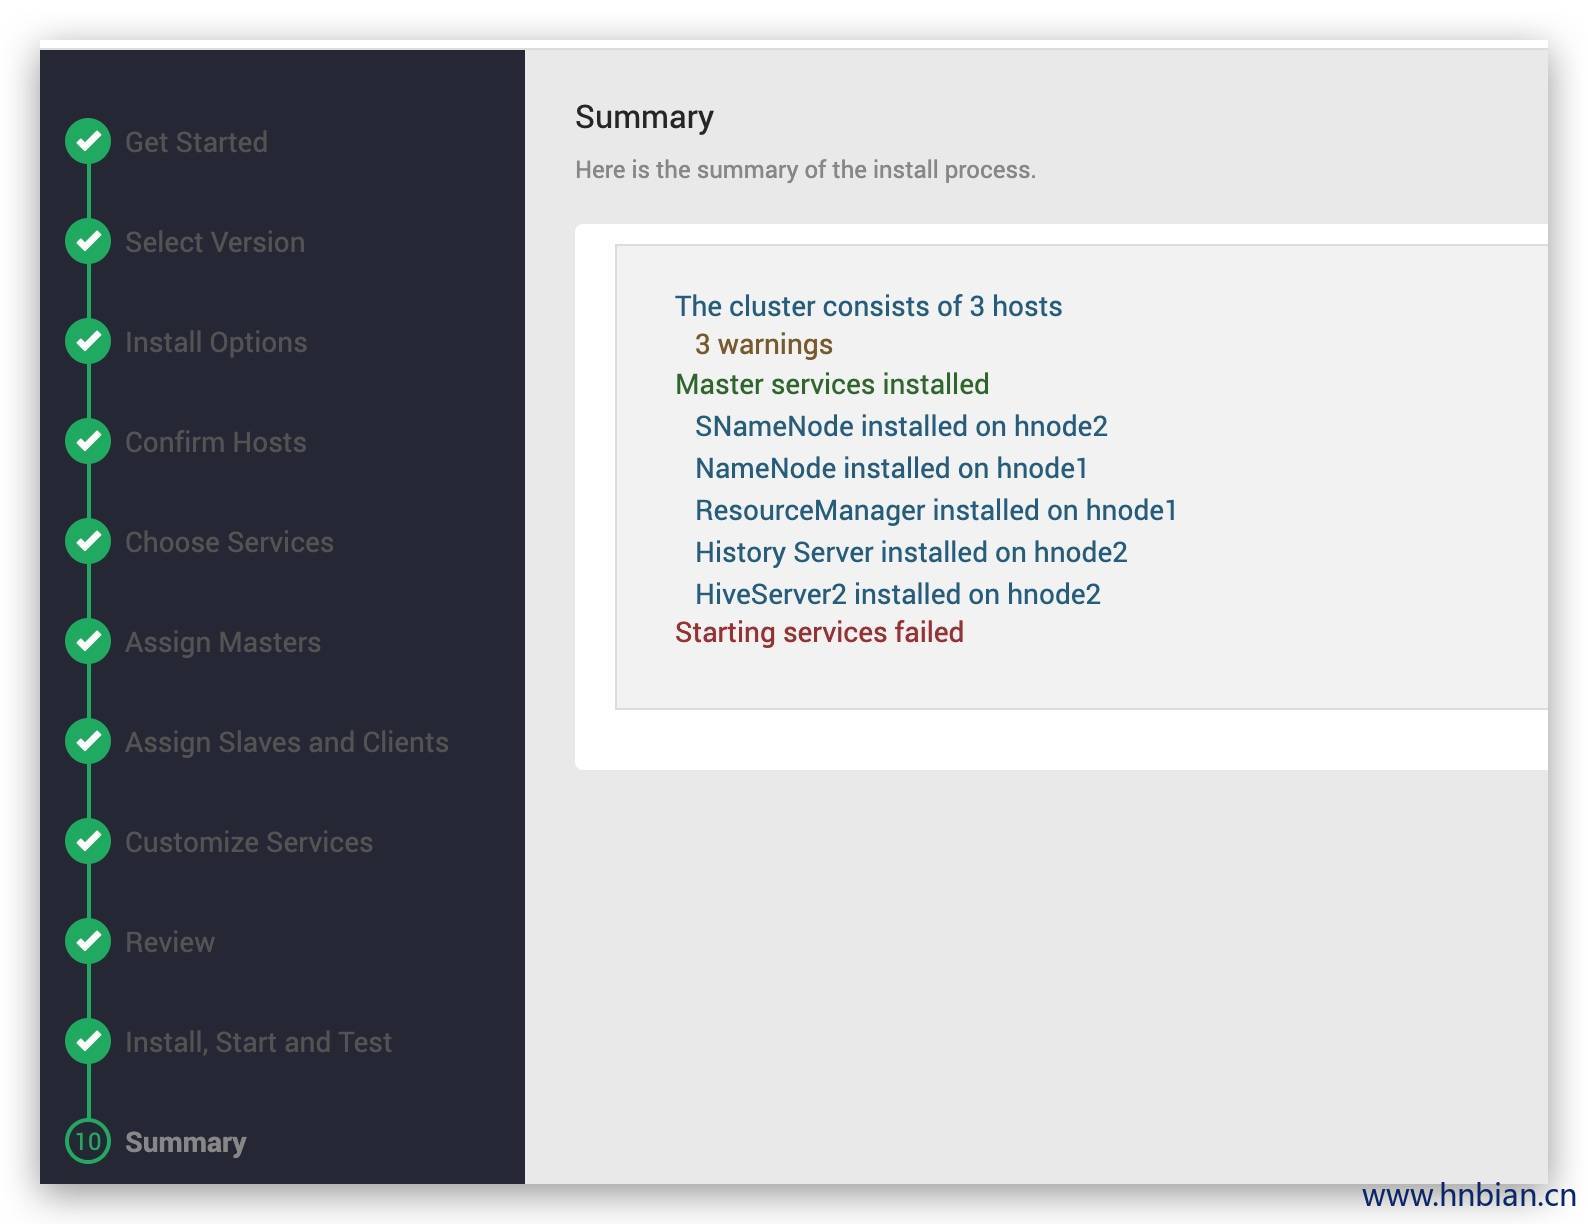
如果某个服务A 依赖服务B,而你没有选择安装服务B, 会提示安装服务B
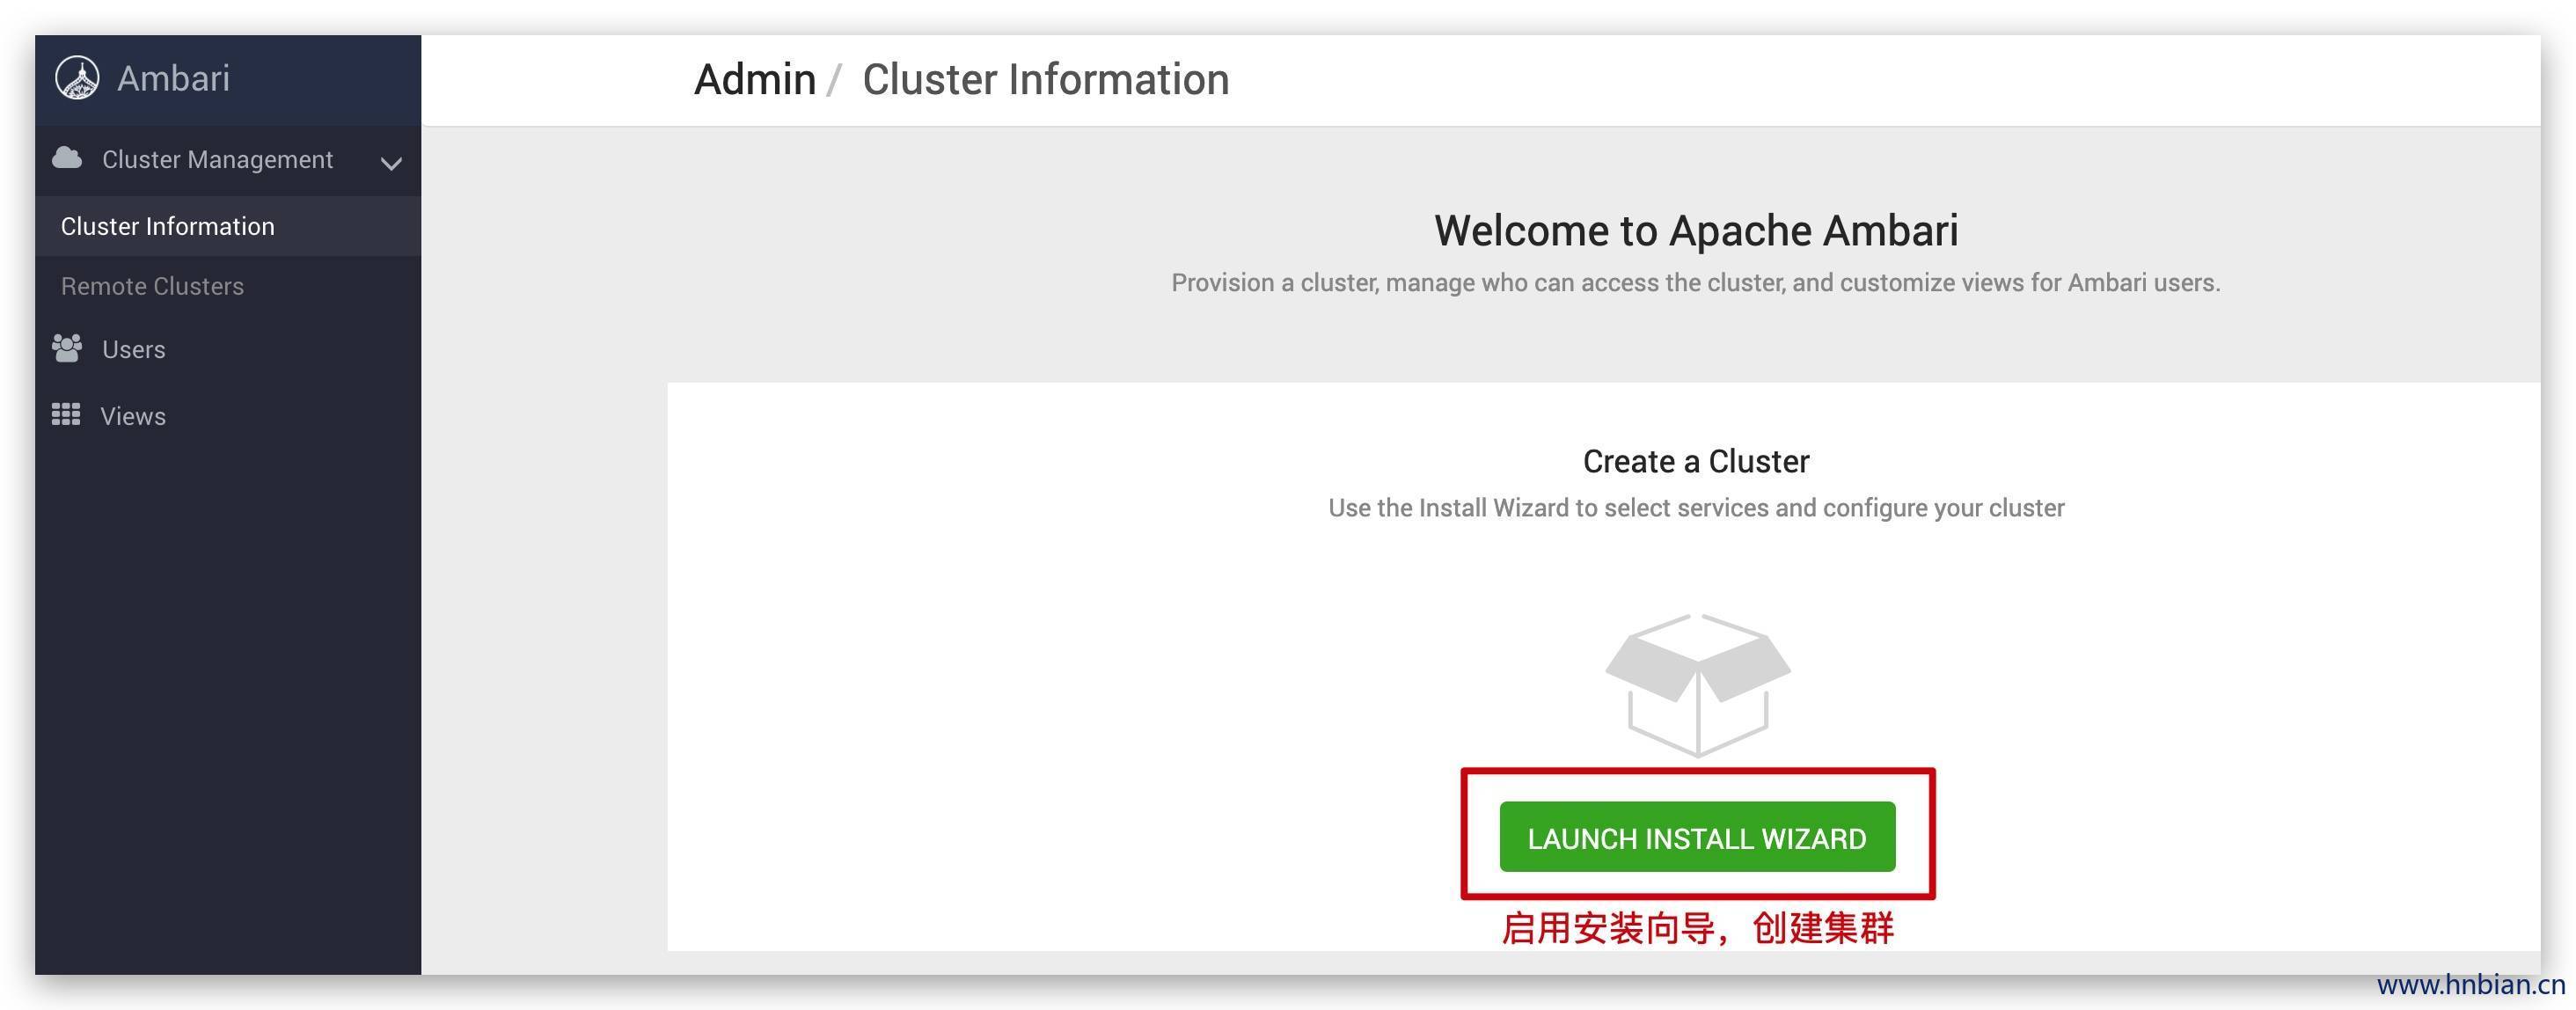
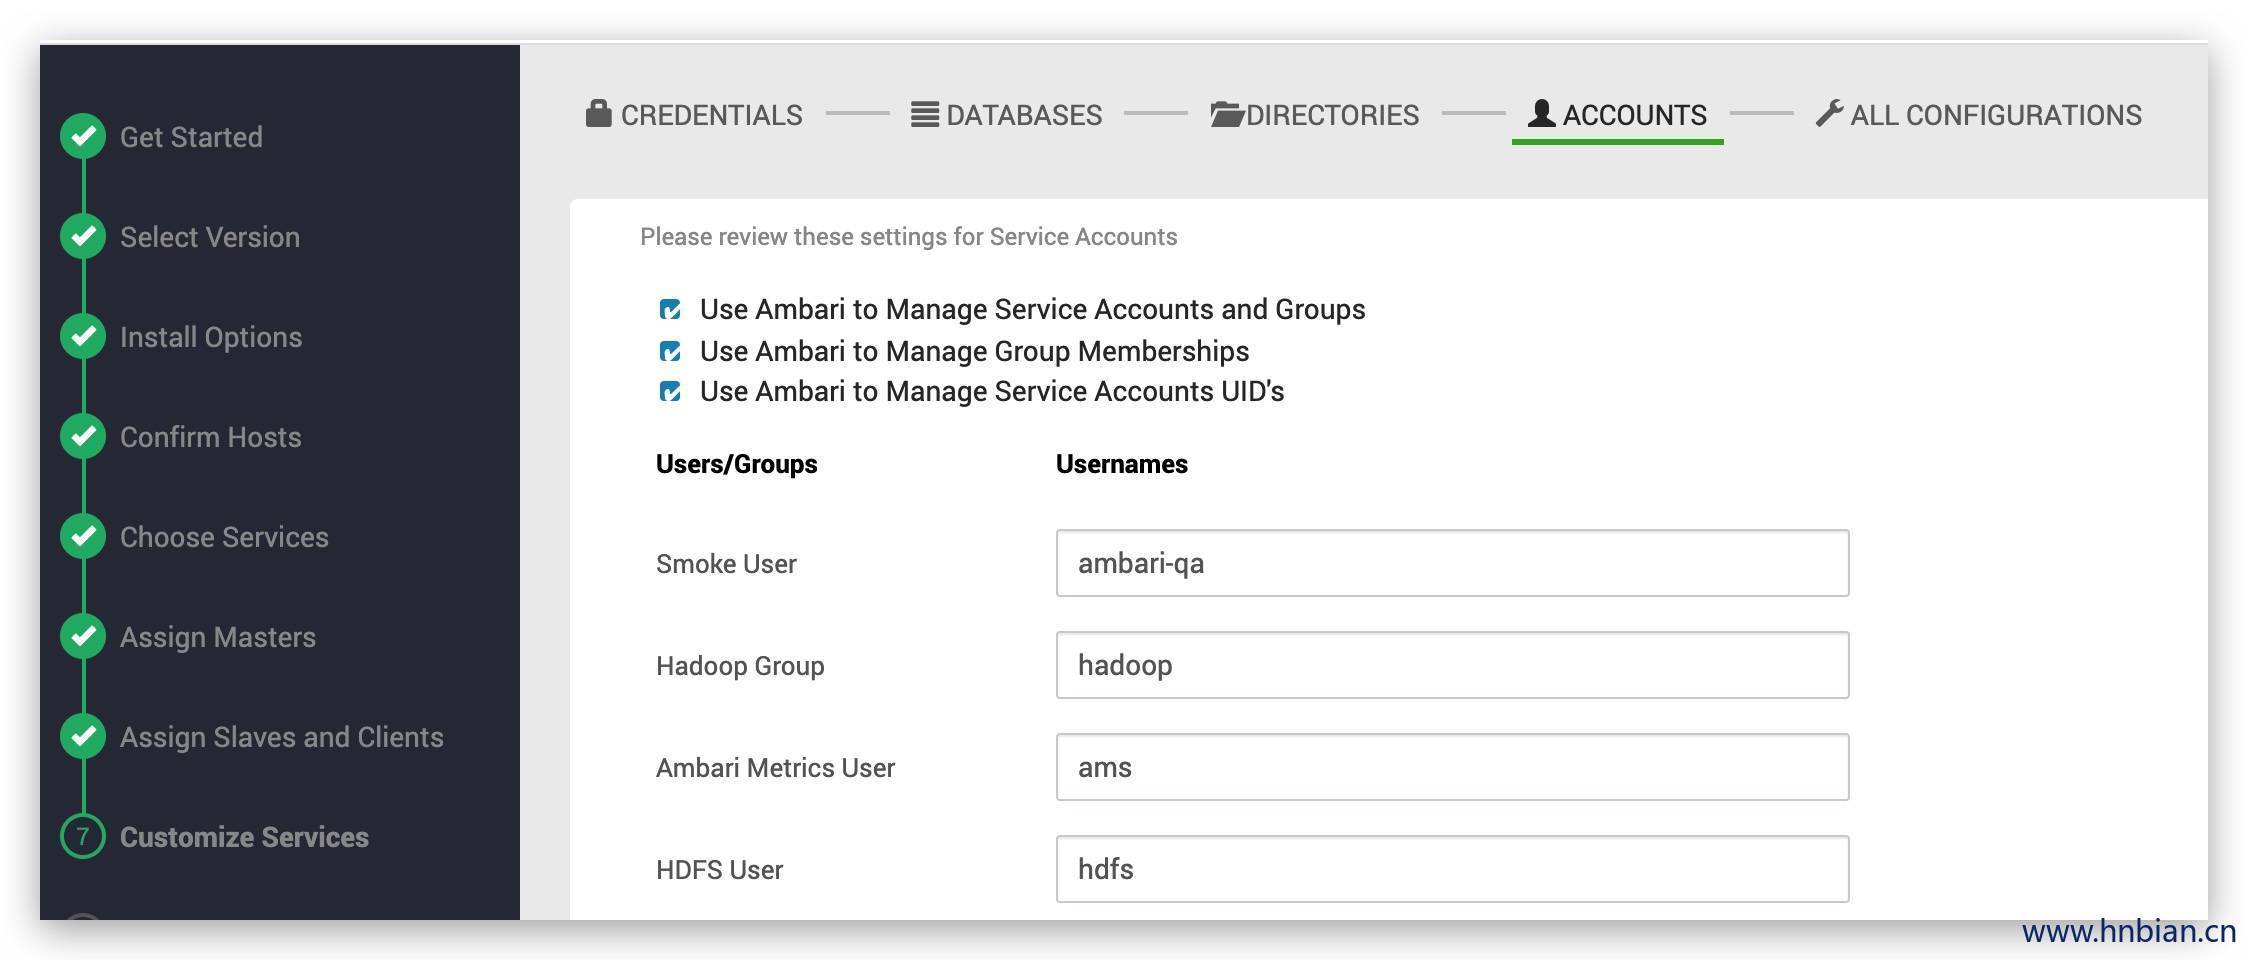
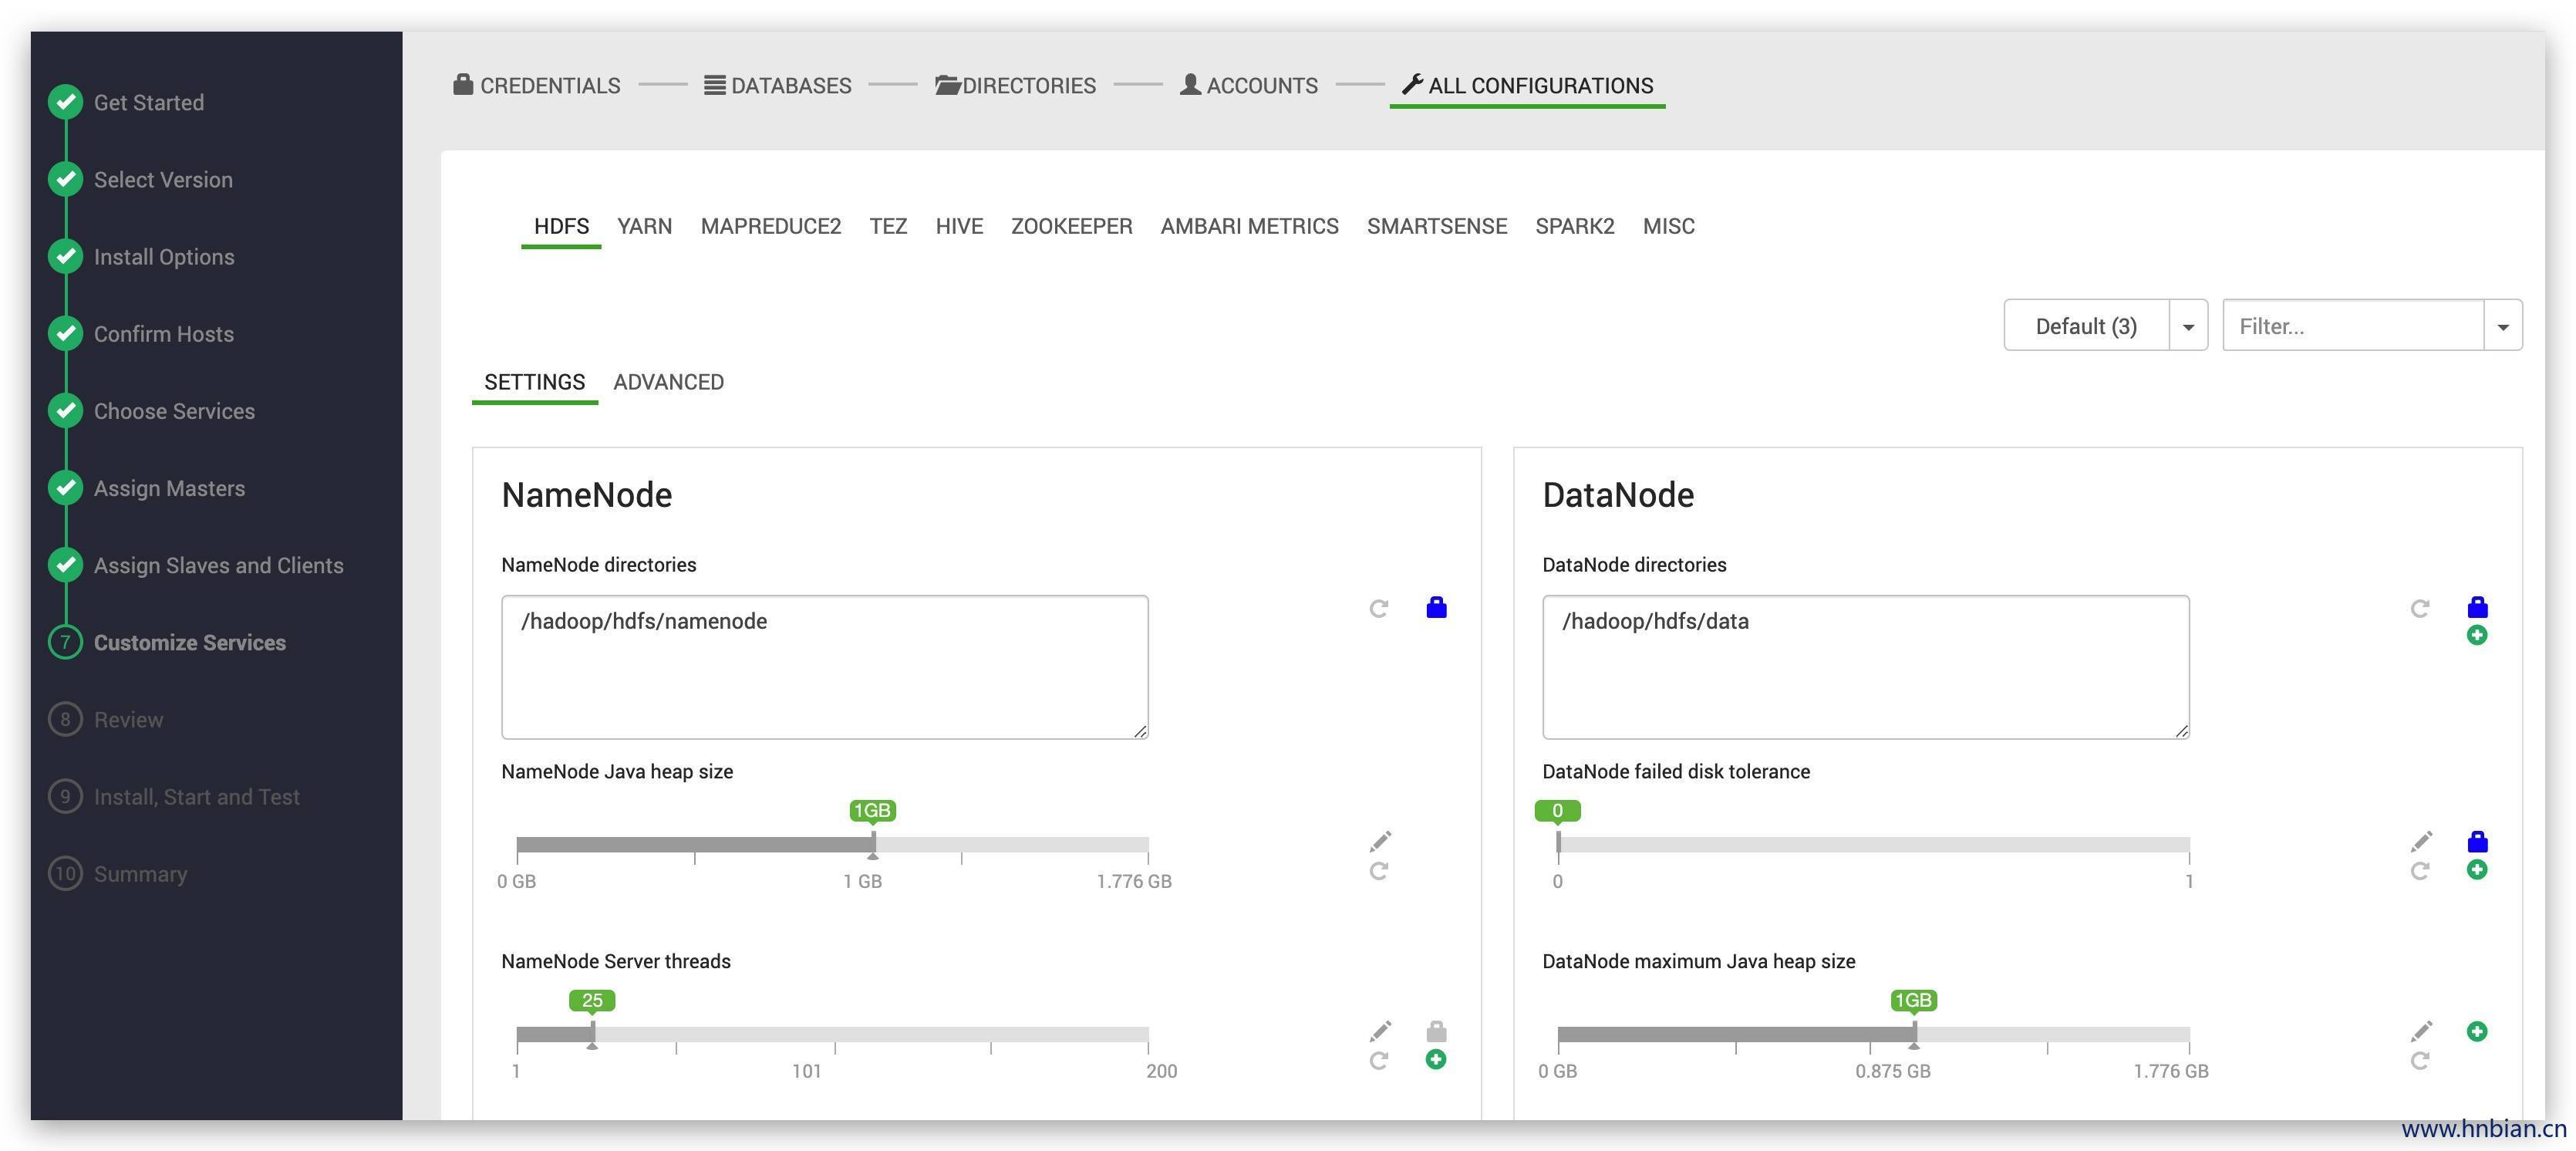
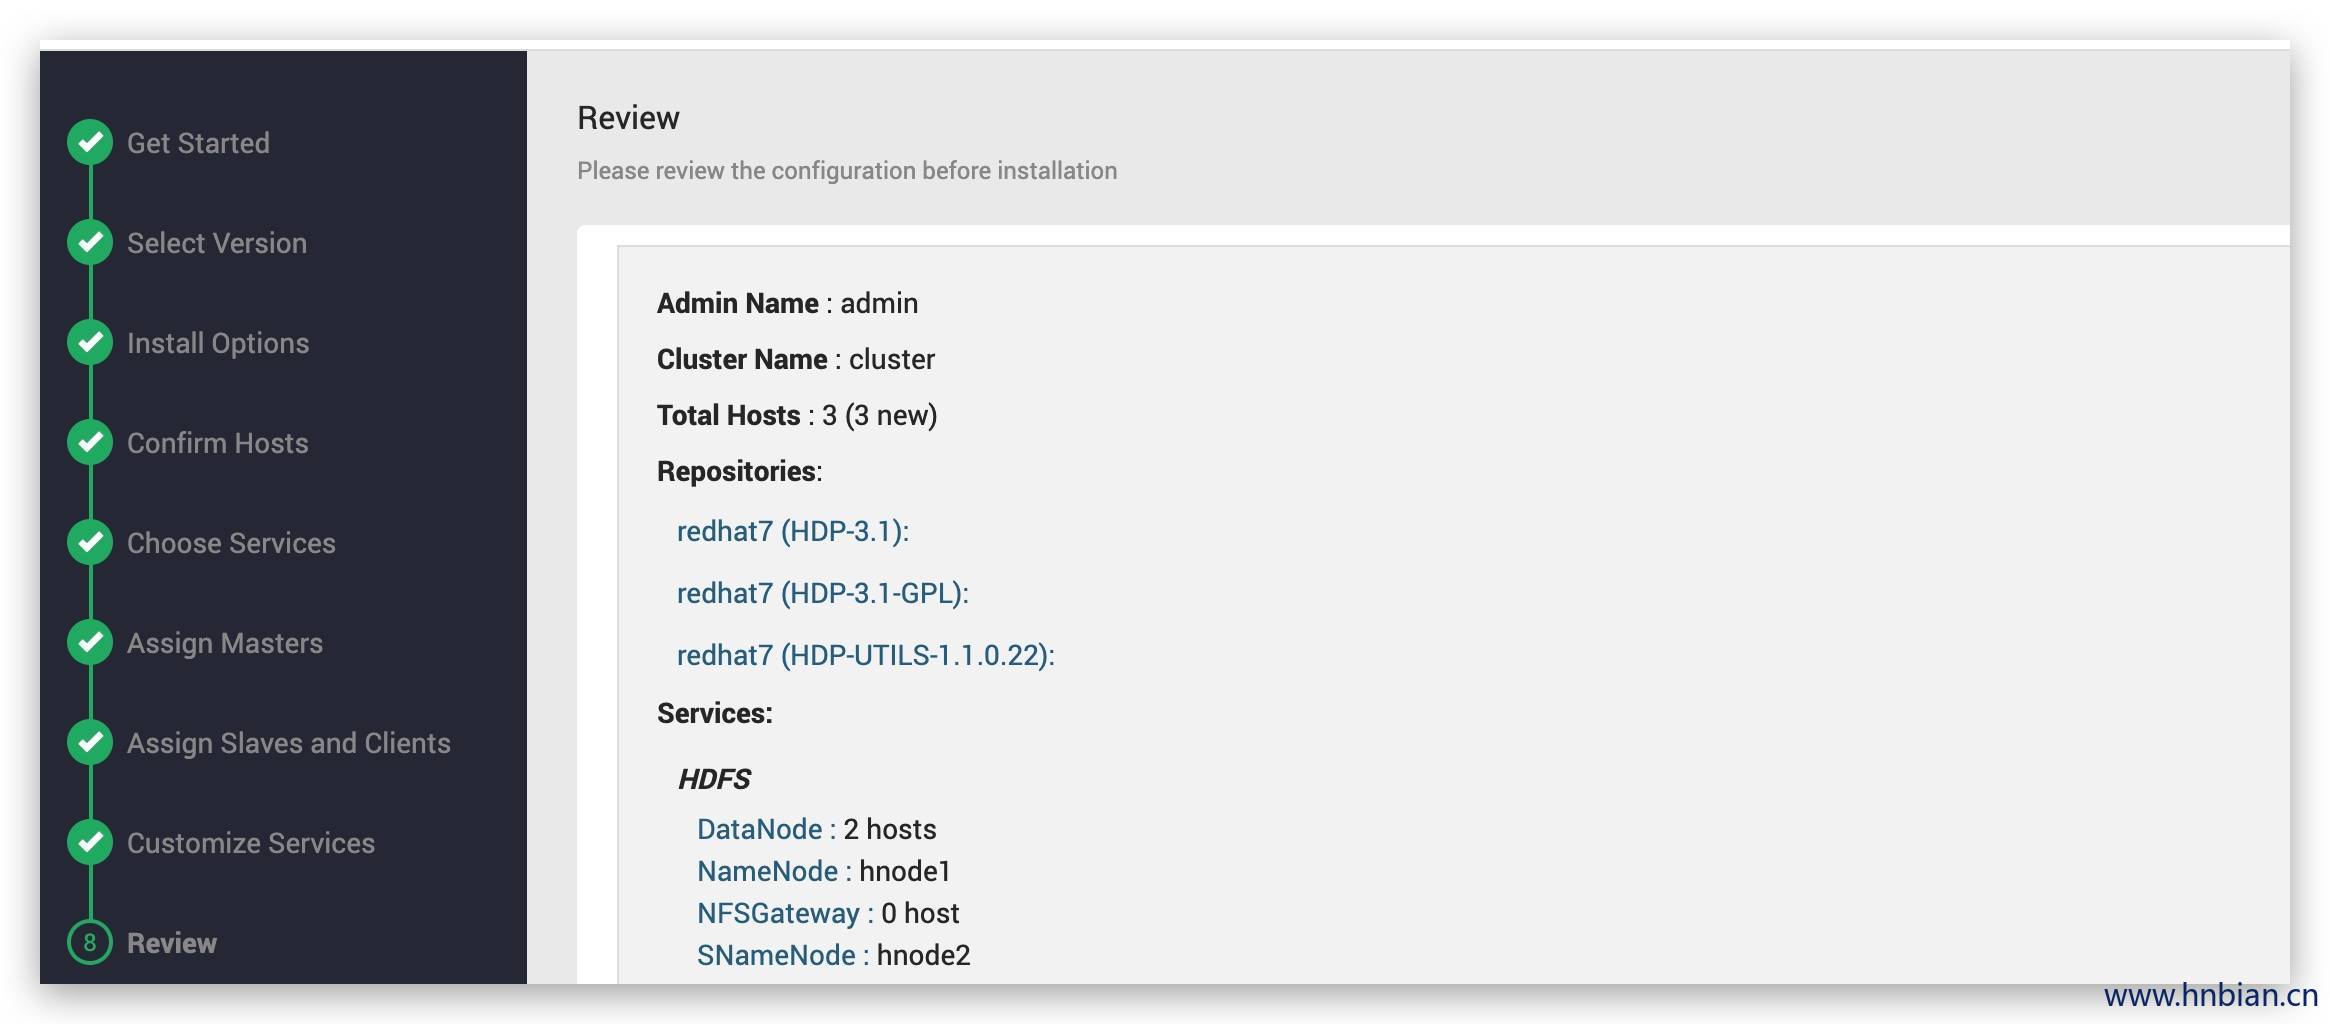
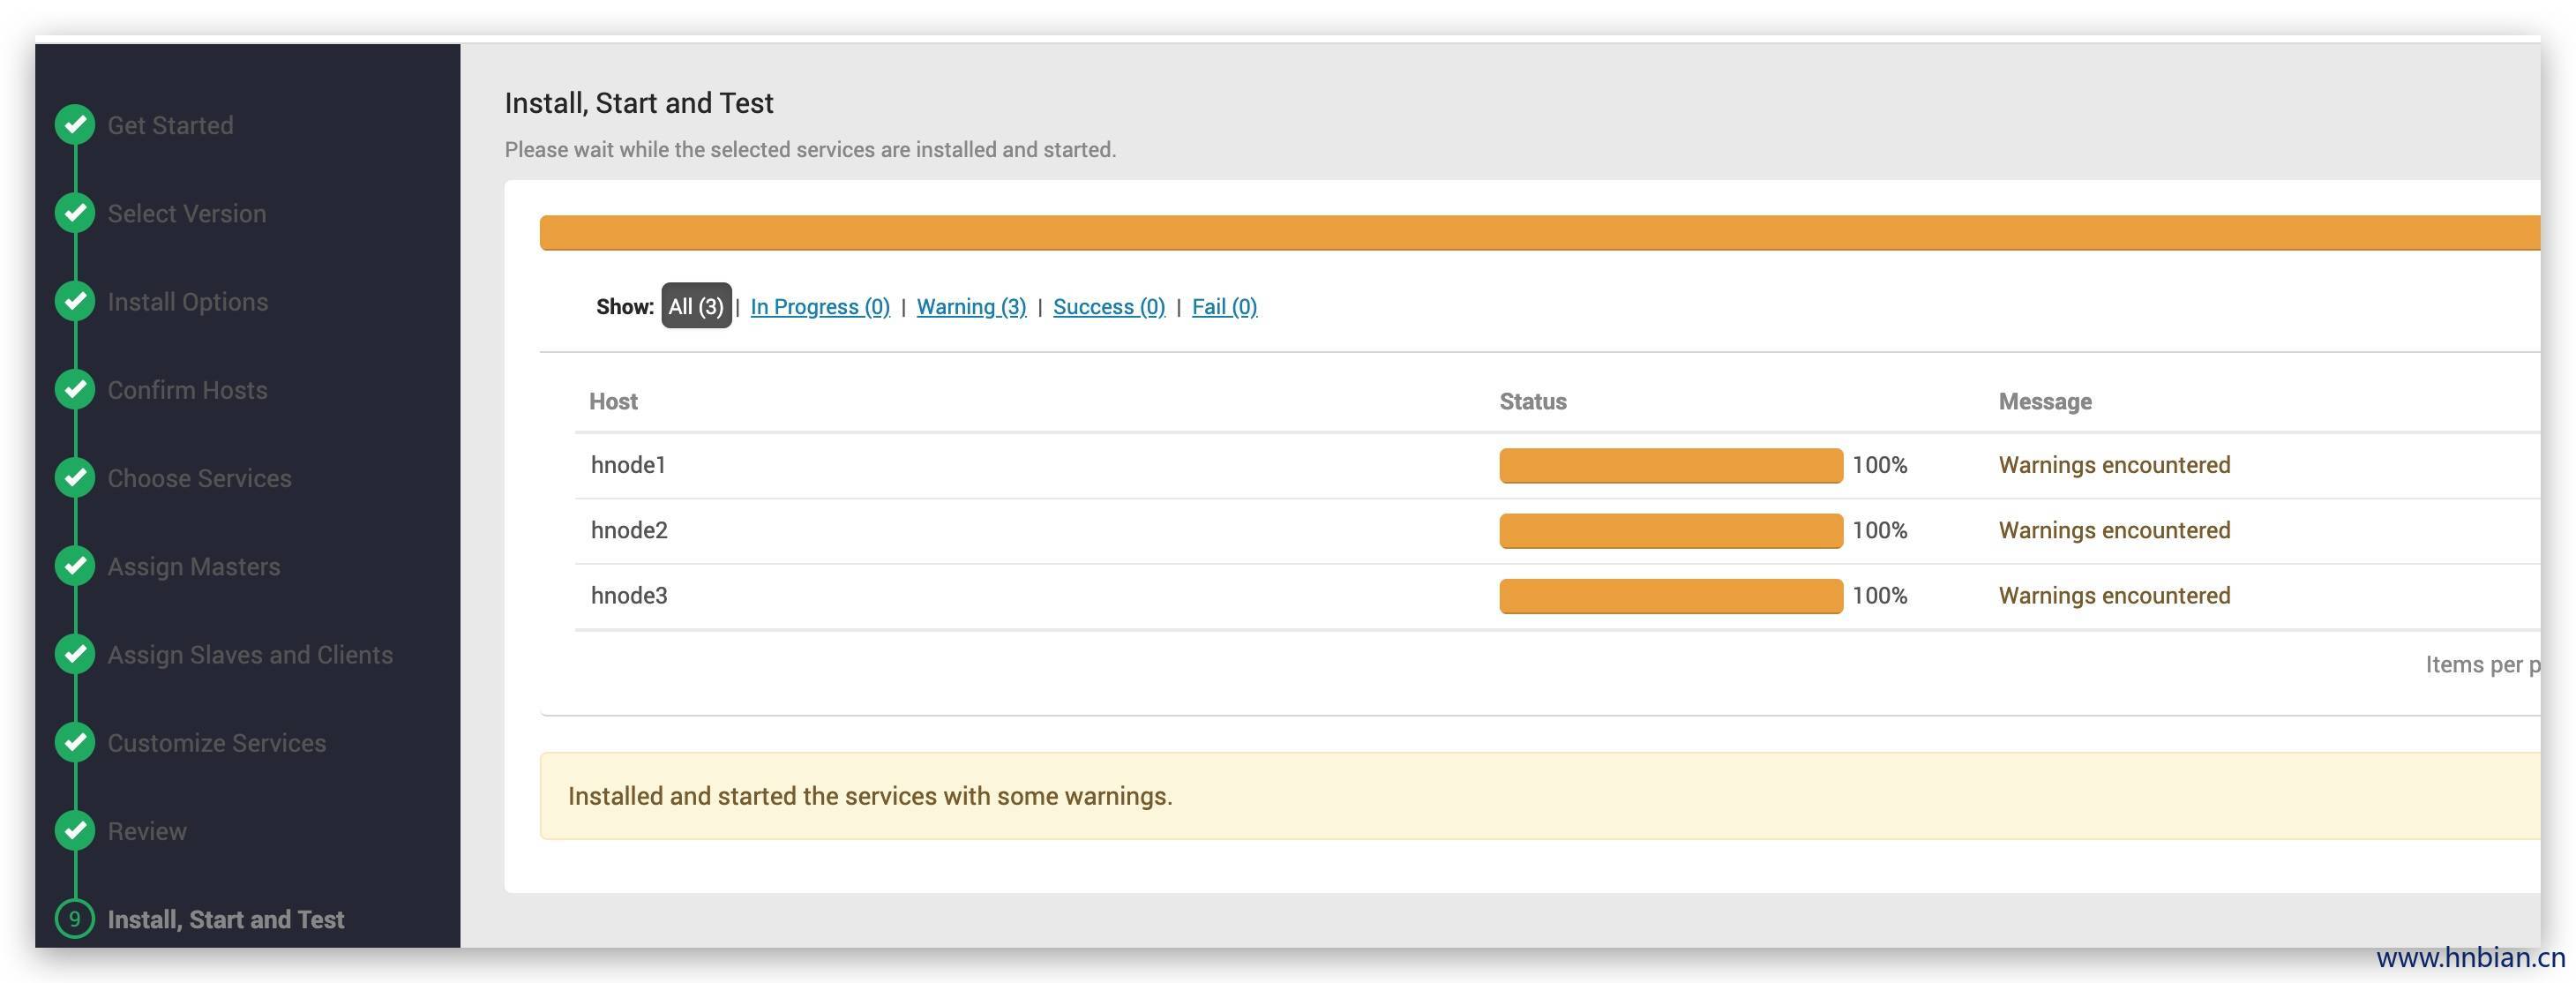
节点服务分配

分配Slaves 和 Clients

定制服务,配置用户密码

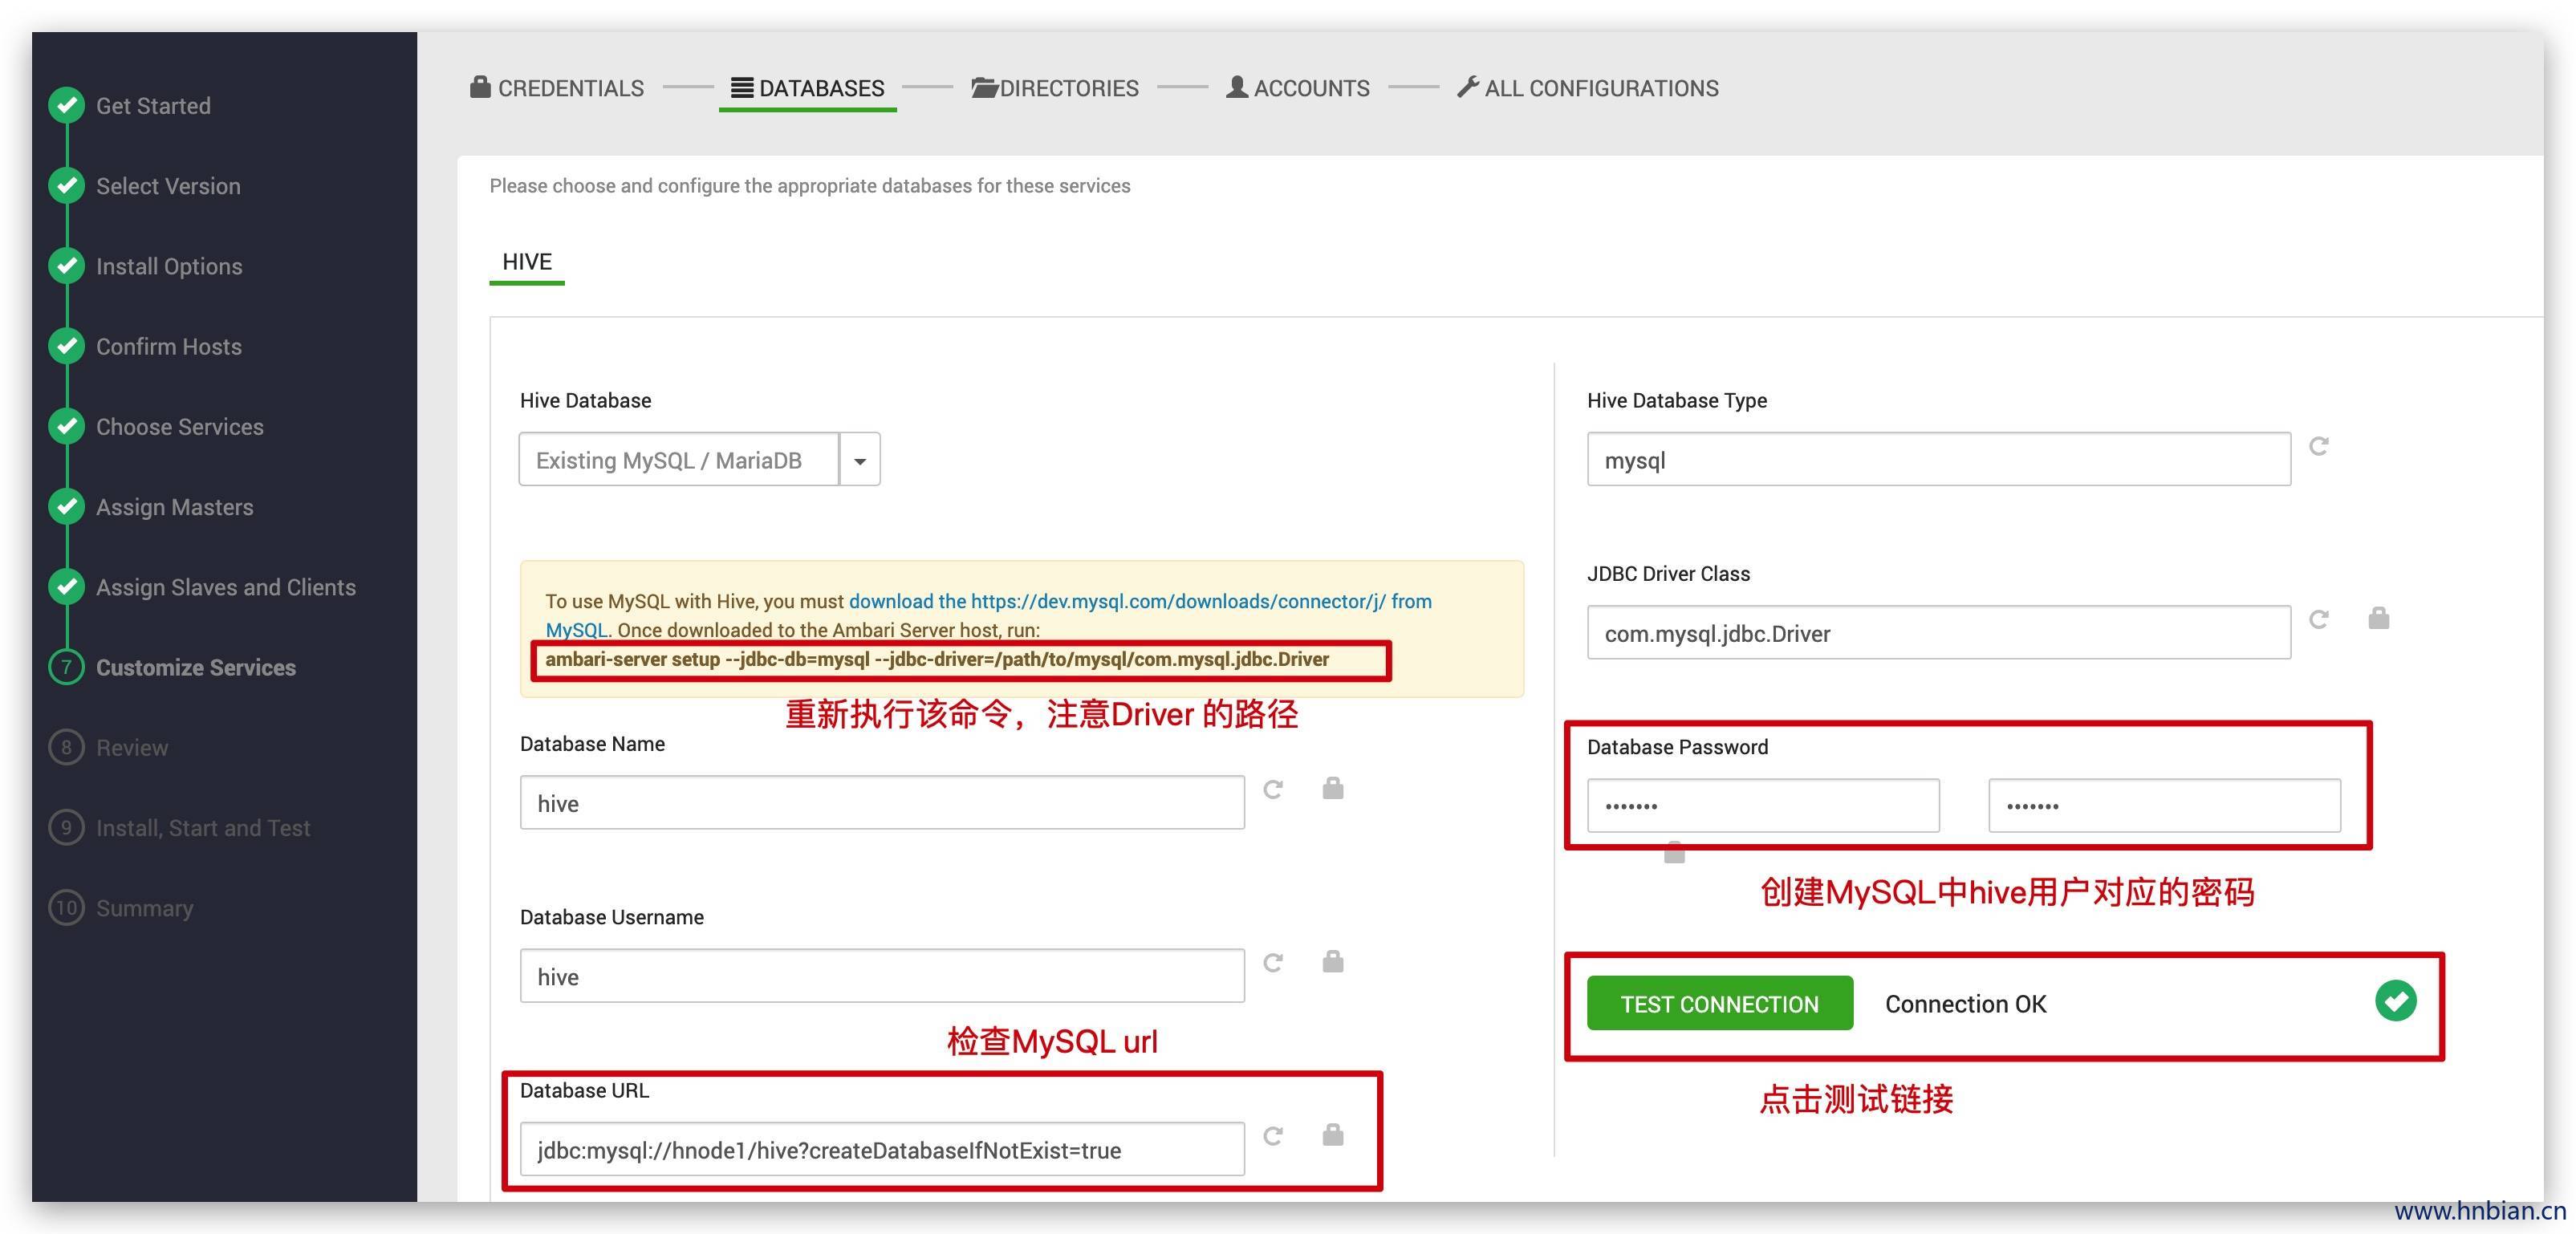
[root@hnode1 .ssh]# ambari-server setup --jdbc-db=mysql --jdbc-driver=/usr/share/java/mysql-connector-java.jar
Using python  /usr/bin/python
Setup ambari-server
Copying /usr/share/java/mysql-connector-java.jar to /var/lib/ambari-server/resources/mysql-connector-java.jar
If you are updating existing jdbc driver jar for mysql with mysql-connector-java.jar. Please remove the old driver jar, 
 from all hosts. Restarting services that need the driver, will automatically copy the new jar to the hosts.
JDBC driver was successfully initialized.
Ambari Server 'setup' completed successfully.

定制服务,相关路径配置

定制服务,用户配置

定制服务,资源配置

查看概况,部署服务

安装完成

有些警告可以在后面调整集群

安装完成,概览安装的服务

监视页面


文章作者: hnbian
版权声明: 本博客所有文章除特別声明外,均采用 CC BY 4.0 许可协议。转载请注明来源 hnbian !
评论
 上一篇
JVM系列(七)、不同的引用类型 JVM系列(七)、不同的引用类型
1. JVM中引用的介绍在java中,除了基本数据类型的变量外,其他所有的变量都是引用类型,指向堆中各种不同的对象。 在jvm中,除了我们常用的强引用外,还有软引用、弱引用、虚引用,这四种引用类型的生命周期与jvm的垃圾回收过程息息相关。
2020-03-15
下一篇 
Kafka总结(七)Kafka监控kafka-manager介绍 Kafka总结(七)Kafka监控kafka-manager介绍
1. kafka-manager介绍CMAK(Cluster Manager for Apache Kafka,以前称为Kafka Manager),是用于管理Apache Kafka群集的工具。在监控介绍阶段我们介绍一下kafka Man
2020-02-23
  目录