前面的 MCP Server 都没有设置身份认证。只要能够访问服务地址,客户端就可以列出 Tool 并执行调用。这种方式适合完全受控的本机实验,但不能直接用于多人环境或公网服务。
这一篇先不搭建完整登录系统,而是使用 RSA 密钥、JWT 和 Scope 给 FastMCP Server 增加两层保护:
- JWT 用来确认调用方身份是否合法。
- Scope 用来限制这个身份可以调用哪些 Tool。
最后再让本地 Qwen3 Agent 携带 Bearer Token 调用受保护的 MCP Tool。
1. 认证和授权
Authentication 通常翻译为身份认证,解决“你是谁”。Authorization 通常翻译为授权,解决“你可以做什么”。
如果请求没有 Token、Token 已经过期或签名错误,服务端无法确认身份,应该返回 401 Unauthorized。如果 Token 本身有效,但缺少 Tool 要求的 Scope,身份已经确认,只是权限不足,服务端仍然必须拒绝对应操作。
在普通 HTTP API 中,后一种情况通常使用 403 Forbidden。本例使用 FastMCP 3.3.1 的组件级授权:无权组件会从能力列表中隐藏,强行调用时客户端收到 ToolError: Unknown tool,而不是直接观察到 HTTP 403。通用状态码语义和当前框架的实际客户端表现不能混为一谈。
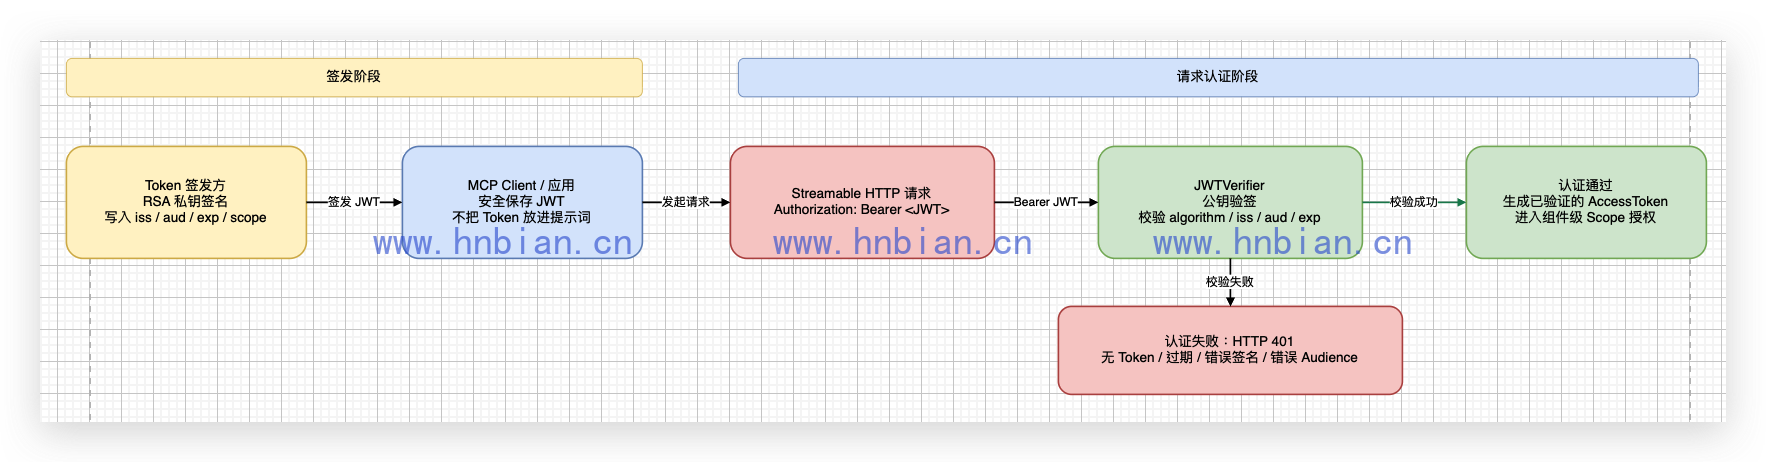
本例定义两个权限:
profile:read   读取用户资料
profile:write  修改用户备注
只读 Token 可以调用 get_user_profile,不能调用 update_user_note。
2. Bearer Token 与 JWT
Bearer 表示“持有者凭证”。客户端把 Token 放在 HTTP 请求头中:
Authorization: Bearer <token>服务端不关心 Token 是从命令行、桌面客户端还是 Agent 中取得,只验证凭证本身。
JWT 通常由三部分组成:
Header.Payload.Signature三部分分别保存:
- Header:签名算法和 Token 类型。
- Payload:身份、签发方、受众、过期时间和权限等声明。
- Signature:使用私钥生成的签名,用于发现内容是否被篡改。
示例需要的关键 Claim 如下:
| Claim | 含义 |
|---|---|
| sub | Token 代表的主体 |
| iss | Token 签发方 |
| aud | Token 允许访问的目标服务 |
| exp | Token 过期时间 |
| scope | 主体拥有的权限集合 |
JWT Payload 只是 Base64URL 编码,不是加密。不要把密码、私钥或其他敏感信息放进 Payload。
3. RSA 加密
本例使用 RS256:签发方保留 RSA 私钥,MCP Server 只保存公钥。
这样有两个好处:
- MCP Server 可以验证签名,但不能伪造新 Token。
- 多个 Resource Server 可以共享公钥,不需要同时持有签发私钥。
私钥、测试 Token 和 OAuth 缓存都保存在 .secrets/,该目录已经加入 .gitignore。生成脚本还会把目录权限设为 0700,把私钥和 Token 文件权限设为 0600。代码和文章中不会输出完整凭据。
4. 项目结构
代码位于:
mcp/p06_fastmcp_jwt_auth/
├── 01_generate_test_credentials.py
├── 02_test_auth_failures.py
├── 03_test_scoped_tools.py
├── 04_agent_with_bearer_token.py
├── server.py
├── requirements.in
├── requirements-lock.txt
└── README.md
创建独立 Python 3.12 环境:
cd /path/to/llm-learning

python3.12 -m venv --prompt llm_learning_mcp_auth .venv_mcp_auth
source .venv_mcp_auth/bin/activate

python -m pip install -r mcp/p06_fastmcp_jwt_auth/requirements-lock.txt
python -m pip check
依赖由 requirements-lock.txt 统一管理。检查结果:
No broken requirements found.5. 生成密钥
01_generate_test_credentials.py 生成一套 RSA 密钥,并创建五个测试 Token:
- read:只有 profile:read。
- write:同时具有读取和写入权限。
- expired:已经过期。
- wrong_audience:Audience 指向其他服务。
- wrong_signature:由另一套私钥签名。
核心代码如下:
"""生成 MCP 系列 6 使用的 RSA 密钥和短期 JWT,只用于本地认证测试。"""

import json
from pathlib import Path

from fastmcp.server.auth.providers.jwt import RSAKeyPair


BASE_DIR = Path(__file__).resolve().parent
SECRETS_DIR = BASE_DIR / ".secrets"
ISSUER = "https://auth.local.example"
AUDIENCE = "http://127.0.0.1:18120/mcp"

def main() -> None:
    """创建持久化测试凭据,避免 Server 每次启动都更换密钥。"""

    # 第 1 步:创建只有当前用户可以访问的凭据目录。
    SECRETS_DIR.mkdir(parents=True, exist_ok=True, mode=0o700)
    # 目录可能已经存在,显式收紧权限,避免其他本机用户读取测试凭据。
    SECRETS_DIR.chmod(0o700)

    # 第 2 步:正常密钥负责签发有效和异常测试 Token。
    key_pair = RSAKeyPair.generate()
    private_key_file = SECRETS_DIR / "private.pem"
    private_key_file.write_text(
        key_pair.private_key.get_secret_value(),
        encoding="utf-8",
    )
    private_key_file.chmod(0o600)
    (SECRETS_DIR / "public.pem").write_text(key_pair.public_key, encoding="utf-8")

    # 第 3 步:另一套密钥只用于生成“签名不匹配”的 Token。
    other_key_pair = RSAKeyPair.generate()

    # 第 4 步:生成五种 Token,用于后续成功和失败案例。
    tokens = {
        "read": key_pair.create_token(
            subject="reader-001",
            issuer=ISSUER,
            audience=AUDIENCE,
            scopes=["profile:read"],
            expires_in_seconds=3600,
        ),
        "write": key_pair.create_token(
            subject="editor-001",
            issuer=ISSUER,
            audience=AUDIENCE,
            scopes=["profile:read", "profile:write"],
            expires_in_seconds=3600,
        ),
        "expired": key_pair.create_token(
            subject="expired-001",
            issuer=ISSUER,
            audience=AUDIENCE,
            scopes=["profile:read"],
            expires_in_seconds=-60,
        ),
        "wrong_audience": key_pair.create_token(
            subject="reader-001",
            issuer=ISSUER,
            audience="http://127.0.0.1:19999/mcp",
            scopes=["profile:read"],
            expires_in_seconds=3600,
        ),
        "wrong_signature": other_key_pair.create_token(
            subject="reader-001",
            issuer=ISSUER,
            audience=AUDIENCE,
            scopes=["profile:read"],
            expires_in_seconds=3600,
        ),
    }
    # 第 5 步:保存 Token,但不在终端输出具体内容。
    tokens_file = SECRETS_DIR / "tokens.json"
    tokens_file.write_text(
        json.dumps(tokens, ensure_ascii=False, indent=2),
        encoding="utf-8",
    )
    tokens_file.chmod(0o600)

    print("RSA 密钥已保存到 .secrets,未输出私钥。")
    print("测试 Token 已生成:read、write、expired、wrong_audience、wrong_signature。")


if __name__ == "__main__":
    main()
运行:
/Users/bianhn/Documents/git/llm-learning/.venv_mcp_auth/bin/python \
  /Users/bianhn/Documents/git/llm-learning/mcp/p06_fastmcp_jwt_auth/01_generate_test_credentials.py
输出:
RSA 密钥已保存到 .secrets,未输出私钥。
测试 Token 已生成:read、write、expired、wrong_audience、wrong_signature。
示例不会把完整 Token 打到终端。日志系统、聊天记录和截图同样不应该保存完整 Token。
6. 给 MCP Server 加密
server.py 只读取公钥,并验证 issuer、audience、签名算法和过期时间。JWTVerifier 的定位和配置方式可以参考 FastMCP Token Verification。
"""启动使用 JWTVerifier 和 Scope 保护的 FastMCP Streamable HTTP 服务。"""

from pathlib import Path

from fastmcp import FastMCP
from fastmcp.server.auth import require_scopes
from fastmcp.server.auth.providers.jwt import JWTVerifier
from fastmcp.server.dependencies import get_access_token


BASE_DIR = Path(__file__).resolve().parent
PUBLIC_KEY_FILE = BASE_DIR / ".secrets" / "public.pem"
ISSUER = "https://auth.local.example"
MCP_URL = "http://127.0.0.1:18120/mcp"

# 第 1 步:确认公钥存在。Server 不需要也不应该读取私钥。
if not PUBLIC_KEY_FILE.exists():
    raise RuntimeError("请先运行 01_generate_test_credentials.py 生成测试密钥。")

# 第 2 步:创建 JWT 验证器。
# MCP Server 只持有公钥,无法用它签发新的 JWT。
verifier = JWTVerifier(
    public_key=PUBLIC_KEY_FILE.read_text(encoding="utf-8"),
    issuer=ISSUER,
    audience=MCP_URL,
    algorithm="RS256",
    base_url="http://127.0.0.1:18120",
)

# 第 3 步:把验证器交给 MCP Server。
mcp = FastMCP(
    name="jwt-profile-mcp",
    instructions="提供带 Scope 权限控制的本地用户资料工具。",
    auth=verifier,
)

USER_PROFILES = {
    "user-001": {"name": "小明", "city": "杭州", "note": "喜欢周末去西湖散步"},
    "user-002": {"name": "小红", "city": "上海", "note": "喜欢阅读"},
}


@mcp.tool(auth=require_scopes("profile:read"))
def get_user_profile(user_id: str) -> dict:
    """读取固定用户资料,需要 profile:read 权限。"""

    # get_access_token() 返回已经通过签名、Issuer 和 Audience 校验的 Token。
    access_token = get_access_token()
    profile = USER_PROFILES.get(user_id)
    if profile is None:
        return {"error": "用户不存在"}
    return {
        "requested_by": access_token.claims.get("sub"),
        "profile": profile,
    }


@mcp.tool(auth=require_scopes("profile:write"))
def update_user_note(user_id: str, note: str) -> dict:
    """更新固定用户的备注,需要 profile:write 权限。"""

    # 装饰器会先检查 profile:write,再进入函数体。
    access_token = get_access_token()
    profile = USER_PROFILES.get(user_id)
    if profile is None:
        return {"error": "用户不存在"}
    profile["note"] = note
    return {
        "updated_by": access_token.claims.get("sub"),
        "user_id": user_id,
        "note": note,
    }


# 第 4 步:启动本地 Streamable HTTP MCP Server。
if __name__ == "__main__":
    mcp.run(
        transport="http",
        host="127.0.0.1",
        port=18120,
        path="/mcp",
        show_banner=False,
    )
生成密钥只会创建公钥、私钥和测试 Token,并不会启动 MCP Server。需要在一个单独的终端中启动 server.py:
/Users/bianhn/Documents/git/llm-learning/.venv_mcp_auth/bin/python \
  /Users/bianhn/Documents/git/llm-learning/mcp/p06_fastmcp_jwt_auth/server.py
服务地址为:
http://127.0.0.1:18120/mcp看到 Uvicorn running on http://127.0.0.1:18120 后,说明 MCP Server 已经启动。这个终端必须保持运行,再去启动 LangGraph。这里绑定 127.0.0.1,不会直接监听局域网或公网网卡。
可以在另一个终端中检查服务:
curl -i http://127.0.0.1:18120/mcp未携带 Token 时返回 401 Unauthorized 是正常现象,也证明服务已经开始监听。如果出现 Couldn’t connect to server,说明 server.py 尚未启动或已经退出。
7. require_scopes 如何保护 Tool
JWTVerifier 先完成身份验证,require_scopes() 再对单个组件执行授权判断。
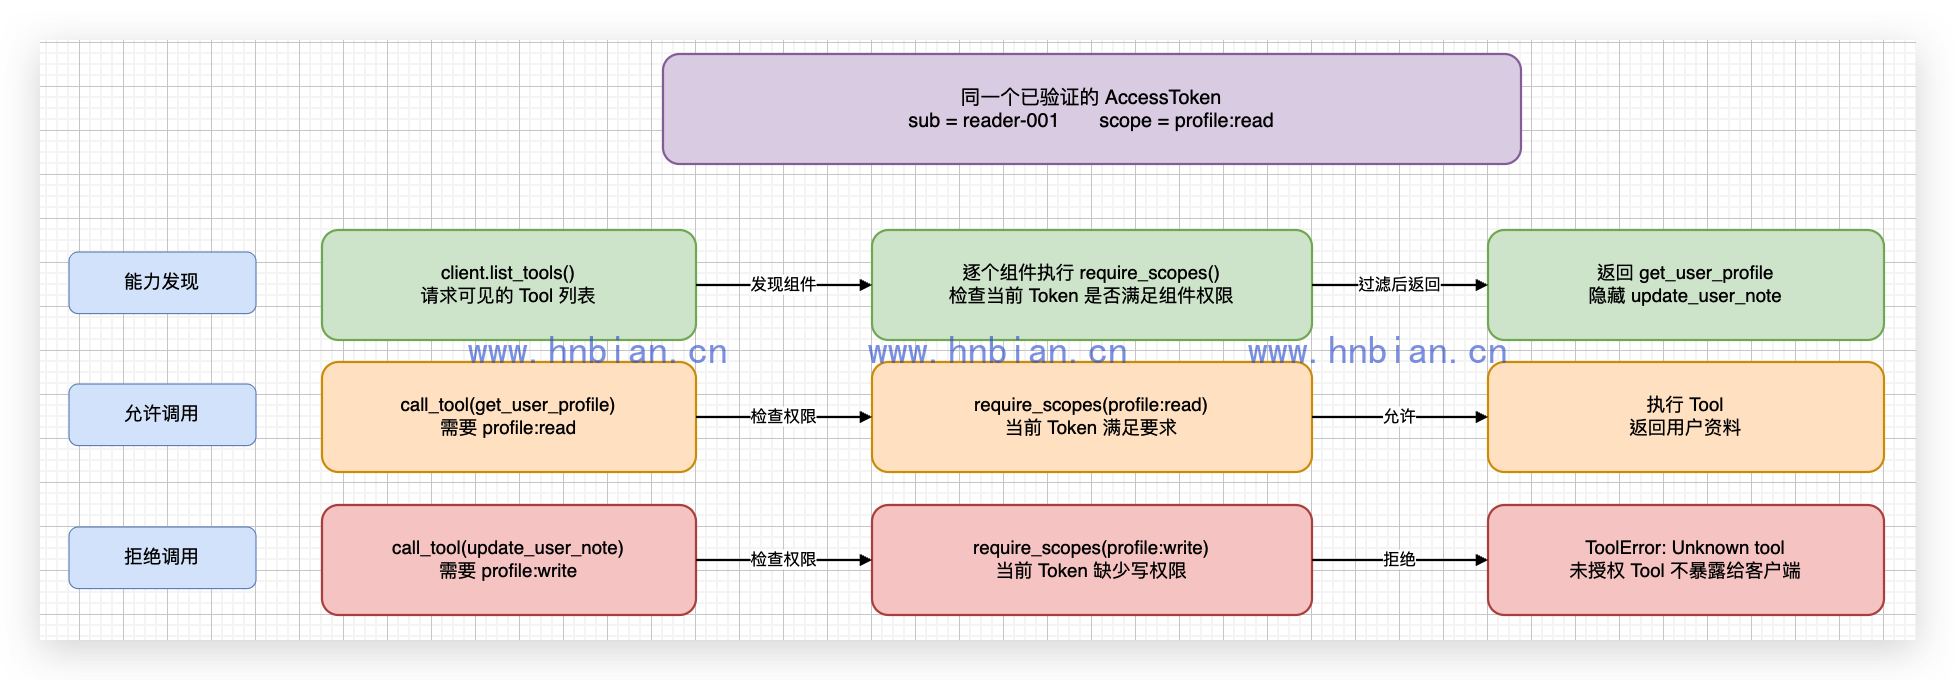
get_access_token() 返回已经验证的访问令牌对象。Tool 可以读取其中的 sub 和 Scope,但不要再次自行解析请求头,更不能信任模型传入的用户 ID 代替已验证身份。
FastMCP 的组件授权同时影响能力发现和调用:只读 Token 执行 list_tools() 时只能看到 get_user_profile;即使客户端绕过列表直接请求 update_user_note,收到的也是 ToolError: Unknown tool。这种隐藏方式可以减少未授权能力的暴露。
Scope 只解决“能不能执行某类操作”,不会自动解决“能操作哪一条数据”。示例中的 profile:read 允许读取资料,但 Tool 仍需在业务代码中判断 sub 是否可以访问传入的 user_id。生产系统不能只配置 Scope 就省略对象级授权。
8. 验证四种无效 Token
02_test_auth_failures.py 先发送无 Token 请求,再使用三种无效 JWT 建立 MCP 连接。
"""验证缺少 Token、过期、错误 Audience 和错误签名都会被 MCP Server 拒绝。"""

import asyncio
import json
from pathlib import Path

import httpx
from fastmcp import Client


BASE_DIR = Path(__file__).resolve().parent
MCP_URL = "http://127.0.0.1:18120/mcp"


async def try_connect(name: str, token: str) -> None:
    """使用指定 Token 连接服务,并打印稳定的失败类型。"""

    try:
        async with Client(MCP_URL, auth=token, timeout=10) as client:
            await client.list_tools()
        print(f"{name}: unexpected success")
    except Exception as exc:
        # 不输出异常详情,避免异常文本意外包含完整 Token。
        print(f"{name}: rejected ({type(exc).__name__})")


async def main() -> None:
    """依次验证四种未授权请求。"""

    # 第 1 步:读取上一个脚本生成的测试 Token。
    tokens = json.loads(
        (BASE_DIR / ".secrets" / "tokens.json").read_text(encoding="utf-8")
    )

    # 第 2 步:不带 Token 访问,确认服务返回 Bearer Challenge。
    with httpx.Client(timeout=10) as http_client:
        response = http_client.get(MCP_URL)
        print("no_token_status:", response.status_code)
        print("www_authenticate:", response.headers.get("www-authenticate", ""))

    # 第 3 步:分别验证过期、Audience 错误和签名错误。
    await try_connect("expired", tokens["expired"])
    await try_connect("wrong_audience", tokens["wrong_audience"])
    await try_connect("wrong_signature", tokens["wrong_signature"])


if __name__ == "__main__":
    asyncio.run(main())
运行:
python 02_test_auth_failures.py 运行结果:
no_token_status: 401
expired: rejected (HTTPStatusError)
wrong_audience: rejected (HTTPStatusError)
wrong_signature: rejected (HTTPStatusError)
WWW-Authenticate 中还包含 Protected Resource Metadata 地址,OAuth Client 可以利用它发现授权服务器。完整发现流程放在下一篇。
9. 验证只读与读写 Scope
03_test_scoped_tools.py 分别连接只读 Token 和读写 Token。
"""验证 profile:read 与 profile:write 对 MCP Tool 的访问范围。"""

import asyncio
import json
from pathlib import Path

from fastmcp import Client


BASE_DIR = Path(__file__).resolve().parent
MCP_URL = "http://127.0.0.1:18120/mcp"


async def main() -> None:
    """分别使用只读 Token 和读写 Token 调用工具。"""

    # 第 1 步:读取只读 Token 和读写 Token。
    tokens = json.loads(
        (BASE_DIR / ".secrets" / "tokens.json").read_text(encoding="utf-8")
    )

    # 第 2 步:只读 Token 可以读取,但写入会被拒绝。
    async with Client(MCP_URL, auth=tokens["read"], timeout=10) as client:
        tools = await client.list_tools()
        print("read_token_tools:", [tool.name for tool in tools])
        result = await client.call_tool("get_user_profile", {"user_id": "user-001"})
        print("read_result:", result.content[0].text)
        try:
            await client.call_tool(
                "update_user_note",
                {"user_id": "user-001", "note": "只读 Token 不应更新"},
            )
            print("read_token_write: unexpected success")
        except Exception as exc:
            print("read_token_write: rejected", type(exc).__name__)

    # 第 3 步:读写 Token 包含 profile:write,可以更新备注。
    async with Client(MCP_URL, auth=tokens["write"], timeout=10) as client:
        tools = await client.list_tools()
        print("write_token_tools:", [tool.name for tool in tools])
        result = await client.call_tool(
            "update_user_note",
            {"user_id": "user-001", "note": "喜欢周末去西湖散步"},
        )
        print("write_result:", result.content[0].text)


if __name__ == "__main__":
    asyncio.run(main())
运行:
python mcp/p06_fastmcp_jwt_auth/03_test_scoped_tools.py只读 Token 的真实结果:
read_token_tools: ['get_user_profile']
read_result: {"requested_by":"reader-001","profile":{"name":"小明","city":"杭州","note":"喜欢周末去西湖散步"}}
read_token_write: rejected ToolError
读写 Token 的真实结果:
write_token_tools: ['get_user_profile', 'update_user_note']
write_result: {"updated_by":"editor-001","user_id":"user-001","note":"喜欢周末去西湖散步"}
FastMCP 不只是“调用时才报错”,还会根据组件授权结果过滤能力列表。因此只读客户端在 list_tools() 中看不到写工具。
10. 让 Agent 携带 Token
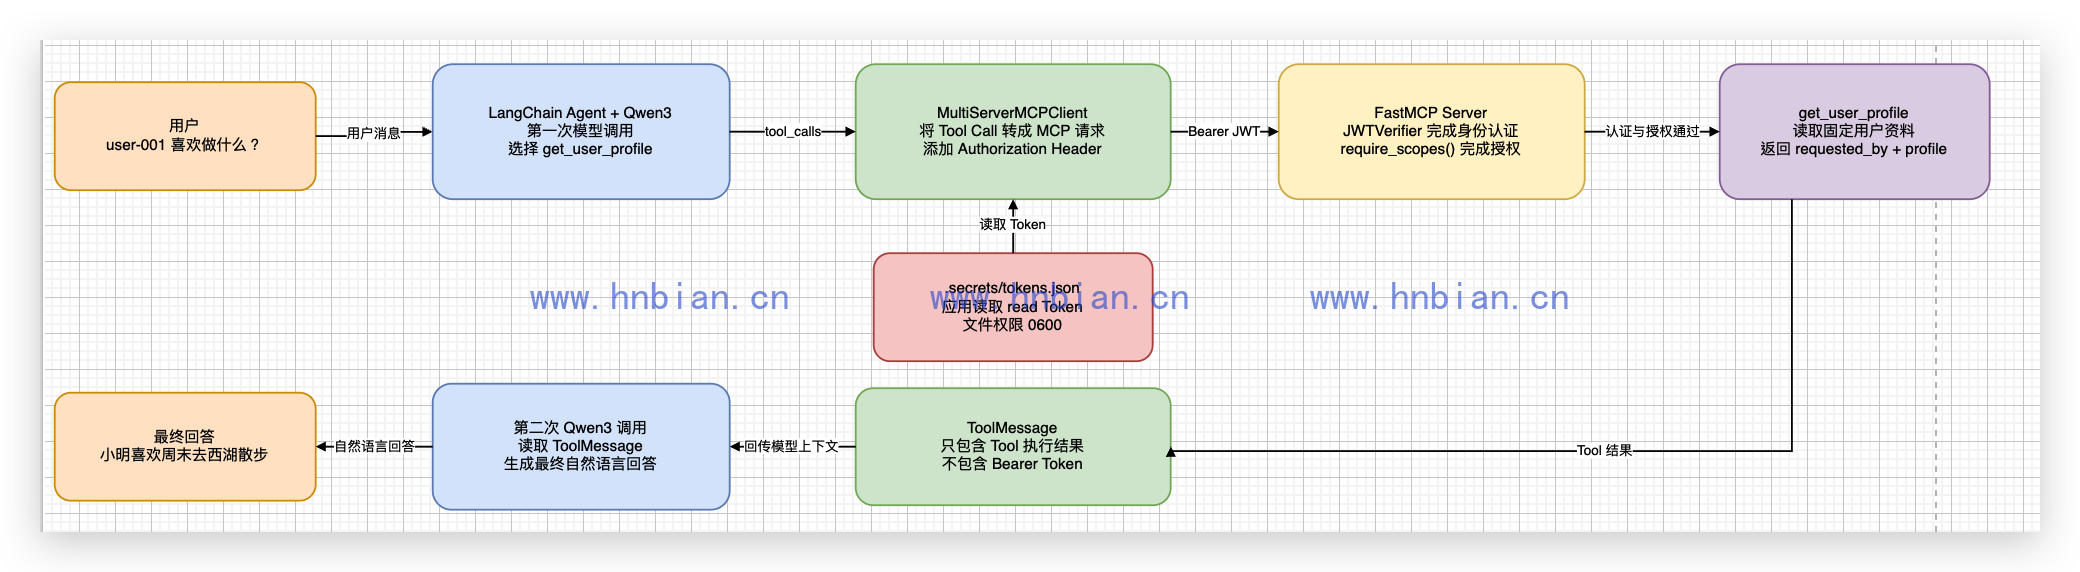
应用从本地凭据文件读取 Token,并把它配置到 MultiServerMCPClient 的 HTTP Header 中。Qwen3 只接收经过授权后可见的 Tool Schema 和 Tool 执行结果,不会收到私钥、原始 Token 或 Authorization 请求头。
启动本地 Qwen3:
source .venv_tool_server/bin/activate

"$VIRTUAL_ENV/bin/python" -m mlx_lm server \
  --model Qwen3-14B-AWQ-4bit-MLX \
  --host 127.0.0.1 \
  --port 18080 \
  --prompt-cache-size 0 \
  --chat-template-args '{"enable_thinking": false}'
接下来需要保持三个进程同时运行:
Qwen3:          http://127.0.0.1:18080
MCP Server:     http://127.0.0.1:18120/mcp
LangGraph:      http://127.0.0.1:2027
生成密钥之后,先在第二个终端启动 MCP Server:
/Users/bianhn/Documents/git/llm-learning/.venv_mcp_auth/bin/python \
  /Users/bianhn/Documents/git/llm-learning/mcp/p06_fastmcp_jwt_auth/server.py
保持 MCP Server 终端运行,然后在第三个终端启动 LangGraph:
cd /Users/bianhn/Documents/git/llm-learning/mcp/p06_fastmcp_jwt_auth

/Users/bianhn/Documents/git/llm-learning/.venv_mcp_auth/bin/langgraph dev \
  --host 127.0.0.1 \
  --port 2027 \
  --studio-url https://apac.smith.langchain.com
04_agent_with_bearer_token.py 把 Token 放进 MCP Server 的请求头配置。Token 不会出现在提示词中,也不会交给 Qwen3。
"""让本地 Qwen3 Agent 携带 Bearer Token 调用受保护的 MCP Tool。"""

import asyncio
import json
from pathlib import Path

from langchain.agents import create_agent
from langchain_mcp_adapters.client import MultiServerMCPClient
from langchain_openai import ChatOpenAI

BASE_DIR = Path(__file__).resolve().parent

def print_agent_result(result: dict) -> None:
    """打印受保护工具的调用过程和 Agent 最终回答。"""

    for message in result["messages"]:
        if getattr(message, "tool_calls", None):
            call = message.tool_calls[0]
            print("Tool call:", call["name"], call["args"])

        if message.type == "tool":
            if isinstance(message.content, list):
                tool_result = message.content[0]["text"]
            else:
                tool_result = message.content
            print("Tool result:", tool_result)

    print("Qwen3 answer:", result["messages"][-1].content)


async def main() -> None:
    """获取认证后的 MCP Tool,并交给本地 Qwen3 使用。"""

    # 第 1 步:读取只读 Token。
    tokens = json.loads(
        (BASE_DIR / ".secrets" / "tokens.json").read_text(encoding="utf-8")
    )
    # 第 2 步:把 Token 放进 Authorization 请求头,再加载 MCP 工具。
    client = MultiServerMCPClient(
        {
            "profiles": {
                "transport": "http",
                "url": "http://127.0.0.1:18120/mcp",
                "headers": {"Authorization": f"Bearer {tokens['read']}"},
            }
        }
    )
    tools = await client.get_tools()
    print("Authenticated MCP tools:", [tool.name for tool in tools])

    # 第 3 步:把认证后取得的工具交给 Agent。
    model = ChatOpenAI(
        model="Qwen3-14B-AWQ-4bit-MLX",
        base_url="http://127.0.0.1:18080/v1",
        api_key="not-needed",
        temperature=0,
        max_tokens=160,
    )
    agent = create_agent(
        model=model,
        tools=tools,
        system_prompt="调用 MCP 用户资料工具回答问题。",
    )
    result = await agent.ainvoke(
        {"messages": [{"role": "user", "content": "user-001 喜欢做什么?"}]}
    )

    # 第 4 步:展示认证工具的实际调用结果。
    print_agent_result(result)


if __name__ == "__main__":
asyncio.run(main())- server.py
"""启动使用 JWTVerifier 和 Scope 保护的 FastMCP Streamable HTTP 服务。"""

from pathlib import Path

from fastmcp import FastMCP
from fastmcp.server.auth import require_scopes
from fastmcp.server.auth.providers.jwt import JWTVerifier
from fastmcp.server.dependencies import get_access_token

BASE_DIR = Path(__file__).resolve().parent
PUBLIC_KEY_FILE = BASE_DIR / ".secrets" / "public.pem"
ISSUER = "https://auth.local.example"
MCP_URL = "http://127.0.0.1:18120/mcp"

# 第 1 步:确认公钥存在。Server 不需要也不应该读取私钥。
if not PUBLIC_KEY_FILE.exists():
    raise RuntimeError("请先运行 01_generate_test_credentials.py 生成测试密钥。")

# 第 2 步:创建 JWT 验证器。
# MCP Server 只持有公钥,无法用它签发新的 JWT。
verifier = JWTVerifier(
    public_key=PUBLIC_KEY_FILE.read_text(encoding="utf-8"),
    issuer=ISSUER,
    audience=MCP_URL,
    algorithm="RS256",
    base_url="http://127.0.0.1:18120",
)

# 第 3 步:把验证器交给 MCP Server。
mcp = FastMCP(
    name="jwt-profile-mcp",
    instructions="提供带 Scope 权限控制的本地用户资料工具。",
    auth=verifier,
)

USER_PROFILES = {
    "user-001": {"name": "小明", "city": "杭州", "note": "喜欢周末去西湖散步"},
    "user-002": {"name": "小红", "city": "上海", "note": "喜欢阅读"},
}


@mcp.tool(auth=require_scopes("profile:read"))
def get_user_profile(user_id: str) -> dict:
    """读取固定用户资料,需要 profile:read 权限。"""

    # get_access_token() 返回已经通过签名、Issuer 和 Audience 校验的 Token。
    access_token = get_access_token()
    profile = USER_PROFILES.get(user_id)
    if profile is None:
        return {"error": "用户不存在"}
    return {
        "requested_by": access_token.claims.get("sub"),
        "profile": profile,
    }


@mcp.tool(auth=require_scopes("profile:write"))
def update_user_note(user_id: str, note: str) -> dict:
    """更新固定用户的备注,需要 profile:write 权限。"""

    # 装饰器会先检查 profile:write,再进入函数体。
    access_token = get_access_token()
    profile = USER_PROFILES.get(user_id)
    if profile is None:
        return {"error": "用户不存在"}
    profile["note"] = note
    return {
        "updated_by": access_token.claims.get("sub"),
        "user_id": user_id,
        "note": note,
    }


# 第 4 步:启动本地 Streamable HTTP MCP Server。
if __name__ == "__main__":
    mcp.run(
        transport="http",
        host="127.0.0.1",
        port=18120,
        path="/mcp",
        show_banner=False,
    )
结果:
Authenticated MCP tools: ['get_user_profile']
Tool call: get_user_profile {'user_id': 'user-001'}
Tool result: {"requested_by":"reader-001","profile":{"name":"小明","city":"杭州","note":"喜欢周末去西湖散步"}}
Qwen3 answer: 小明喜欢在周末去西湖散步。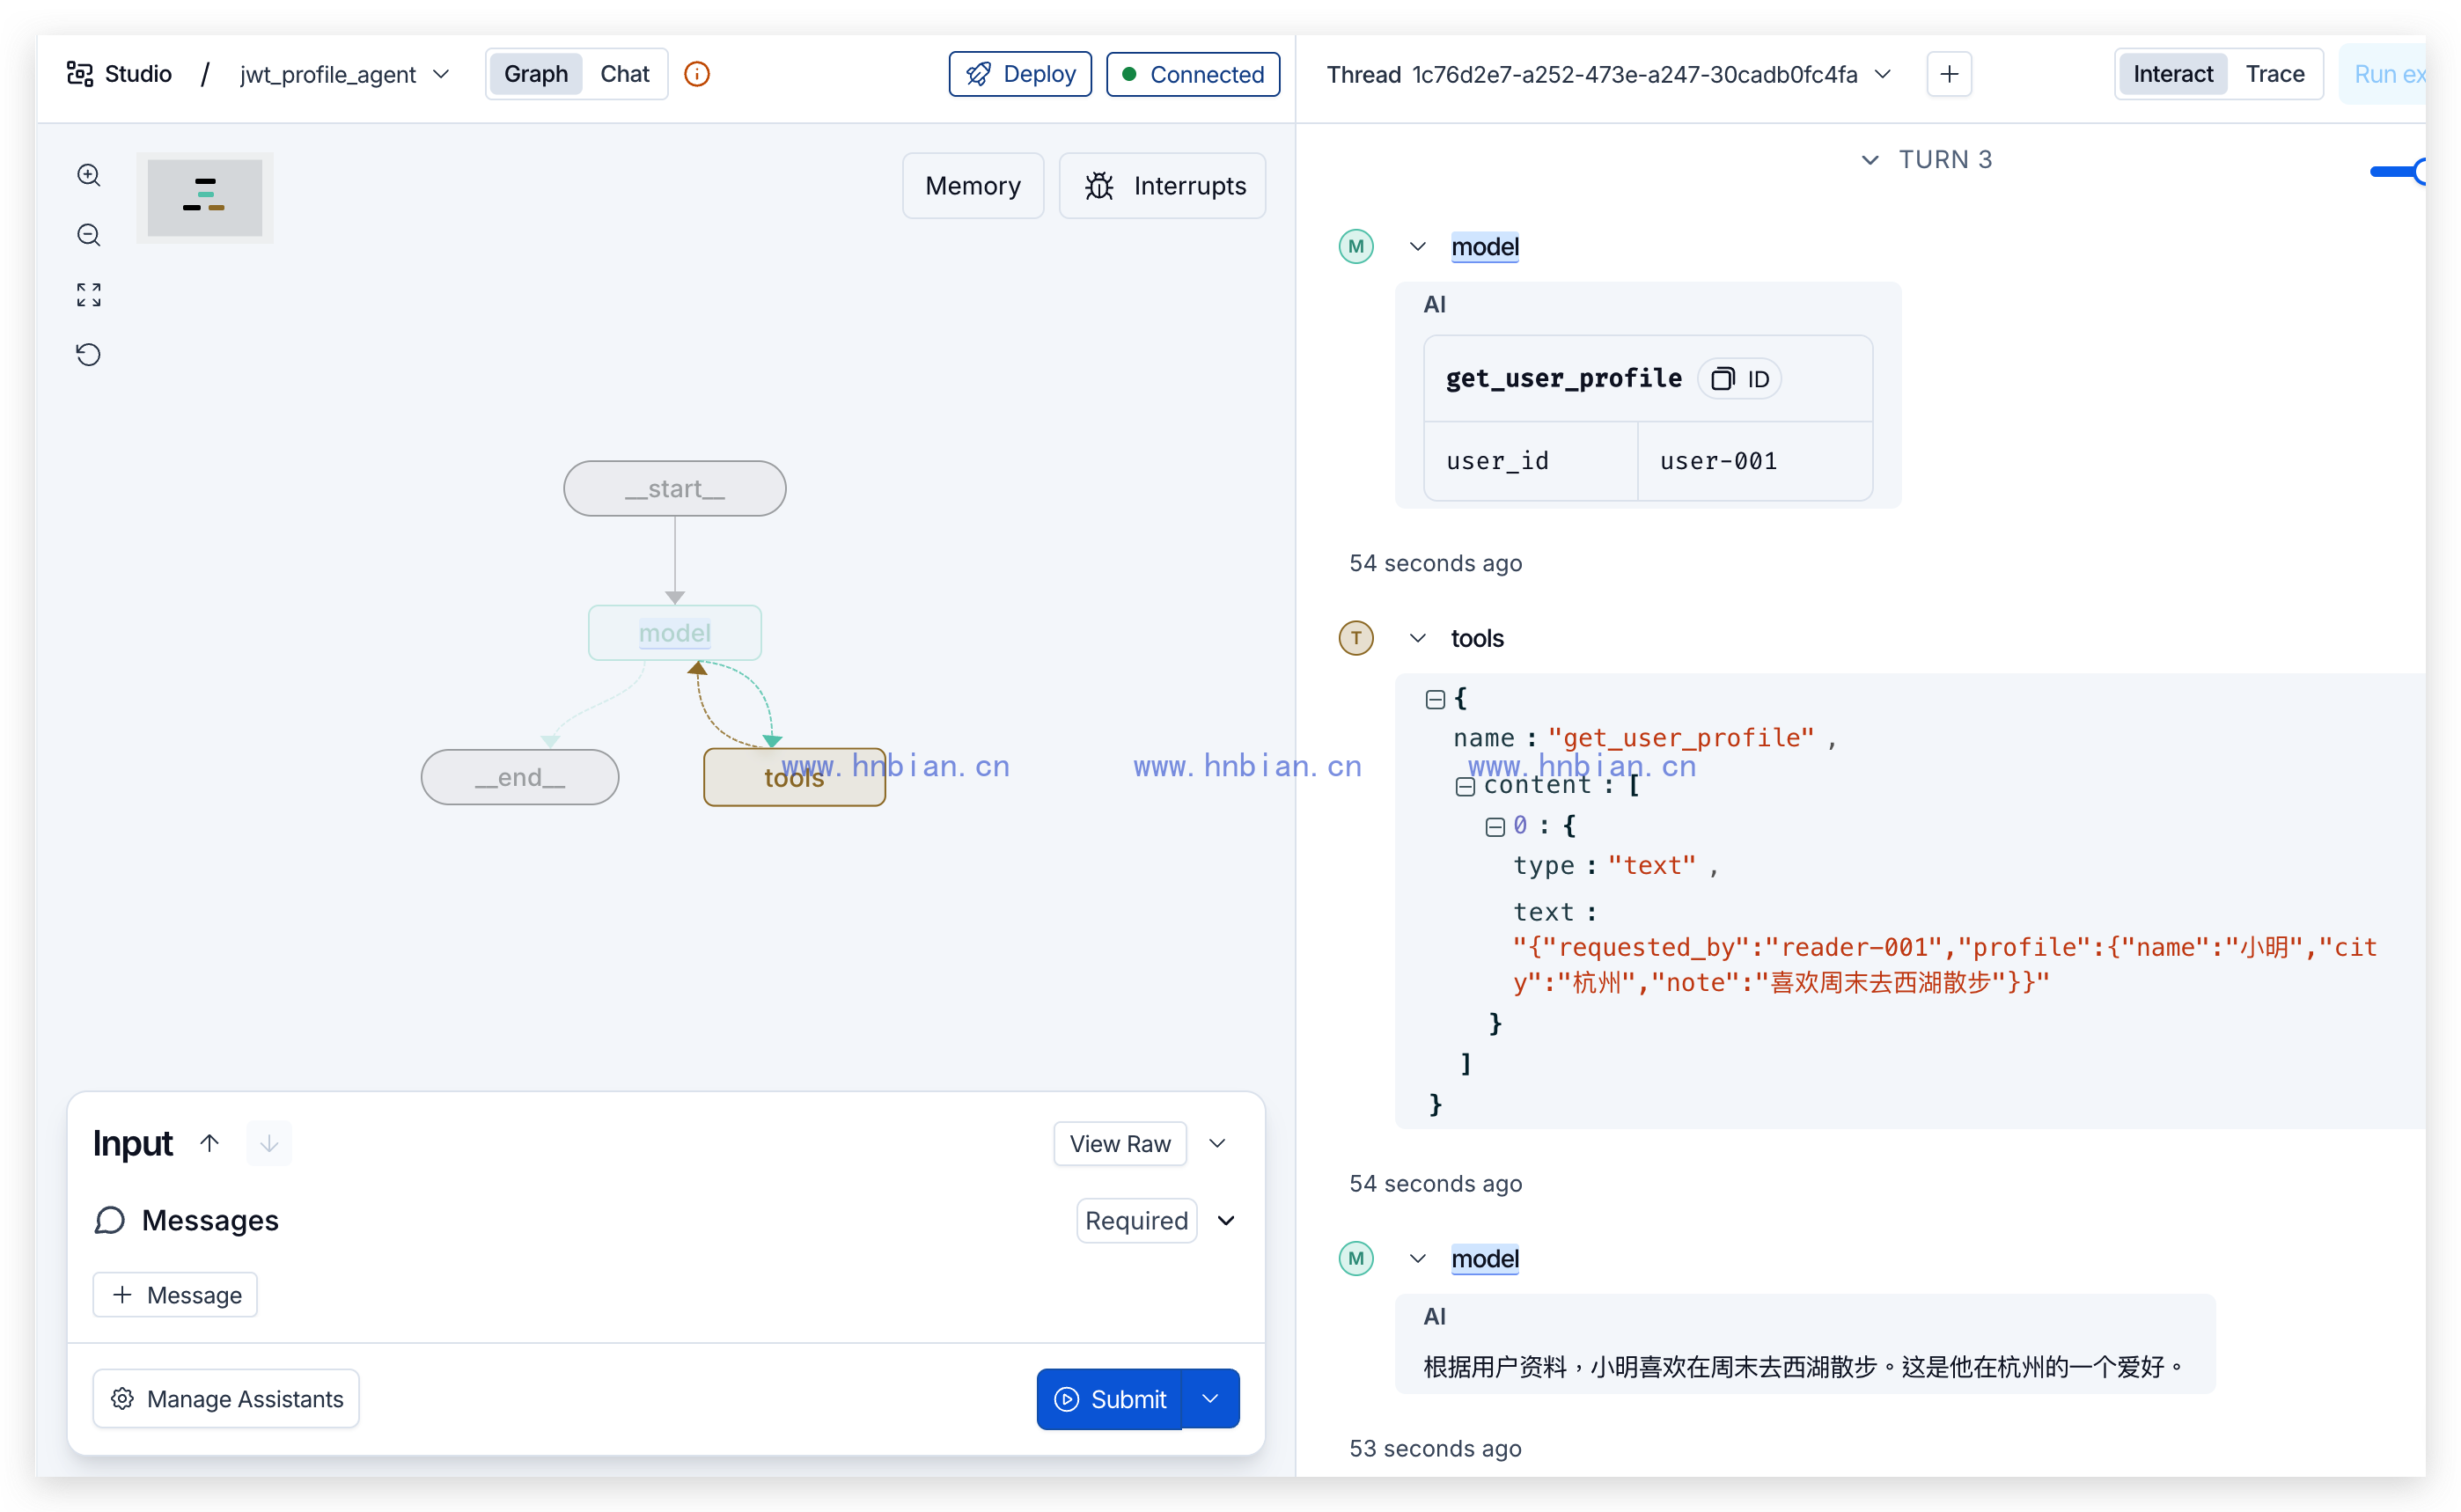
模型只负责选择 Tool 和整理答案。Bearer Token 的保存、发送和验证都在应用层完成。