ClickHouse 12.副本与分片 2.分片


1. 数据分片

  • clickhouse 中每个服务器节点都可以被称为一个 shard(分片)。 假设有 N 台服务器,每个服务器上都有一张数据表 A,且每个服务器上的 数据表 A 的数据不重复,那么就可以说数据表 A 拥有 N 的分片。

  • 对于一个完整的方案来说,还要考虑在数据写入时如何被均匀低写到各个分片中,以及数据在查询时如何路由到每个分片,组合成结果集。

  • clickhouse 的数据分片需要结合 DIstributed 表引擎一起使用。DIstributed 表引擎本身不存储任何数据,它能够作为分布式表的一层代理,在集群内部自动展开数据写入、分发、查询、路由等工作。

1.1 集群的配置方式

在 clickhouse 中集群配置用shard 代表分配,replica 代表副本。

  • 1 分片,0 副本配置
<shard> <!--分片-->
  <replica> <!--副本-->
  </replica>
</shard>
  • 1 分片,1 副本配置
<shard> <!--分片-->
  <replica> <!--副本-->
  </replica>
    <replica> <!--副本-->
  </replica>
</shard>
  • clickhouse 集群有两种配置方式

1.1.1 不包含副本的分片

如果直接使用 node 标签定义分配节点,那么该节点质保函分配,不包含副本,配置如下

<yandex>
  <!-- 自定义配置名称,与 conf.xml 配置的 include 属性相同即可-->
  <clickhouse_remote_servers>
    <shard_1> <!--自定义集群名称-->
      <node> <!--自定义 clickhouse 节点-->
        <!--必填参数-->
        <host>node3</host>
        <port>9977</port>

        <!--选填参数-->
        <weight>1</weight>
        <user>default</user>
        <password></password>
        <secure></secure>
        <compression></compression>
      </node>
      <node>
        <host>node2</host>
        <port>9977</port>
      </node>
    </shard_1>
  </clickhouse_remote_servers>
</yandex>
<!-- 配置定义了一个名为 shard_1 的集群,包含了两个节点 node3、node2 -->
配置 说明
shard_1 自定义集群名称,全局唯一,是后续引用集群配置的唯一标识
node 用于定义节点,不包含副本
host clickhouse 节点服务器地址
port clickhouse 服务的tcp 端口
weight 分片权重,默认为 1
user clickhouse 用户,默认为 default
password clickhouse 的用户密码,默认为空字符
secure SSL 连接端口,默认 9440
conpression 是否要开启数据压缩功能,默认 true

1.1.2 自定义副本和分片

  • 集群配置支持自定义分配和副本的数量,这种形式需要使用 shard 标签代替前面配置的 node标签,除此之外的配置完全相同。
  • 配置自定义副本和分片时,副本和分片的数量完全交给由配置所决定。
  • 其中 shard 表示逻辑上的数据分片,而物理上的分片则用 replica 表示
  • 如果在一个 shard 标签下定义 N 组 replica,则该 shard 的语义表示 1 个分片和 N-1 个副本。
  1. 不包含副本的分片
<!-- 2 分片,0 副本-->
<sharding_simple> <!-- 集群自定义名称 -->
  <shard> <!-- 分片 -->
    <replica> <!-- 副本 -->
      <host>node3</host>
      <port>9977</port>
    </replica>
  </shard>
    <shard>
    <replica>
      <host>node2</host>
      <port>9977</port>
    </replica>
  </shard>
</sharding_simple>
  1. N 分片和 N 副本

可以根据自己的需求,配置副本与分片的组合

<!-- 1 分片,1 副本-->
<sharding_simple> <!-- 集群自定义名称 -->
  <shard> <!-- 分片 -->
    <replica> <!-- 副本 -->
      <host>node3</host>
      <port>9977</port>
    </replica>
    <replica>
      <host>node2</host>
      <port>9977</port>
    </replica>
  </shard>
</sharding_simple>

<!-- 2 分片,1 副本-->
<sharding_simple> <!-- 集群自定义名称 -->
  <shard> <!-- 分片 -->
    <replica> <!-- 副本 -->
      <host>node3</host>
      <port>9977</port>
    </replica>
    <replica>
      <host>node2</host>
      <port>9977</port>
    </replica>
  </shard>
  <shard> <!-- 分片 -->
    <replica> <!-- 副本 -->
      <host>node4</host>
      <port>9977</port>
    </replica>
    <replica>
      <host>node5</host>
      <port>9977</port>
    </replica>
  </shard>
</sharding_simple>
<!-- 集群部署中,副本数量的上线是 clickhouse 节点的数量决定的 -->

在 clickhouse 中给我们配置了一些示例,可以打开配置文件看一下

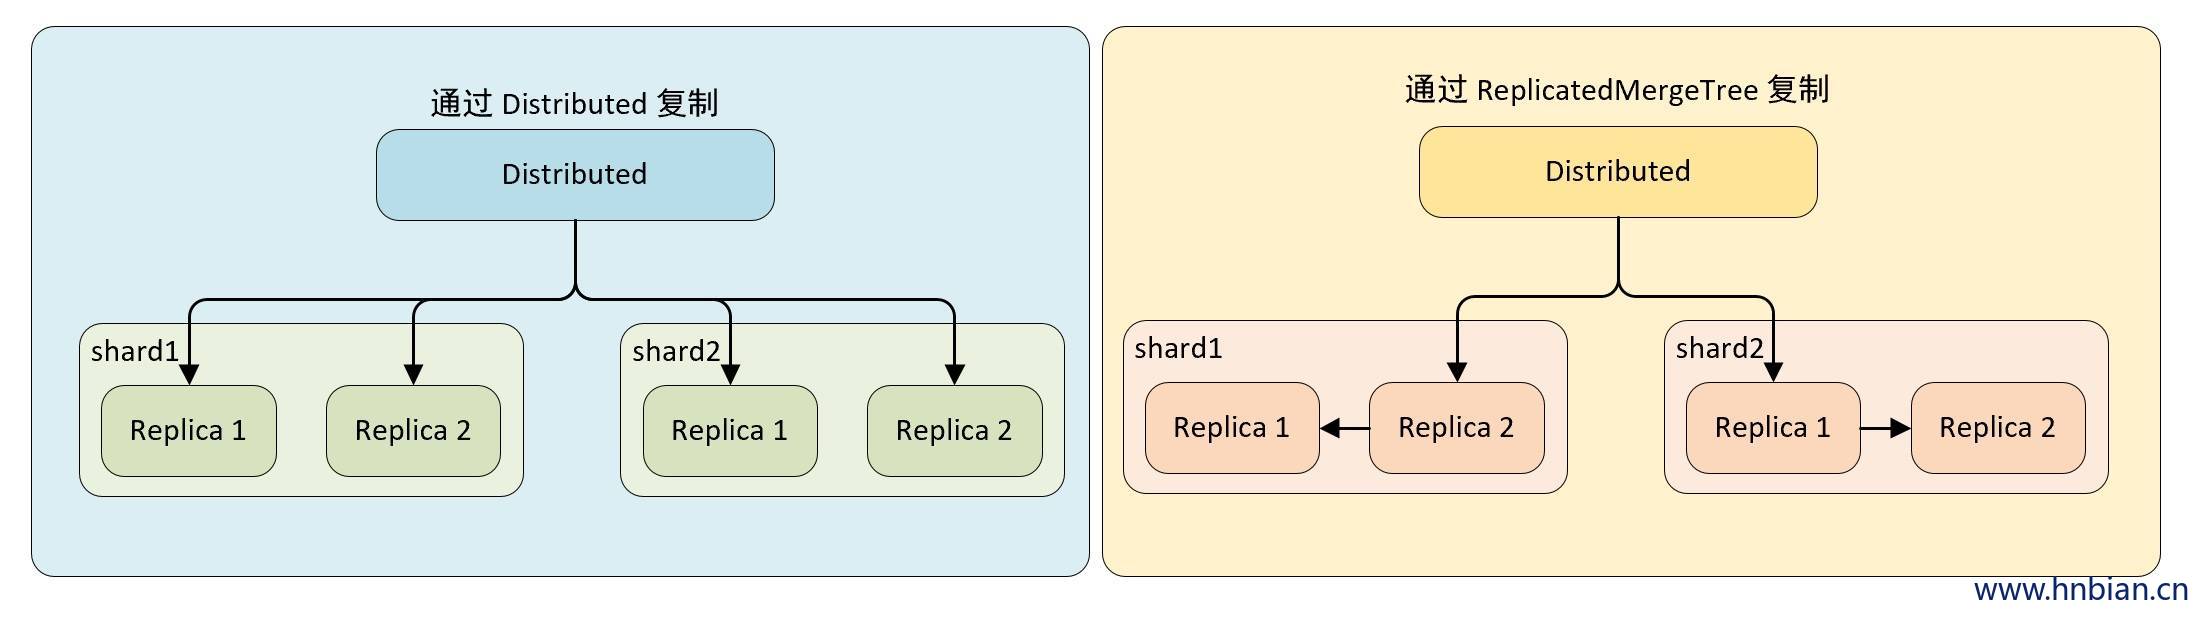
    <remote_servers>
        <!-- Test only shard config for testing distributed storage -->
        <test_shard_localhost>
            <!-- Inter-server per-cluster secret for Distributed queries
                 default: no secret (no authentication will be performed)

                 If set, then Distributed queries will be validated on shards, so at least:
                 - such cluster should exist on the shard,
                 - such cluster should have the same secret.

                 And also (and which is more important), the initial_user will
                 be used as current user for the query.

                 Right now the protocol is pretty simple and it only takes into account:
                 - cluster name
                 - query

                 Also it will be nice if the following will be implemented:
                 - source hostname (see interserver_http_host), but then it will depends from DNS,
                   it can use IP address instead, but then the you need to get correct on the initiator node.
                 - target hostname / ip address (same notes as for source hostname)
                 - time-based security tokens
            -->
            <!-- <secret></secret> -->

            <shard>
                <!-- Optional. Whether to write data to just one of the replicas. Default: false (write data to all replicas). -->
                <!-- <internal_replication>false</internal_replication> -->
                <!-- Optional. Shard weight when writing data. Default: 1. -->
                <!-- <weight>1</weight> -->
                <replica>
                    <host>localhost</host>
                    <port>9000</port>
                    <!-- Optional. Priority of the replica for load_balancing. Default: 1 (less value has more priority). -->
                    <!-- <priority>1</priority> -->
                </replica>
            </shard>
        </test_shard_localhost>
        <test_cluster_two_shards_localhost>
             <shard>
                 <replica>
                     <host>localhost</host>
                     <port>9000</port>
                 </replica>
             </shard>
             <shard>
                 <replica>
                     <host>localhost</host>
                     <port>9000</port>
                 </replica>
             </shard>
        </test_cluster_two_shards_localhost>


      <!-- 配置 2 个分配,0 副本 -->
        <test_cluster_two_shards>
            <shard>
                <replica>
                    <host>127.0.0.1</host>
                    <port>9000</port>
                </replica>
            </shard>
            <shard>
                <replica>
                    <host>127.0.0.2</host>
                    <port>9000</port>
                </replica>
            </shard>
        </test_cluster_two_shards>

       <!--2 分片,0 副本-->
        <test_cluster_two_shards_internal_replication>
            <shard>
                <internal_replication>true</internal_replication>
                <replica>
                    <host>127.0.0.1</host>
                    <port>9000</port>
                </replica>
            </shard>
            <shard>
                <internal_replication>true</internal_replication>
                <replica>
                    <host>127.0.0.2</host>
                    <port>9000</port>
                </replica>
            </shard>
        </test_cluster_two_shards_internal_replication>

       <!--1分片 0 副本,权重设为 1-->
        <test_shard_localhost_secure>
            <shard>
                <replica>
                    <host>localhost</host>
                    <port>9440</port>
                    <secure>1</secure>
                </replica>
            </shard>
        </test_shard_localhost_secure>


        <test_unavailable_shard>
            <shard>
                <replica>
                    <host>localhost</host>
                    <port>9000</port>
                </replica>
            </shard>
            <shard>
                <replica>
                    <host>localhost</host>
                    <port>1</port>
                </replica>
            </shard>
        </test_unavailable_shard>

      <!-- 手动添加新的集群 -->
      <two_shard>
              <shard>
                <replica>
                    <host>node3</host>
                    <port>9977</port>
                </replica>
            </shard>
            <shard>
                <replica>
                    <host>node2</host>
                    <port>9977</port>
                </replica>
            </shard>
      </two_shard>


    </remote_servers>
-- 在 system.clusters 中查看配置情况
select cluster,host_name from system.clusters;

┌─cluster──────────────────────────────────────┬─host_name─┐
│ test_cluster_two_shards                      │ 127.0.0.1 │
│ test_cluster_two_shards                      │ 127.0.0.2 │
│ test_cluster_two_shards_internal_replication │ 127.0.0.1 │
│ test_cluster_two_shards_internal_replication │ 127.0.0.2 │
│ test_cluster_two_shards_localhost            │ localhost │
│ test_shard_localhost                         │ localhost │
│ test_shard_localhost_secure                  │ localhost │
│ test_unavailable_shard                       │ localhost │
└──────────────────────────────────────────────┴───────────┘
  • 定义动态变量

在每个节点的 config 配置文件中 增加变量配置

# node3
vim /etc/clickhouse-server/config.xml
# 增加如下内容
<macros>
  <shard>01</shard>
  <replica>node3</replica>
</macros>

# node2
vim /etc/clickhouse-server/config.xml
# 增加如下内容
<macros>
  <shard>02</shard>
  <replica>node2</replica>
</macros>
-- 进入 clickhouse 命令行查看变量是否配置成功

select * from system.macros;

-- 查看远端节点的数据
select * from remote('node2:9977','system','macros','default')

1.2 基于集群实现分布式 DDL

在默认情况下,创建多张副本表需要在不同服务器上进行创建,这是因为 create、drop、rename和 alter 等 ddl 语句不支持分布式执行,而在假如集群配置后,就可以使用新的语法实现分布式DDL 执行了。

create / drop / rename / alter table on cluster cluster_name

-- cluster_name 对应为配置文件中的汲取名称,clickhouse 会根据集群的配置,去各个节点执行 DDL 语句

-- 在 two_shard 集群 创建测试表

CREATE TABLE t_shard ON CLUSTER two_shard
(
    `id` UInt8,
    `name` String,
    `date` DateTime
)
ENGINE = ReplicatedMergeTree('/clickhouse/tables/{shard}/t_shard', '{replica}')
PARTITION BY toYYYYMM(date)
ORDER BY id

┌─host──┬─port─┬─status─┬─error─┬─num_hosts_remaining─┬─num_hosts_active─┐
│ node2 │ 99770 │       │                   11 │
└───────┴──────┴────────┴───────┴─────────────────────┴──────────────────┘
┌─host──┬─port─┬─status─┬─error─┬─num_hosts_remaining─┬─num_hosts_active─┐
│ node3 │ 99770 │       │                   00 │
└───────┴──────┴────────┴───────┴─────────────────────┴──────────────────┘

-- 表引擎可以使用其他任意引擎
-- {shard} 和 {replica} 两个动态变量代替了前面的硬编码方式
-- clickhouse 会根据 shard_2 的配置在 node3 和 node2 中创建 t_shard 数据表

-- 删除 t_shard 表
drop table t_shard on cluster shard_2;

1.2.1 数据结构

  1. zookeeper 内的节点结构
<!-- 在默认情况下,分布式 DDL 在 zookeeper 内使用的根路径由config.xml distributed_ddl 标签配置 -->

<distributed_ddl>
  <path>/clickhouse/task_queue/ddl</path>
</distributed_ddl>

<!-- 默认为 /clickhouse/task_queue/ddl-->

在此路径之下,还有一些其他监听节点,包括 /query-[seq] 这是 DDL 操作日志,每执行一次分布式 DDL 查询,该节点下就会增加一条操作日志,记录响应操作。当各个节点监听到有新的日志假如的时候,便会响应执行。

DDL 操作日志使用 zookeeper 持久化顺序节点,每条指令的名称以 query-[seq] 为前缀,后面的序号递增,在 query-[seq] 操作日志下,还有两个状态节点:

  • query-[seq]/active:用做监控状态,在执行任务的过程中,在该节点下会临时保存当前集群内状态为 active 的节点
  • query-[seq]/finished:用于检查任务完成情况,在任务执行过程中,每当集群内的某个 host 节点执行完成之后,就会在该节点下写入记录。
/query-000001/finished
node3 : 0
node2 : 0

# 表示 node3,node2 两个节点已经执行完成
  1. DDLLogEntry 日志对象的数据结构
# 在 /query-[seq]下记录的信息由 DDLLogEntry 承载,它的核心属性有以下几个:
version: 1

query: CREATE TABLE default.t_shard UUID \'d1679b02-9eae-4766-8032-8201a2746692\' ON CLUSTER two_shard (`id` UInt8, `name` String, `date` DateTime) ENGINE = ReplicatedMergeTree(\'/clickhouse/tables/{shard}/t_shard\', \'{replica}\') PARTITION BY toYYYYMM(date) ORDER BY id
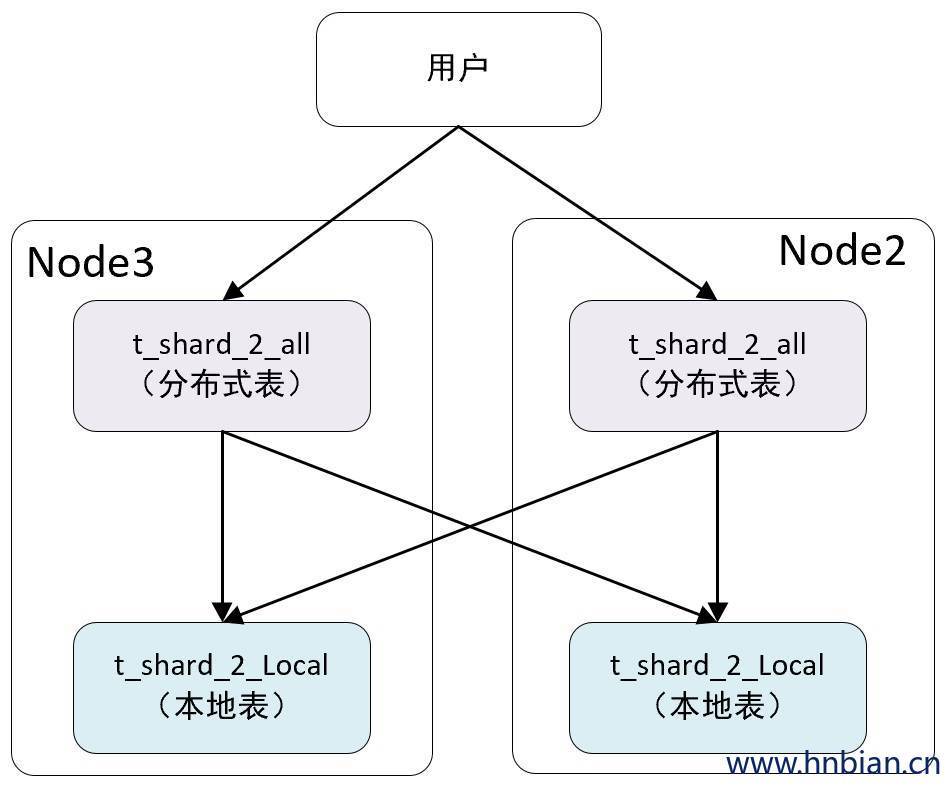
hosts: ['node3:9977','node2:9977']

initiator: node3:9977

# query:记录了 DDL 查询的执行语句
# host:记录了指定集群的 hosts 主机列表,集群由分布式 DDL 语句中的 on cluster 指定,在分布式 DDL 执行过程中,会根据 hosts 列表逐个判断它们的执行状态。
# initiator:记录初始 host 主机的名称,hosts 主机列表的取值来自于初始化 host 节点上的去集群

host主机列表的取值来源等同于下面的查询

SELECT host_name
FROM system.clusters
WHERE cluster = 'two_shard'

┌─host_name─┐
│ node3     │
│ node2     │
└───────────┘

1.2.2 分布式 DDL 的执行流程

以创建分布式表为例说明分布式 DDL 的执行流程。

分布式 DDL 整个流程按照从上而下的时间顺序执行,大致分成 3 个步骤:

  1. 推送 DDL 日志:首先在 node3 节点执行 create table on cluster ,同时 node3 也会创建 DDLLogEntry 日志 ,并将日志推送到 zookeeper 中,并监控任务的执行进度
  2. 拉取日志并执行:node3、node2 两个节点分别监控到 ddl/query-[seq] 日志的推送,分别拉取日志到本地,首先会判断各自的 host 是否被包含在 DDLLogEntry 的 host 列表中,如果包含进到执行流程,执行完毕后写入 finished 节点,如果不包含,忽略
  3. 确认执行进度:在第一步中执行 DDL 语句后,客户端会阻塞 180 秒,以期望所有 host 执行完毕,如果等待时间大于 180 秒,则会转入后台线程继续等待,等待时间由 distributed_ddl_task_timeout 参数设置,默认 180

2. Distributed 原理解析

Distributed 表引擎是分布式表的代名词,他自身不存储任何数据,而是作为数据分片的代理,能够自动路由数据至集群中的各个节点,所以 DIstributed 表引擎需要和其他表引擎一起协同工作。

从上图可以看出一张表分成了两部分:

  • 本地表:通常以 _local 后缀进行命名。本地表是承接数据的载体,可以使用 非 Distributed 的任意表引擎,yi’zhang’ben

  • 分布式表:通常以 _all 为后缀进行命名,分布式表只能使用 Distributed 表引擎,他们与本地表形成一对多的映射关系,以后通过分布式表代理操作多张本地表。

对于分布式表与本地表之间表结构的一致性检查,Distributed 表引擎采用了读时检查的机制,这意味着如果他们的表结构不兼容,需要在查询时才会抛出异常,而在创建表引擎时不会进行检查,不同 clickhouse 节点上的本地表之间使用不同表引擎也是可行的,但是通常不会这么做,保持他们的结构一致,有利于后期的维护避免造成不可预计的后果。

2.1 定义形式

Distributed 表引擎的定义形式

CREATE TABLE [IF NOT EXISTS] [db_name.]table_name on cluster cluster_name(
  name1 [type] [DEFAULT|MATERIALIZED|ALIAS expr],
  name2 [type] [DEFAULT|MATERIALIZED|ALIAS expr],
  ...
) ENGINE = Distributed(cluster,database,table,[sharding_key])
[PARTITION BY expr]
[ORDER BY expr]
[PRIMARY KEY expr]
[SAMPLE BY expr]
[SETTINGS name=value, ...]
  • cluster:集群名称,与集群配置中的自定义名称相对应,在对分布式表执行写入和查询过程中,它会使用集群的配置信息来找对应的节点。
  • database:对应数据库名称
  • table:对应数据表名称,
  • sharding_key:分片键,选填参数,在写入数据的过程中,分布式表会依据分片键的规则,将数据分布到各个本地表所在的节点中。
-- 创建分布式表 t_shard_2_all 代理 two_shard 集群的 drfault.t_shard_2_local 表

CREATE TABLE t_shard_2_all ON CLUSTER two_shard
(
    `id` UInt8,
    `name` String,
    `date` DateTime
)
ENGINE = Distributed(two_shard, default, t_shard_2_local, rand())

Query id: 83e4f090-0f7d-4892-bbf3-a094f97a6eea

┌─host──┬─port─┬─status─┬─error─┬─num_hosts_remaining─┬─num_hosts_active─┐
│ node2 │ 99770 │       │                   11 │
└───────┴──────┴────────┴───────┴─────────────────────┴──────────────────┘
┌─host──┬─port─┬─status─┬─error─┬─num_hosts_remaining─┬─num_hosts_active─┐
│ node3 │ 99770 │       │                   00 │
└───────┴──────┴────────┴───────┴─────────────────────┴──────────────────┘

-- 这里用的是 on cluster 分布式 DDL, 所以在 two_shard 集群中每个节点都会创建一张分布式表
-- 写入数据时会根据 rand() 随机函数的取值决定写入那个分片,
-- 当这时还没有创建 本地表,可以看出Distributed 是读数据时才会进行检查。

-- 尝试 查询 t_shard_2_all 分布式表 
SELECT *
FROM t_shard_2_all;


Received exception from server (version 21.4.3):
Code: 60. DB::Exception: Received from localhost:9977. DB::Exception: Table default.t_shard_2_local doesn t exist.


-- 使用分布式 DDL 创建本地表
CREATE TABLE t_shard_2_local ON CLUSTER two_shard
(
    `id` UInt8,
    `name` String,
    `date` DateTime
)
ENGINE = ReplicatedMergeTree('/clickhouse/tables/{shard}/t_shard_2_local', '{replica}')
PARTITION BY toYYYYMM(date)
ORDER BY id

┌─host──┬─port─┬─status─┬─error─┬─num_hosts_remaining─┬─num_hosts_active─┐
│ node3 │ 99770 │       │                   10 │
│ node2 │ 99770 │       │                   00 │
└───────┴──────┴────────┴───────┴─────────────────────┴──────────────────┘

-- 尝试 查询 t_shard_2_all 分布式表 
SELECT *
FROM t_shard_2_all;

Query id: 5ae82696-0f07-469b-bff5-bd17dc513da7

Ok.

0 rows in set. Elapsed: 0.009 sec.

-- 到现在为止,拥有两个数据分配的分布式表 t_shard_2_all 就创建好了

2.2 查询的分类

分布式表的查询操作可以分为以下几类:

  1. 作用于本地表的查询:对应 select 和 insert 分布式表会以分布式的方式作用于 local 本地表
  2. 只会影响分布式表自身,不会作用于本地表的查询,分布式表支持部分元数据操作,包括 create、drop、rename 和 alter,其中 alter 并不包括分区的操作(attach partition 和 replace partition等)。这些操作只会修改分布式表自身,并不会修改 local 本地表,
  3. 如果想要彻底删除一张分布式表,需要分别删除分布式表和本地表
-- 删除分布式表
drop table t_shard_2_all on cluster two_shard;

-- 删除本地表
drop table t_shard_2_local on cluster two_shard;
  1. 不支持的操作,分布式表不支持任何的 mutation 类型的操作,包括 alter delete 和 alter update。

2.3 分片规则

关于分片的规则这里进一步说明,分片键要求返回一个整型类型的取值,包括 Int和 UInt 类型的系列

-- 分片键可以是一个具体的整型字段
-- 按照用户 ID 划分
Distributed(cluster,database,table,userid)

-- 分片键也可以是返回整型的表达式
-- 按照随机数划分
Distributed(cluster,database,table,rand())

-- 按照用户 ID 的散列值划分
Distributed(cluster,database,table,intHash64(userid))

如果不声明分片键,那么分布式表只能包含一个分片,这意味着只能映射一张表,否则写入数据时将抛出异常。当一个分布式表只包含一个分片的时候也就失去了分布式的意义,所以通常会按照业务需要设置分片键。

2.3.1 分片权重(weight)

在配置集群时,有一项 weight 的设置

1

weight 默认为 1,它可以被设置成任意整除,但是建议将其设置为比较小的值。分片权重会影响分片中的数据倾斜程度,分片权重越大,写入的数据就会越多。

2.3.2 槽(slot)

slot 的数量等于所有分片权重之和,假设集群有两个分片,第一个分片 weight 为 10,第二个 weight 为20 ,那么 slot 的数量为 30(10+20),slot 按照权重元素的取值区间,与对应的分片形成映射关系,

  • 如果 slot 取值区间在[0-10) 区间,则对应第一个分片
  • 如果 slot 取值区间在[10-20) 区间,则对应第二个分片

2.3.3 选择函数

选择函数用于判断一行待写入的数据应该被写到哪个分片中,判断过程大致分成两个步骤:

  1. 找出 slot 取值,计算公式如下:

slot = shard_value % sum_weight

  • shard_value 为分片键的取值,
  • sum_weight 为所有分片的权重之和

如果某行数据 shard_value = 10,sum_weight = 30, 那么 30%10 = 10,即 slot = 10

  1. 基于 slot 值找到对应的数据分片,当 slot 等于 10 的时候它属于 [10,20) 区间,所以这行数据会被对应到第二个分片。

2.4 分布式写入的核心流程

向集群内的分片写入数据时,通常有两种思路,

  1. 借助外部计算系统,先将数据均匀分片,再借由计算系统直接将数据写入 clickhouse 集群的各个本地表,这种方案通常有更好的写入性能,因为分片数据时被并西恩点对点写入的,但是这种方案主要依赖外部系统,而不在于 clickhouse 自身。
  2. 通过Distributed 表引擎代理分片数据。下面详细介绍这种方式的写入流程。

为了便于理解,这里将分片写入和副本复制拆分成两个部分讲解,使用一个拥有 2 个分片 0 个副本的集群讲解分片写入流程,使用一个拥有 1 个分片 1 个副本的集群讲解分片副本复制流程。

2.4.1 将数据写入分片的流程

在对 Distributed 表执行 insert 操作的时候,会进入数据写入的执行逻辑。整个过程大约分成 5 个步骤。

  1. 在第一个分片节点写入本地分片数据

首先在 node3 节点对分布式表 t_shard_2_all 执行 insert 操作,写入 10,30,40,60 4 行数据,执行之后分布式表会做两件事:

  • 根据分配规则划分数据,在这个示例中,30,60 被划分到第一个分片,10,40 被划分到第二个分片
  • 数据当前分配的数据直接写入本地表 t_shard_2_local
  1. 第一个分片建立远端连接,准备发送远端分片数据

将需要放到远端分片的数据以分区为单位,分别写入 t_shard_2_all 存储目录下的临时 bin 文件,数据文件命名规则如下:

/database@host:port/[increase_num].bin

# 10,40 的两条数据会写入到这个临时文件中

临时数据写完后会尝试与 第二个分片的服务器进行连接。

  1. 第一个分片向远端发送数据

这时会有另一组监听人会负责监听 t_shard_2_all 目录下的文件变化,这些任务负责将目录数据发送到远端分片,其中每份数据将由独立的进程负责发送,数据在传输之前会被压缩。

  1. 第二个分片接收数据并写入本地

第二个分片与第一个分片的服务器建立连接后接受来自第一个分片的数据,并将他们写入本地表

  1. 第一个分片确认完成写入

由数据发送方确认所有数据发送完毕,至此数据写入流程完毕。

由 Distributed 表负责向远端分片发送数据时,有异步和同步两种模式:

  • 异步:在 Distributed 表在写完本地分片之后,insert 操作就会返回写入成功信息
  • 同步:在执行 insert 操作之后,会等待所有分片完成写入

由 insert_distributed_sync 参数控制使用何种模式,默认 false(异步),如果设置为 true ,还需要设置 insert_distributed_timeout 参数控制同步等待超时时间。

2.4.2 副本复制的流程

  1. 通过 Distributed 复制数据

在这种实现方式下,即使本地表不使用 ReplicatedMergeTree 表引擎,也能实现数据副本的功能,Distributed 会同时负责副本与分片的数据写入工作,而副本的写入流程与分片的写入流程相同,这种情况下,Distributed 节点的写入性能可能成为瓶颈。

  1. 通过 ReplicatedMergeTree 复制数据

如果在集群的 shard 配置中增加设置 internal_replication = true,那么 Distributed 将在没每个分片只写一份数据,不负责其副本的写入,如果此时,本地表使用的是 ReplicatedMergeTree 表引擎,那么在 shard 内的多个副本会由 ReplicatedMergeTree 自己处理。

Distributed 选择 replica的算法大致是,clickhouse 服务器节点中拥有一个全局计数器 errors_count,当服务器出现异常时计数器 +1,当一个分片有多个副本时,选择 errors_count 计数最小的服务器,进行数据写入。

2.5 分布式查询的核心流程

与写入数据有所不同,面向集群查询数据的时候,只能通过Distributed 表引擎实现,当Distributed 表执行查询操作的时候,会依次查询每个分片的数据,然后再汇总返回。

2.5.1 多副本路由选择

在查询数据的时候,如果一个集群中有一个分片有多个副本,那么 Distributed 需要面临副本选择的问题,clickhouse 会使用负载均衡算法从众多副本中选择一个,而具体使用哪种算法由load_balancing参数控制。

# clickhouse 提供四种负载均衡算法
load_balancing=random/nearest_hostname/in_order/first_or_random
  1. random

random 是默认的负载均衡算法,clickhouse 服务器节点中有一个全局计数器 errors_count, 当服务器发生异常时 计数器+1,random 就是选择 errors_count 最少的节点,如果有多个计数最少的errors_count节点,那么随机选择一个。

  1. nearest_hostname

可以看做是 random 的变种,同样选择 errors_count 最少的节点,如果有多个计数最少的errors_count节点,那么选择选择与当前配置的 hostname 最相似的一个。

  1. in_order

可以看做是 random 的变种,同样选择 errors_count 最少的节点,如果有多个计数最少的errors_count节点,那么根据 replica 的配置顺序逐个选择。

  1. first_or_random

可以看做是 in_order 的变种,同样选择 errors_count 最少的节点,如果有多个计数最少的errors_count节点,选择配置的第一个 replica 节点,如果第一个 replica 节点不可用,随机选择一个。

2.5.2 多分片查询的核心流程

分布式查询与分布式写入类似,同样是谁发起谁负责,它会由接收 select 查询的 Distributed 表,负责串联起整个查询。

首先针对分布式表的查询SQL,按照分片数量将查询根据分片拆分成若干个针对本地表查询的子查询,然后向各个表发起查询,最后再汇总各个分片的结果。

-- 例如在分布式表执行下面查询,查看执行计划

EXPLAIN
SELECT count(1)
FROM t_shard_2_all;

┌─explain─────────────────────────────────────────────────────────────────────┐
│ Expression ((Projection + Before ORDER BY))                                 │
│   MergingAggregated                                                         │
│     SettingQuotaAndLimits (Set limits and quota after reading from storage) │
│       Union                                                                 │
│         Expression (Convert block structure for query from local replica)   │
│           ReadFromPreparedSource (Optimized trivial count)                  │
│         ReadFromPreparedSource (Read from remote replica)                   │
└─────────────────────────────────────────────────────────────────────────────┘

整个执行计划从上至下可分成两个步骤

  1. 查询各分片数据

其中 读取本地数据 和 读取远程数据 是并行的,他们分别负责执行本地和远端分片的查询动作。

  1. 返回合并结果

将返回结果合并

2.5.3 使用 global 优化分布式子查询

如果在分布式查询中使用子查询,可能会面临两难的局面,

先看下面一个示例:

-- 使用分布式 DDL 创建 分布式表
CREATE TABLE t_distributed_query_all ON CLUSTER two_shard
(
    `id` UInt8, -- 用户编号
    `repo` UInt8 -- 仓库编号
)
ENGINE = Distributed(two_shard, default, t_distributed_query_local, rand());

-- 使用分布式 DDL 创建本地表
CREATE TABLE t_distributed_query_local ON CLUSTER two_shard
(
    `id` UInt8,
    `repo` UInt8
)
ENGINE = TinyLog;

-- 在 node2 节点写入数据
insert into t_distributed_query_local values (1,100),(2,100),(3,100);
-- 查询数据
select * from t_distributed_query_local;
┌─id─┬─repo─┐
│  1100 │
│  2100 │
│  3100 │
└────┴──────┘

-- 在 node3 节点写入数据
insert into t_distributed_query_local values (3,200),(4,200);
-- 查询数据
select * from t_distributed_query_local;
┌─id─┬─repo─┐
│  3200 │
│  4200 │
└────┴──────┘

-- 查询全局表数据
select * from t_distributed_query_all;

┌─id─┬─repo─┐
│  1100 │
│  2100 │
│  3100 │
└────┴──────┘
┌─id─┬─repo─┐
│  3200 │
│  4200 │
└────┴──────┘

要求找到同时拥有两个仓库的用户,对于这种查询可以使用 in 查询子句,与此同时面临的问题是 in 查询使用分布式表还是本地表?

  1. 使用本地表的问题

如果在 in 查询中使用本地表:

SELECT uniq(id)
FROM t_distributed_query_all
WHERE (repo = 100) AND (
  id IN
    (
      SELECT id
      FROM t_distributed_query_local
      WHERE repo = 200
    )
);

┌─uniq(id)─┐
│        0 │
└──────────┘
-- 并没有查询出结果

-- 在分布式表在接收到查询后,将上面 SQL 替换成本地表的形式再发送到每个分片进行执行

SELECT uniq(id)
FROM t_distributed_query_local
WHERE (repo = 100) AND (
  id IN
    (
      SELECT id
      FROM t_distributed_query_local
      WHERE repo = 200
    )
);
-- 单独在分片 1 或分片 2 都无法找到满足 同时等于 100 和 200 的数据
  1. 使用 global 优化查询

为了解决查询问题,可以使用 global in 或者 join 进行优化

SELECT uniq(id)
FROM t_distributed_query_all
WHERE (repo = 100) AND (id GLOBAL IN
(
    SELECT id
    FROM t_distributed_query_all
    WHERE repo = 200
))

Query id: 0a55d59d-c87b-4bc8-8985-dad26f0a39b9

┌─uniq(id)─┐
│        1 │
└──────────┘

Global 查询流程:

  1. 将 in 子句单独提出,发起一次分布式查询
  2. 将分布式表转成 local 表后,分别在本地和远端分片执行查询
  3. 将 in 子查询结果进行汇总,放入一张临时的内存表进行保存
  4. 将内存表发送到远端分片节点
  5. 将分布式表转为本地表后,开始执行完整的 SQL 语句,in 子句直接使用临时表的数据

在使用 global 修饰符之后,clickhouse 使用内存表临时保存了 in 子查询到的数据,并将其发送到远端分片节点,以此达到了数据共享的目的,从而避免了查询放大的问题,in 或者 join 子句返回的数据不宜过大,如果内存表存在重复数据,可以实现在子句中增加 distinct 实现去重。


文章作者: hnbian
版权声明: 本博客所有文章除特別声明外,均采用 CC BY 4.0 许可协议。转载请注明来源 hnbian !
评论
 上一篇
ClickHouse元数据 1.表相关元数据 ClickHouse元数据 1.表相关元数据
1. disks(磁盘信息表)记录有关服务器配置中定义的磁盘的信息。 name type comment name String 磁盘名称 path String 指向文件系统中的挂载点路径 free_space UIn
2021-08-01
下一篇 
ClickHouse 11.副本与分片 1. 副本 ClickHouse 11.副本与分片 1. 副本
1. 介绍 集群是副本和分片的基础,它将 clickhouse 的服务拓扑由单节点延伸到多个节点。 clickhouse 集群配置很灵活,既可以将所有节点组成一个单一的大集群,也可以按照业务需求,把节点划分为多个小集群。 在每个小集群区域之
2021-07-20
  目录