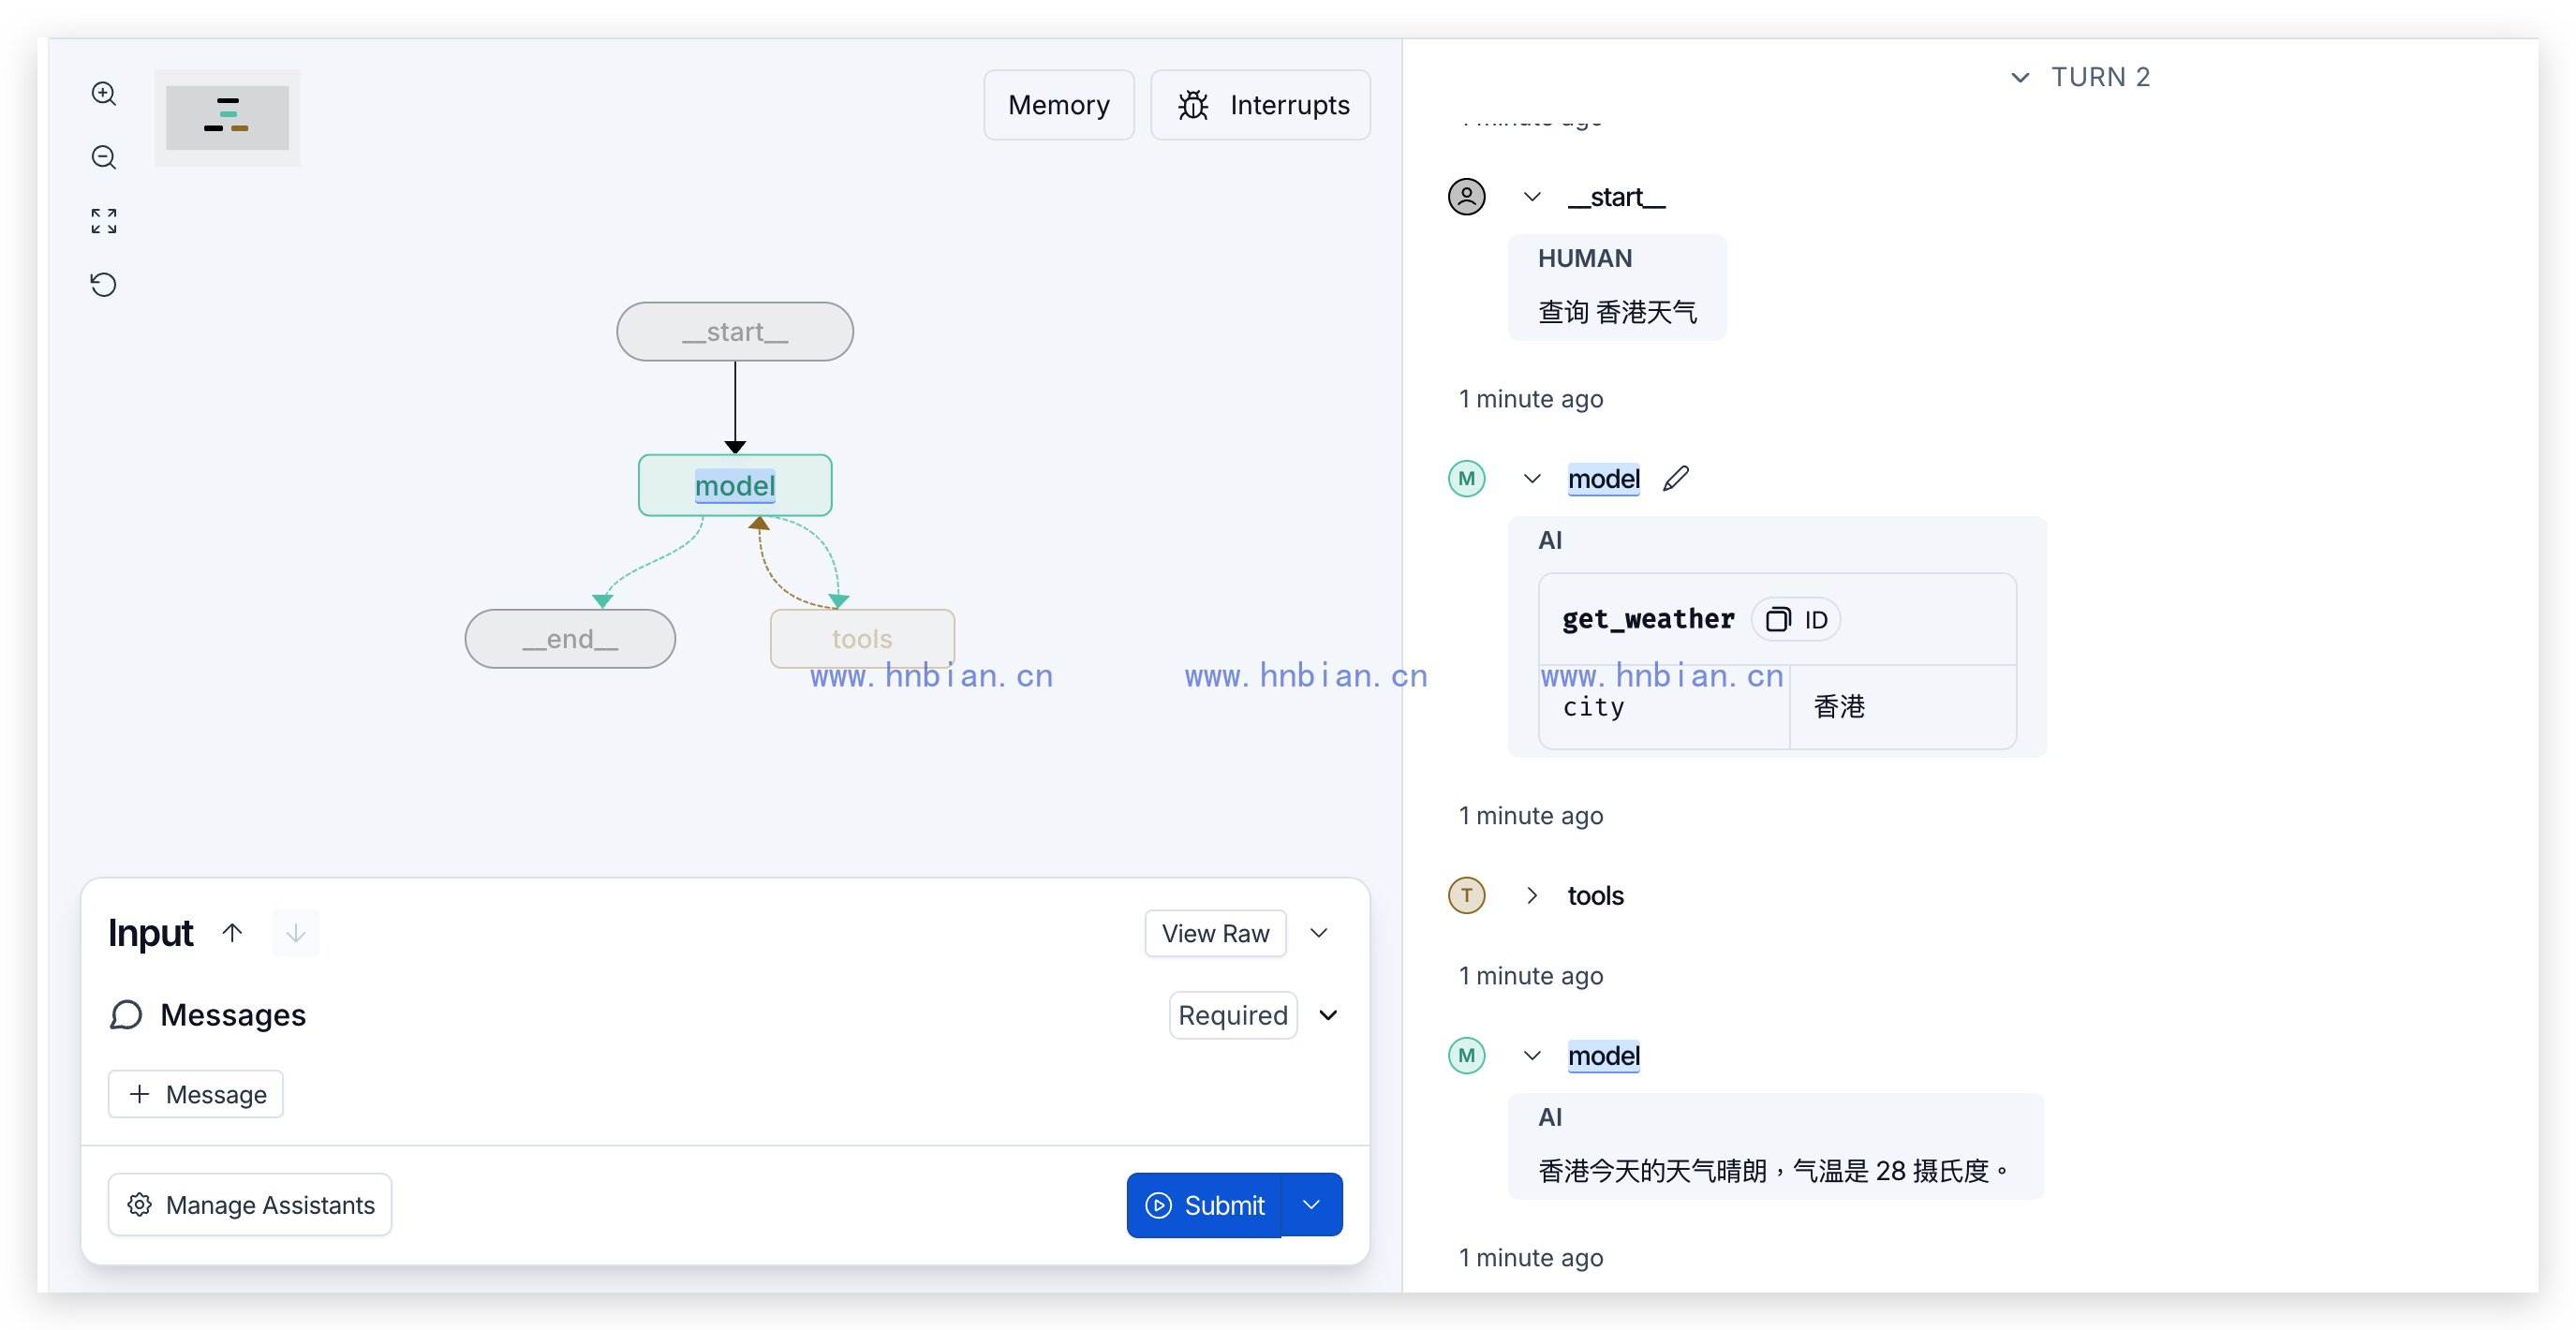
本篇开始搭建第一个 LangGraph 项目:安装 CLI,认识项目配置,再使用本地 Qwen3 和一个模拟天气工具创建最小 Agent。
这一步只完成项目和 Graph,不启动 Agent Server。服务启动和调试放到下一篇。
1. 创建虚拟环境
前面的 LangChain 示例运行在主虚拟环境中。LangGraph CLI 会安装本地 Agent Server 所需的运行组件,如果直接装进主环境,可能升级已有依赖并影响前面的代码。
因此在 llm_learning 根目录创建独立的 Python 3.12 环境:
cd /path/to/llm-learning

python3.12 -m venv \
  --prompt llm_learning_langgraph \
  .venv_langgraph

source .venv_langgraph/bin/activate
激活后检查 Python:
python --version输出:
Python 3.12.112. 准备项目依赖
项目中的 requirements.txt 只记录直接依赖:
langgraph==1.1.3
langgraph-cli[inmem]==0.4.19
langchain==1.2.13
langchain-core==1.2.22
langchain-openai==1.1.12
openai==2.30.0
httpx==0.28.1
[inmem] 会安装 langgraph dev 所需的内存运行时。本地开发不需要先启动 Docker 或数据库。
为了避免后续安装时解析到不同的间接依赖,项目还提供了由这些直接依赖生成的 requirements-lock.txt。安装时使用锁文件:
python -m pip install \
  -r langgraph/p02_local_agent_project/requirements-lock.txt
检查依赖:
python -m pip check
langgraph --version
3. 使用 CLI 创建模板项目
LangGraph CLI 提供 new 命令,可以从官方模板创建项目:
langgraph new \
  /tmp/langgraph-template-check \
  --template new-langgraph-project-python
真实执行结果:
Attempting to download repository as a ZIP archive...
Downloaded and extracted repository to /tmp/langgraph-template-check
New project created at /tmp/langgraph-template-check
如果不指定 –template,CLI 会显示交互菜单,让用户选择 Python 或 JavaScript 模板。
官方模板包含示例 Agent、单元测试、集成测试、GitHub Actions 和锁文件,适合新项目直接起步。本文为了让代码更容易理解,没有把全部模板文件复制进当前项目,而是保留本次运行真正需要的最小结构。
4. 项目目录结构
本篇代码位于:
llm-learning/
  langgraph/
    p02_local_agent_project/
      .env.example
      langgraph.json
      pyproject.toml
      requirements.txt
      requirements-lock.txt
      README.md
      src/
        weather_agent/
          __init__.py
          graph.py
下面这张图只展示本篇完成的项目创建、配置、可编辑安装和 Graph 导入验证。Agent Server 的启动属于下一篇,不放进当前流程。
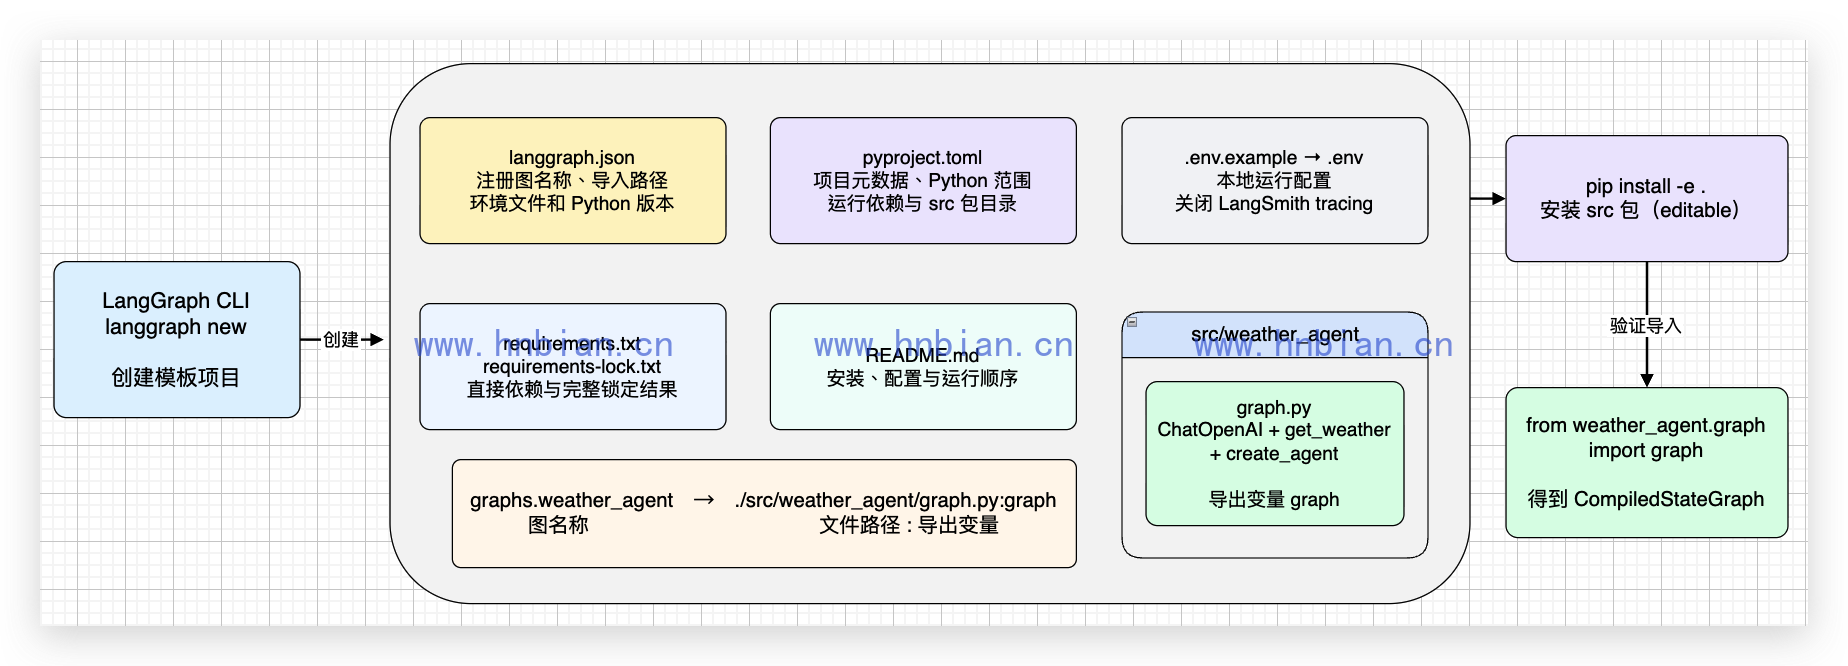
这几个文件各自负责不同工作:
- graph.py:真正的 Agent 代码。
- langgraph.json:告诉 Agent Server 应该加载哪张图。
- pyproject.toml:声明 Python 项目和运行依赖。
- .env.example:运行环境变量模板,复制为 .env 后由 langgraph.json 加载。
- requirements.txt:记录需要主动维护的直接依赖。
- requirements-lock.txt:固定包含间接依赖在内的完整安装结果。
- README.md:记录环境安装、配置复制和后续服务启动顺序。
这种结构将 Graph、项目配置、依赖和环境变量分开管理,也符合 LangGraph 对本地应用结构的基本要求。LangGraph Application structure
5. 编写 pyproject.toml
完整配置如下:
[build-system]
requires = ["setuptools==82.0.1"]
build-backend = "setuptools.build_meta"

[project]
name = "local-weather-agent"
version = "0.1.0"
description = "使用本地 Qwen3 的 LangGraph 天气 Agent 教学项目"
requires-python = ">=3.12,<3.13"
dependencies = [
    "httpx==0.28.1",
    "langchain==1.2.13",
    "langchain-core==1.2.22",
    "langchain-openai==1.1.12",
    "langgraph==1.1.3",
    "openai==2.30.0",
]

[tool.setuptools.packages.find]
where = ["src"]
where = [“src”] 表示 Python 包放在 src 目录中。安装项目后,无论从哪个工作目录执行 Python,都可以导入 weather_agent。
执行可编辑安装:
python -m pip install -e langgraph/p02_local_agent_project-e 表示 editable。修改 src/weather_agent/graph.py 后不需要重复打包安装,适合本地开发。
6. 编写 langgraph.json
Agent Server 启动时会读取项目根目录下的 langgraph.json:
{
  "dependencies": ["."],
  "graphs": {
    "weather_agent": "./src/weather_agent/graph.py:graph"
  },
  "env": ".env",
  "python_version": "3.12"
}
几个字段的作用如下:
- dependencies:项目运行时需要安装的本地依赖,. 表示项目自身。
- graphs:注册可以由 Agent Server 加载的图。
- weather_agent:图在服务中的名称。
- ./src/weather_agent/graph.py:graph:文件路径和导出的 Python 变量。
- env:启动服务时加载的环境变量文件。
- python_version:项目使用的 Python 版本。
如果 graph.py 中没有名为 graph 的变量,或者路径拼写错误,服务启动时会直接导入失败。
7. 关闭 LangSmith 追踪
本文只在本机测试,不向 LangSmith 上传追踪信息。.env.example 内容如下:
# 本文只在本地运行,不向 LangSmith 上传追踪数据。
LANGSMITH_TRACING=false
复制为本地 .env:
cd langgraph/p02_local_agent_project
cp .env.example .env
.env 已被 .gitignore 排除,避免将后续可能加入的密钥提交到仓库。
8. 编写天气 Agent
src/weather_agent/graph.py 的完整代码如下:
"""使用本地 Qwen3 和一个模拟天气工具创建最小 LangGraph Agent。"""

import httpx
from langchain.agents import create_agent
from langchain_openai import ChatOpenAI

# 第 1 步:创建模型客户端。
# ChatOpenAI 只负责按 OpenAI 兼容协议连接本地 Qwen3 服务。
model = ChatOpenAI(
    model="Qwen3-14B-AWQ-4bit-MLX",
    base_url="http://127.0.0.1:18080/v1",
    api_key="not-needed",
    temperature=0,
    max_tokens=256,
    http_client=httpx.Client(trust_env=False),
)

def get_weather(city: str) -> str:
    """查询指定城市的天气。"""

    # 第 2 步:定义 Agent 可以调用的工具。
    # 这是模拟数据,不会请求真实天气接口,方便初学者专注于 Agent 结构。
    return f"{city}今天的天气晴朗,气温是 28 摄氏度。"

# 第 3 步:把模型、工具和系统提示词组装成 Agent。
# create_agent() 返回一个由 LangGraph 驱动的已编译状态图。
graph = create_agent(
    model=model,
    tools=[get_weather],
    system_prompt="你是一个中文智能助手。用户询问天气时,必须调用天气工具。",
)
9. 启动 langgraph
  /Users/bianhn/Documents/git/llm-learning/.venv_langgraph/bin/langgraph dev \
  --host 127.0.0.1 \
  --port 2024

  INFO:langgraph_api.cli:

        Welcome to

╦  ┌─┐┌┐┌┌─┐╔═╗┬─┐┌─┐┌─┐┬ ┬
║  ├─┤││││ ┬║ ╦├┬┘├─┤├─┘├─┤
╩═╝┴ ┴┘└┘└─┘╚═╝┴└─┴ ┴┴  ┴ ┴

- 🚀 API: http://127.0.0.1:2024
- 🎨 Studio UI: https://smith.langchain.com/studio/?baseUrl=http://127.0.0.1:2024
- 📚 API Docs: http://127.0.0.1:2024/docs

This in-memory server is designed for development and testing.
For production use, please use LangSmith Deployment.
10.访问 langgraph 并执行
https://smith.langchain.com/studio/?baseUrl=http://127.0.0.1:2024